7 Ways to Fix Camera On MacBook Not Working in 2023
Mac users may experience issues initiating video calls, which can be due to problems with the built-in camera or external webcam, and may be resolved by checking the camera settings, restarting the app, or adjusting the camera permissions.
The built-in camera on Mac is crucial for various applications, including professional presentations and social meetings. Its malfunction can impact third-party apps that utilize the system's camera, causing inconvenience to users.
The Mac camera not working issue can be resolved by checking the camera settings, restarting the camera, updating the operating system, checking for software conflicts, and resetting the System Management Controller (SMC). Additionally, disabling and re-enabling the camera, checking for physical obstructions, and using the built-in camera app can also help resolve the issue. Furthermore, resetting the NVRAM, checking for hardware issues, and seeking professional help if necessary can also be considered.
| Workable Solutions | Step-by-step Troubleshooting |
|---|---|
| Quit macOS Camera Processes | Launch Terminal. For that, you need to click on Applications > Utilities > Terminal...Full steps |
| Choose the Right Camera | For that, you need to first open the app. After that press Command + Comma...Full steps |
| Allow Camera Access | Go to the Apple menu. Click on System Settings from the drop-down menu...Full steps |
| Other Woking Solutions | Restart your Mac > Check the Camera in Mac's System Report > Remove Apps Screen Time Limit...Full steps |
How to Fix Camera Not Working on macOS?
If your Mac camera isn't working, don't worry, there are several solutions to fix the issue.
The solutions involve using a combination of different methods to solve the problem. One approach is to use a calculator to find the square root of a number, then multiply it by itself to get the original number.
Method 1. Quit macOS Camera Processes
To resolve the camera not working issue on MacOS, killing the camera processes can be helpful. If you're concerned about data loss, backing up critical files first is a good idea. You can quit the camera processes by following these steps.
Step 1. Quit the applications that use the camera.
Step 2. To launch Terminal, click on Applications > Utilities > Terminal.
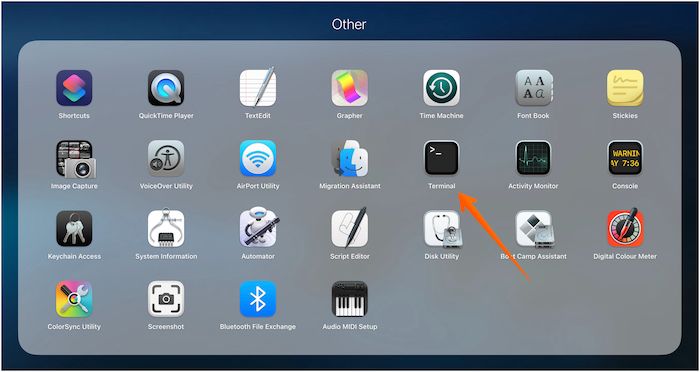
Step 3. Type sudo killall VDCAssistant. Press the Enter key.
Step 4. Type sudo killall AppleCameraAssistant. Press the Enter key.
Note: If the system asks, you might need to enter the admin password.
You must restart the system and see if the problem is resolved. If not, you will need to move on to other solutions.
Method 2. Choose the Right Camera in the App's Settings
Incorrect settings within an app can cause a camera to malfunction. If you've noticed issues with your camera, it's possible that you've inadvertently made some wrong setting choices within an app that uses the camera. Identifying and correcting this mistake is essential to get your camera working properly again.
To access the camera settings, first open the app, then press Command + Comma, which will lead you to the preferences, and finally, you can view the camera settings.
If you have multiple cameras connected to your system, choose the correct one to use. If you're unsure, select the built-in camera on your Mac. This may resolve the Zoom camera not working issue.
Method 3. Allow Camera Access on Mac
If your camera permissions are disrupted after updating your system, you'll need to reset them again.
For that, take a look at the steps you must follow –
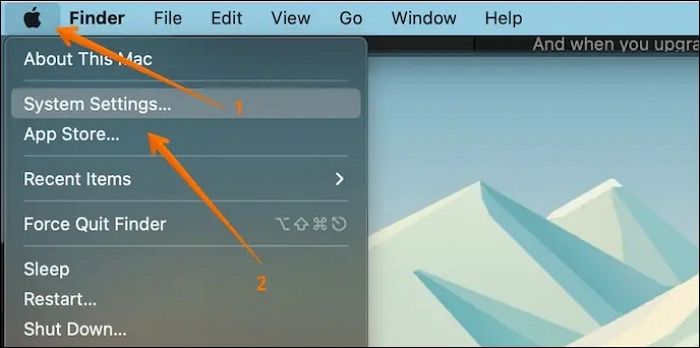
Step 1. To access System Settings, go to the Apple menu and click on System Settings from the drop-down menu.
Step 2. Now, choose Privacy & Security. After that, go to the Privacy tab.
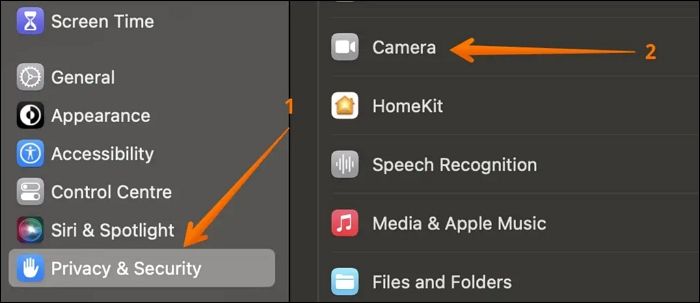
Step 3. On the left side, select Camera. Look at the apps listed and choose the ones that require access to the camera.
Step 4. Quit the window. Open any app that uses the camera and see if it's working.
Method 4. Restart your Mac to Make the Camera Working
Sometimes, the simplest solution yields the best results. Have you tried restarting the system to fix the issue? You never know when the problem might get resolved.
To restart the system, click on the Apple icon, select Restart from the drop-down menu, and the system will shut down and restart after a few seconds.
Method 5. Check the Camera in Mac's System Report
To troubleshoot the Mac Camera not working, check the System Report by following these steps: 1. Go to Apple Menu and select "About This Mac", 2. Click on "System Report", 3.
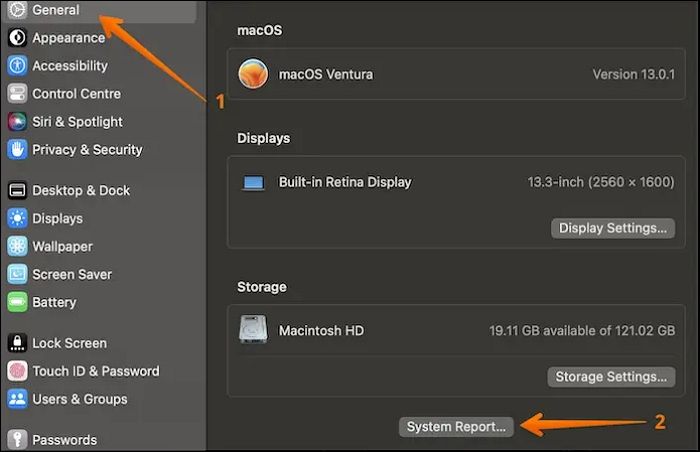
Step 1. Go to the Apple icon. Choose System Settings.
Step 2. To view the System Report, go to the General tab from the left-hand sidebar and click on System Report in the right-hand side settings panel.
Step 3. To view camera information, go to Settings, then select Hardware, and click on Camera. This will display all the information related to the camera.
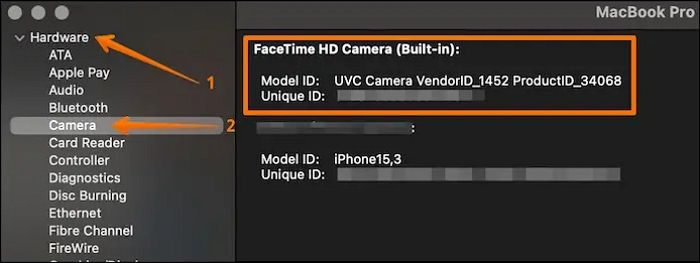
Note: If the system cannot detect the camera, it may be due to a software issue or a hardware problem. Try restarting your device, updating your operating system, or reinstalling the app to see if it resolves the issue. If the problem persists, you may need to contact Apple Support for further assistance. Additionally, you can try checking the camera settings on your device to ensure it is enabled and configured correctly.
Method 6. Remove Apps Screen Time Limit on macOS
If the camera is working for one app but not working for another, it's likely due to the screen time of the apps. To troubleshoot, open different apps and check where the camera is functioning. This will help identify if the issue is specific to a particular app or a broader problem.
Removing the screen time limit aids in fixing the problem. Check out the steps here.
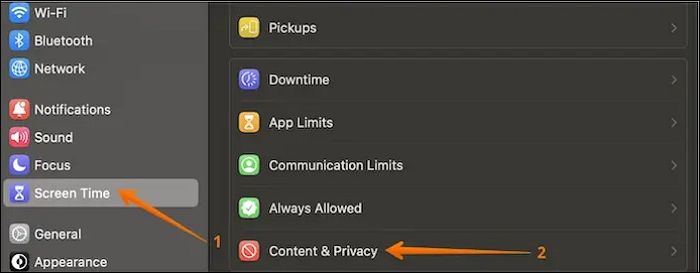
Step 1. Go to the Apple menu. Choose System Settings.
Step 2. Select Screen Time from the left-hand panel. Go to Content & Privacy.
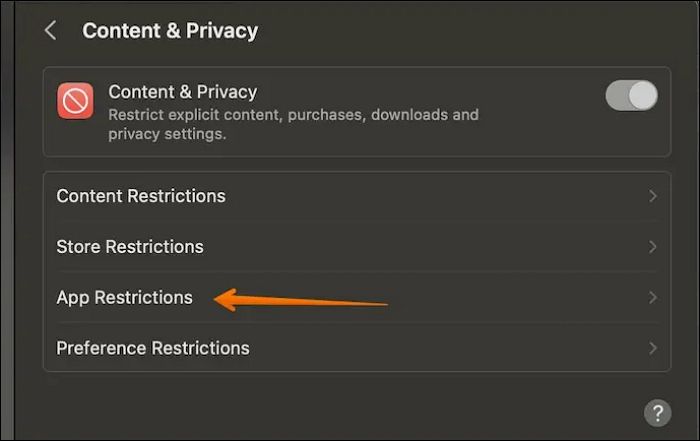
Step 3. To proceed, navigate to the next window and select the App Restrictions option.
Step 4. Ensure the Allow Camera is turned on in the Allowed section.
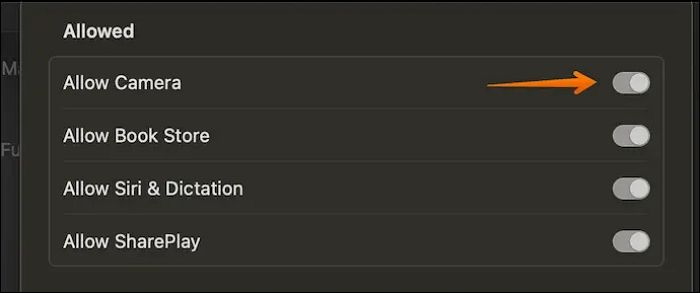
Reopen the camera to see if the issue is resolved.
Method 7. Update to the Latest macOS to Fix Mac Camera
In some cases, glitches related to the existing macOS can lead to the camera not working. Updating the macOS to the latest version can resolve this issue. This ensures that any existing bugs or problems are fixed, allowing the camera to function properly.
Take a look at the steps you can adopt to update to the recent macOS.
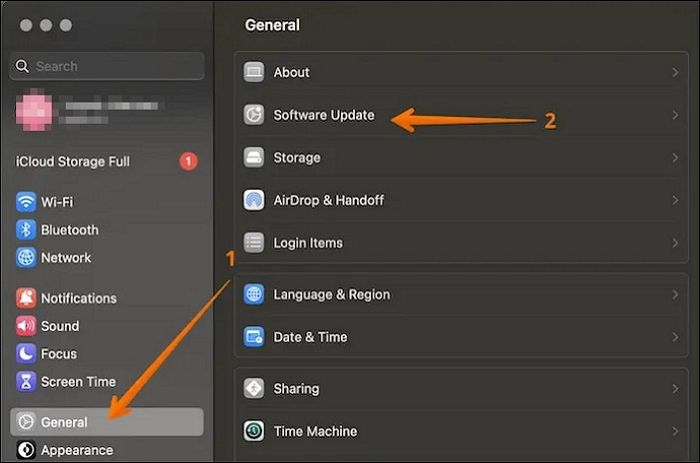
Step 1. Go to the Apple menu and select System Settings from the drop-down.
Step 2. To upgrade your system, go to General, then Software Update, and select Upgrade Now if updates are available.
If there are no upgrades, you'll need to visit again at a later time to see if any updates have been made.
Bonus Tip: How to Recover Lost Videos on Mac
If you've encountered data loss during the upgrade to the latest macOS version, you can use professional data recovery software like Qiling Data Recovery Wizard for Mac to retrieve your data. This tool can help you restore your lost data in a hassle-free manner.
Qiling Mac USB recovery software is a professional data recovery tool that helps retrieve various types of data. Its user-friendly interface makes it easy to recover data with simple steps, and it comes with exciting features that make it a desirable choice.
- You can recover Mac deleted files, including videos, music files, documents, and other types of files.
- Data recovery software can be used to retrieve data from various storage devices such as hard drives, solid-state drives (SSD), USB flash drives, pen drives, and more.
- To securely send data recovered from a device to cloud storage, you can use cloud backup services like Google Drive, Dropbox, or OneDrive. These services allow you to upload your recovered data to their servers, providing a safe and accessible way to store and manage your files. You can also use cloud backup software such as Backblaze or CrashPlan, which can automatically upload your recovered data to their servers, ensuring it's safely stored and easily retrievable.
- With this software, you can preview the files you want to recover, ensuring that you're only recovering the specific files you need, and saving time and disk space.
- You can scan lost data and choose the one you want to restore with the file filter option.
Step 1. Select the drive to be scanned
In the main Qiling Data Recovery Wizard window, select the drive you need to recover lost/deleted files from and click the "Search for lost files" button.
Note: Before attempting data recovery, it's recommended to create a backup of your Mac by clicking "Disk Backup" in the left sidebar to avoid further data loss. This backup can then be used by the software to recover data, allowing your computer to be used for new data entries.

Step 2. Select your lost data/files
Qiling Data Recovery Wizard for Mac will immediately scan your selected disk volume and display the scanning results on the left pane. You can sort the results to find the wanted files if you are looking for certain files.

Step 3. Recover lost/deleted data
Once you have found the desired files, preview them and then click "Recover" to start the recovery of your deleted/lost Mac files.

Conclusion
The Mac camera not working can be a frustrating issue, especially when it comes to attending meetings or presentations. To resolve this problem quickly, various solutions are available.
To resolve the issue, update to the latest macOS versions, check the System Report, and restart the system. However, it's recommended to consider potential data loss before taking these steps.
If you've experienced data loss, an efficient data recovery program like Qiling can be a lifesaver. This user-friendly and highly reliable software is easy to download and install, making it a great option to try out today.
MacBook Pro Camera Not Working FAQs
If your MacBook Pro camera is not working, there are several solutions you can try to fix the issue. However, if you want to know more about these solutions, you can check out the listed questions and answers below for more information.
1. How do I reset my Mac camera?
To reset the Mac camera, launch Terminal and type 'sudo killall VDCAssistant' and 'sudo killall AppleCameraAssistant', then hit Enter and enter the admin password if prompted.
2. Why is my Mac camera showing a black screen?
The black screen of the Mac camera can be caused by a blocked lens or issues with the driver software responsible for the camera's efficient working.
3. How do I open the camera on Mac?
To open the camera on a Mac, go to the Finder app, select Applications, and double-click on Photo Booth. If the green light is on, it indicates the camera is active.
4. How do I turn on the camera on my Mac?
To turn on the camera on your Mac, go to Applications, select Photobooth, and wait for the green light to indicate the app is working properly.
Related Articles
- How to Factory Reset Terminal on Mac [Bash and Zsh]
- What Should I Do After Accidentally Marked Drive C Active [2023 New]
- How to Stop Windows 10 Deleting Files Automatically
- Is Your SSD Slow to Load Games? Here Are New Fixes!
- Best Guide to Recover Forgotten Blizzard Password
Forgot your Blizzard password? No need to worry. In this article,we provides methods of how to recover forgotten Blizzard password. Choose the way that fits you best. - 3 Methods | How to Find and Recover Microsoft Visual Studio Product Key
Have you lost your Microsoft Visual Studio Product Key? Don't worry. You can easily get your lost product key on your own, Here is a step-by-step guide on How to Find and Recover Microsoft Visual Studio Product Key.