[Fixed] Target Disk Mode Not Working on macOS Ventura/Monterey
If you're experiencing issues with Target Disk Mode not working on your Mac, there are several methods you can try to resolve the problem. You can try the full steps for each method, or click on the "Full steps" link to skip to the target method.
| Workable Solutions | Step-by-step Troubleshooting |
|---|---|
| To fix the issue of Target Disk Mode not working on your Mac, you need to update your macOS version. The Target Disk Mode requires macOS 10.13 or later, so ensure your Mac is running the latest version. | Access "System Settings" by clicking the Apple menu in the bottom-right corner of your screen...Full steps |
| To fix Target Disk Mode not working on your Mac, you can try resetting the System Management Controller (SMC) and the Power Management Unit (PMU). This can be done by shutting down your Mac, pressing the power button, and then pressing the Command (⌘) + Option (⌥) + P + R keys at the same time. Hold these keys for 10 seconds, then release them. | Restart your Mac if it is currently in Target Disk Mode. From the "Utilities" folder, open Disk Utility Mac...Full steps |
| To resolve the issue of Target Disk Mode not working, check the ports and cables. Ensure that the Thunderbolt cable is properly connected to both the host Mac and the target device, and that the target device is turned on. Also, verify that the target device's boot mode is set to Target Disk Mode. | Choose the Apple menu and go to "About This Mac". Double-click your serial number, then...Full steps |
| To fix Target Disk Mode not working due to incorrect Finder Preferences, adjust the settings as follows: go to Finder > Preferences > Advanced, and ensure that "Show these items on the desktop" is unchecked for both "External disks" and "CDs, DVDs, and iPods." Also, disable the "Show these items on the desktop" option for "Connected servers" and "External volumes." This adjustment should resolve the issue with Target Disk Mode not functioning properly. | In the Target Disk Mode, connect your Mac to another Mac. Open "Finder" and go to "Preferences"....Full steps |
| To fix the issue of Target Disk Mode not working due to a Firmware Password, turn it off. This can be done by following these steps: Enter the System Preferences, then Security & Privacy, and finally, select the option to turn off the Firmware Password. Once the Firmware Password is turned off, restart the Mac and try to enter Target Disk Mode again. | In the Menu Bar, click on "Utilities" and select "Startup Security Utility" or "Firmware Password Utility"...Full steps |
Why Is the Target Disk Mode Not Working on My Mac
The macOS base system has undergone significant revisions, with one notable feature being Target Disk Mode. This boot system allows for easy file transfer using USB, USB-C, or Thunderbolt cables, functioning similarly to an external hard drive. To activate, simply hold the "T" key while your Mac boots up.
Sometimes Target Disk Mode not working issue will happen on your Mac, possibly due to issues with the macOS Ventura or Monterey operating system, which may prevent the Target Disk Mode from functioning as expected.
Target Disk Mode may not appear on the host computer, the connected Mac may not recognize the connected Mac as an external hard drive, or Target Disk Mode USB-C may not be working on M1 Macs due to various reasons.
The common reason for this issue is using the wrong port or cable for your Mac computer. Other possible causes include a faulty cable, a malfunctioning USB port, or a software issue with your Mac's operating system.
- To resolve the issue of a wrong format of the hard drive, you can try the following steps: Check if the hard drive is in the correct format by checking the disk properties. If it's not in the correct format, you can try to format it again. If the problem persists, you can try to use a disk formatting tool to format the hard drive.
- You've set external files to be hidden on Finder, so always check if your files and folders are accessible normally.
- It's recommended to use a Thunderbolt cable to connect computers, rather than a USB or USB-C cable, in order to ensure a stable and high-speed connection. This is particularly important for tasks that require high bandwidth and low latency, such as video editing, 3D modeling, and data transfer. Using a Thunderbolt cable can help to prevent issues such as dropped frames, lag, and data corruption, and can also provide a faster and more reliable connection overall.
To boot a Mac into Target Disk Mode, regardless of whether it's an Apple Silicon or Intel-based model, follow these steps. First, ensure the Mac is turned off.
Fix 1. Update macOS Version on Mac to Fix Target Disk Mode Issues
If your Mac is formatted as APFS and you want to boot it in Target Disk mode, the computer you connect to must run macOS High Sierra or later, as older software cannot recognize the APFS format.
To fix the issue, update your Mac to the latest version of macOS and ensure you have sufficient free storage space before transferring files.
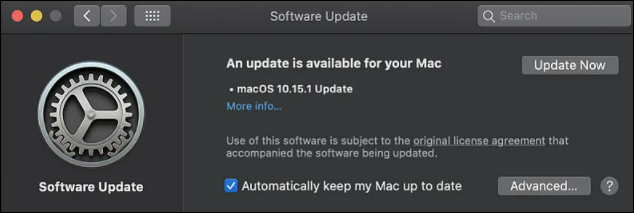
To update your Mac to High Sierra or later (Ventura/Monterey), follow these steps:
Step 1. To access "System Settings" on your Mac, click the Apple menu located in the bottom-right corner of your screen.
Step 2. In the sidebar, click "General".
Step 3. Click on the "Software Update" option on the right side of the screen to update your Mac. This will check for any available updates and allow you to install them.
If you're experiencing issues with getting your Mac into Target Disk Mode, updating to High Sierra or later may resolve the problem. However, if that's not feasible, you'll need to verify the format your Mac is using in Target Disk Mode.
To resolve Target Disk Mode issues on your Mac, you can try resetting the System Management Controller (SMC) and the Power Management Unit (PMU). This can be done by booting your Mac in safe mode, then restarting it normally.
Fix 2. Fix Target Disk Mode Not Working by Reformat Your Mac
To check the format of your Mac, you can follow these steps:
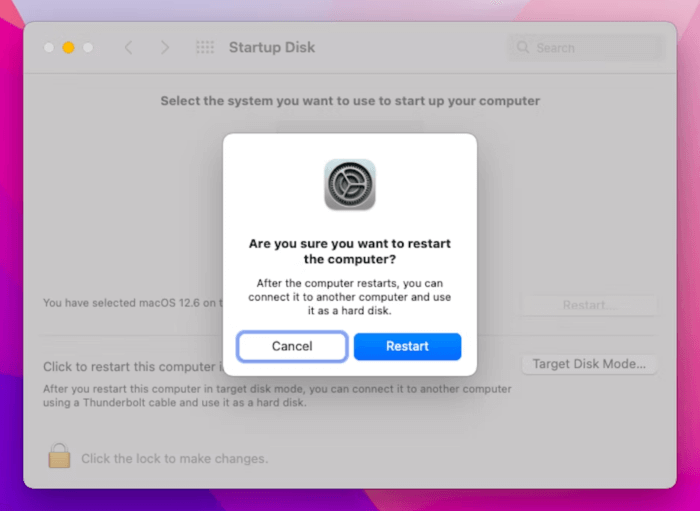
Step 1. If your Mac is currently in Target Disk Mode, restart it by pressing the power button and selecting "Restart" from the Apple menu. This will exit Target Disk Mode and return your Mac to its normal state.
Step 2. From the "Utilities" folder, open Disk Utility Mac.
Step 3. Select "Macintosh HD" from the sidebar, which will display the hard drive format beneath its name at the top of the window.
If your Mac is in APFS format, you'll need to erase the drive and reformat your Mac storage, but first, make sure to back up your data to avoid losing it.
Now follow the steps to erase the drive:
Step 1. To view all devices in Disk Utility, go to the "View" menu and select "Show All Devices".
Step 2. Select your Mac's hard drive parent folder and click "Erase".
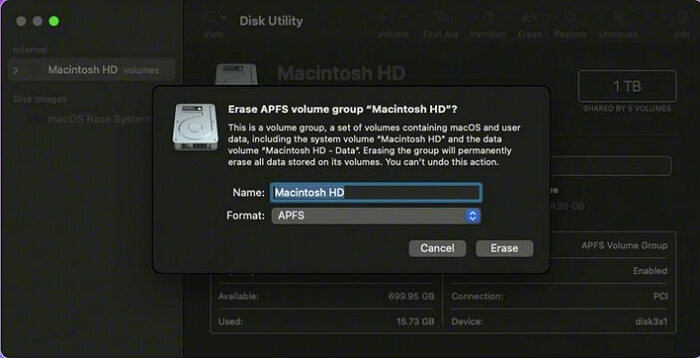
Step 3. Choose the "Format", "Scheme", and "Name" you want to use.
Note: We recommend selecting the GUID Partition Map and Mac OS Extended (Journaled) format for your hard drive.
Step 4. Now click on "Erase" to reformat the Mac.
Step 5. Finally, recover your data backup and check if the Target Disk Mode works now.
Fix 3. Check if the Ports and Cables on Mac Are Available
If Target Disk mode is working, but you're unable to connect to another Mac, the issue might be with the cable or port being used for the file transfer. You should check the cables and ports to see if they're functioning properly.
To use Target Disk mode, you need to use a cable that is compatible with it. You can check the guide to see which cables are suitable for data transfer in Target Disk mode.
1. What Cables Are Needed for Target Disk Mode
In Target Disk mode, you can use various cables and ports, including USB-C (Thunderbolt 3), USB-A, and Ethernet, to connect your Mac to another Mac or a PC, or to an external drive, and access the other Mac's hard drive or the external drive as if it were an internal drive. However, it's essential to note that you should not use Target Disk mode on a Mac connected to a network, as it can compromise the security of the network, and also check the compatibility of your Mac before using this feature.
- Thunderbolt 3
- Thunderbolt 2
- FireWire
Check your Mac's ports at Apple's website and use high-quality, official cables to connect your devices, including using a USB-C cable in the Thunderbolt 3 port.
2. How to Check Ports and Cables Are Working Properly
Here's how you can check if Ports and Cables Are Working Properly or not: Check your ports for any signs of physical damage or wear, such as frayed cords, bent pins, or loose connections. Try using a different cable or port to rule out any issues with the original cable or port.
If your device isn't working, try switching the ports on your devices and if it starts working in another port, your port is faulty. If this doesn't work, try a different cable and see if the new one works fine.
Sometimes you are sure that the used cables/ports are in proper order, then try this technical trick to overcome the hassle that you are facing: Check the cable and port for any signs of physical damage or wear and tear. Verify that the cable is securely connected to both the device and the port.
Step 1. Choose the Apple menu and go to "About This Mac".
Step 2. Double-click your serial number, then press Command-C to copy it.
Step 3. On the "Tech Specs" page, click on the search specs bar, press Command-V to enter your Mac's serial number, and start searching.

This will let you see all the ports on your Mac and give you an idea about the ports and cables that can be used.
Fix 4. Adjust Finder Preferences to Fix Target Disk Mode Not Working
Your Mac may be in Target Disk mode, but a Finder issue can make it hard to see. Changing your Finder preferences might solve the problem, but if not, you can try using Disk Utility to find your Target Disk.
Let's see the steps to solve this issue by adjusting Finder preferences:
Step 1. In Target Disk Mode, you can connect your Mac to another Mac, allowing you to access the first Mac's disk as if it were an external drive. This is useful for transferring files, reinstalling the operating system, or performing other disk-related tasks.
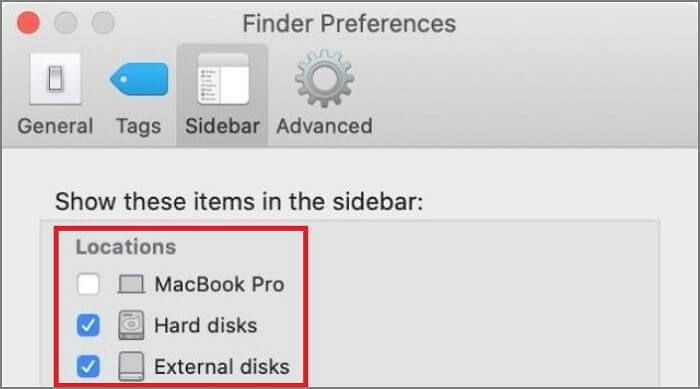
Step 2. Open "Finder" and go to "Preferences".
Step 3. Now, open the "Sidebar" tab.
Step 4. To view hard disks and external disks, check the box, and your target disk will appear in the Finder sidebar.
If this doesn't work, use the Disk Utility and follow the steps below.
Step 1. Open "Disk Utility".
Step 2. In the sidebar, check for the Target Disk.
Step 3. If the disk is grayed out, click the "Mount" button after selecting it.
Now go back to the Finder and look for the Target disk again.
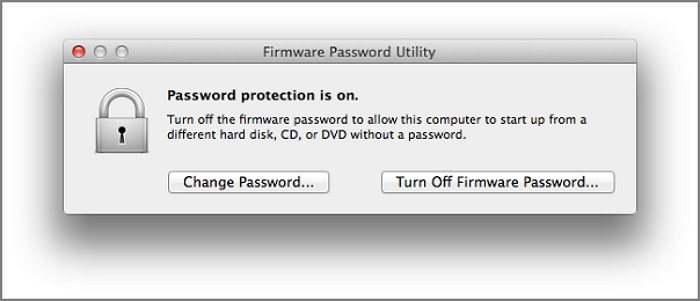
Fix 5. Turn off Firmware Password to Fix Target Disk Mode Issue
If the Mac firmware password is set to "ON", you won't be able to enter Target Disk Mode from a cold boot, so it's recommended to disable it.
To resolve the issue, boot your Mac into macOS Recovery Mode and follow the steps below. If your Mac won't boot into Recovery Mode, check this link for assistance.
Step 1. To access the Startup Security Utility or Firmware Password Utility, follow these steps: Click on the Menu Bar, then select "Utilities" and choose either "Startup Security Utility" or "Firmware Password Utility".
Step 2. Click on "Turn off Firmware Password".
Step 3. Enter the firmware password and exit the utility.
Step 4. Now that we have disabled the Firmware Password, we can easily access the Target Disk mode by restarting the Mac.
If you lost your Mac Data or forgot to keep a backup anywhere during the process, there is still hope. You can use a data recovery tool to scan your Mac and recover any lost data. These tools can scan your Mac's storage devices and recover deleted or lost files. They can also recover data from formatted or corrupted storage devices.
Recover Lost Files While Fixing Target Disk Mode Not Working
If you lost your Mac data or forgot to keep a backup during the Target Disk process, don't panic. We have a solution. Your data is at risk of being lost permanently while updating and reformatting your Mac.
If you've lost data due to a macOS upgrade failure, system crash, or other reasons, Deep Data Recovery for Mac can help you recover it.
Deep Data Recovery for Mac allows users to recover various types of files, including images, videos, audio files, documents, and more, from a range of devices and media, including Macs, SD cards, external hard drives, memory cards, and cameras, even after emptying the Trash Bin on Mac.
To recover your lost data, simply follow these steps:
Step 1. Select the location to scan
Launch Deep Data Recovery for Mac, select the device where data was lost, and click "Search for lost files" to begin scanning.
Note: Before attempting data recovery, it's recommended to click "Disk Backup" from the left sidebar to create a backup of your Mac, which will prevent further data loss. Once backed up, the software can recover data from the Mac backup, allowing your computer to be used for new data entry.

Step 2. Filter lost Mac data
The software automatically scans for lost data on MacBook/iMac, and once the scan is complete, it allows users to filter and recover wanted data using the "Type" and "Path" buttons.

Step 3. Recover lost data or files
Double-Click a file to preview it, then click the "Recover" button to restore the lost data to another place.

Summary
Target Disk Mode is an excellent way to transfer data, but it can also be a headache if it stops working correctly. Luckily, we have covered the best solutions in this article to help you quickly fix the Target Disk Mode problems.
If you're concerned about keeping your data safe, we've discussed a professional and functional data recovery tool called "Deep Data Recovery for Mac" that can help you recover your data. To fix your Mac Target Disk Mode problems without losing your data, check out the fantastic solutions offered by this tool.
Target Disk Mode Not Working FAQs
If you're experiencing issues with Target Disk Mode, this article aims to provide a comprehensive solution. However, if you still have questions or doubts, we've prepared a list of frequently asked questions (FAQs) to help clarify things.
1. What can my Mac do in Target Disk Mode?
While in Target Disk Mode, your Mac's drive acts as an external storage device, allowing you to access, partition, mount, and even format the drive, including transferring data through Thunderbolt Bridge in Intel-based Macs.
Target Disk Mode allows a Mac to be used as an external drive, making it easy to perform various tasks such as booting another Mac from it, creating a backup of the Mac's startup disk, and transferring files between Macs. It can also be used to transfer data from an old Mac to a new one, or to recover data from a Mac that won't boot.
- For file transfer between 2 Macs.
- To boot a Mac using another Mac.
- To migrate your files to a new Mac from an older one, you can use the built-in feature called "Migration Assistant". This tool allows you to transfer your files, settings, and applications from your old Mac to your new one, making the process relatively smooth and efficient.
- If your Mac won't turn on, you can put it in Target Disk Mode and run Mac First Aid from another Mac to repair the disk, making it bootable again.
- If your MacBook won't turn on, you can still retrieve your files.
2. How to recover data from Mac with a broken screen in Target Disk Mode?
To recover data from a Mac with a broken screen, you'll need two Macs and a cable to connect them. Connect the two Macs using a Thunderbolt or FireWire cable, and then boot up the working Mac. Go to System Preferences, select Startup Disk, and choose the broken Mac's startup disk as the startup disk for the working Mac.
- Connect the Mac with the broken screen to the other Mac using a Thunderbolt 3 cable, and then use Target Display Mode to extend the desktop of the working Mac to the broken Mac's screen. This will allow you to access the broken Mac's files and perform any necessary repairs.
- Shut Down your Mac with the broken screen.
- Turn on the other Mac and enter Target Disk Mode by pressing the "T" key.
- To transfer data from a broken Mac to a new one, click the disk icon on the new Mac, which will launch the Setup Assistant. Follow the on-screen instructions to recover data from the broken Mac to the new one.
We hope you have successfully recovered the data to your new Mac from the one with the broken screen.
3. How do I fix Target Disk Mode on Mac?
If your Mac is experiencing issues with Target Disk Mode, there are several easy fixes. Firstly, ensure that your Mac is turned off and the other Mac is turned on.
- Try updating or reformatting your macOS
- Try changing the Finder preferences
- To ensure the cables and ports you're using are functioning properly, you can perform a few simple checks. First, try swapping the cables with known working ones to rule out any issues with the current cables.
- You can also disable FileVault encryption to fix Target Disk Mode.
- Make sure your Mac's Firewall password is turned off.
4. Does Mac Target Disk Mode work with USB?
The Thunderbolt 3 port in your Mac, which has the same form factor as the USB-C, can be used as a USB-C/USB port, allowing you to use a USB-C/USB cable on your Mac in Target Disk Mode.
Related Articles
- [Solved] System Image Recovery Not Showing
- Why Is My Chromebook So Slow and How Do I Speed It Up? [Complete Guide]
- Can't End Task Access Denied (Cuauses & Solutions)👍
Fix cannot end task access denied in Windows Task Manager. Learn why processes refuse to close and how to stop stubborn apps safely. - Checksum Error in WinRAR? How to Fix the Checksum Error (2023)
If you're experiencing a Checksum error in WinRAR, you can try repairing and recovering incomplete or partially corrupt files using professional recovery software. This can help you recover files that were not fully downloaded or were damaged during the download process. - How to Recover Overwritten Word Document No Previous Version [Full Ways]
If you've accidentally replaced a Word document, don't worry, you can recover the overwritten file with these practical solutions. Whether it's a Word document or any other type of file, you can easily recover it by following this guide. Just try out these steps to get your document back. - Recover Saved Game Data on Xbox Series X [ 5 Proven Ways]
If you've lost your game data on Xbox Series X, - there are three effective methods to recover it. You can recover saved game data from an external hard drive, use cloud gaming to access your saved games, or restore from a backup.