Why Is My Chromebook So Slow and How Do I Speed It Up? [Complete Guide]
Chromebooks are fast and responsive due to ChromeOS, which can run smoothly on inexpensive hardware. Their lightweight software ensures they remain functional for many years with minimal maintenance.
The most advanced Chromebooks have an expiry date, with their performance deteriorating over time due to daily usage. As a result, tasks that were once seamless can become sluggish, leading to a Chromebook running slow. Fortunately, there are tips and tricks that can help give your aging Chromebook a performance boost.
To troubleshoot your Chromebook's slowness, try restarting it, closing unused apps, and checking for software updates. You can also check the Chromebook's storage by going to Settings > About Chrome OS and see if it's running low. If it is, consider deleting unnecessary files or apps to free up space.
Why Is My Chromebook So Slow
If you're a fan of using a Chromebook to quickly sort through tasks, you might be frustrated if its reduced speed starts to jeopardize performance. There are thousands of reasons why a Chromebook might be running slow, but here are the 5 most common culprits.
Reason 1. Google update
Google's latest ChromeOS update, version 91.0.4472.147, has been released, but it has resulted in Chromebooks becoming slower and less attractive due to bugs and reduced performance.
Reason 2. Slow internet connection
A slow internet connection can make your Chromebook slower, regardless of tweaks or hardware/software installed or downloaded.
Reason 3. Installed extensions
Installing extensions on your Chromebook can actually have a negative impact on its performance. The more extensions you add, the more resources your device consumes, ultimately leading to slower speeds. In other words, the very thing that's meant to enhance your browsing experience - installing extensions - is actually the main reason your Chromebook gets slower.
Reason 4. Multiple apps opened in the background
You have multiple programs and apps running on your system, consuming maximum system resources and memory. It's recommended to browse through the installed apps and remove those that are least in use or outdated, which could be contributing to your Chromebook's slowness.
How Do I Speed Up My Chromebook
To speed up your Chromebook, consider using the methods below. You can clear browser data and cache to free up space, disable extensions that are slowing it down, and turn off unnecessary features like location services and notifications. Additionally, updating your Chrome OS to the latest version can also improve performance.
- Method 1. Enable hyper-threading
- Method 2. Automatically suspend inactive tabs on Chromebook
- Method 3. Free up Chromebook storage
- Method 4. Check with task manager
- Method 5. Remove extensions
Method 1. Enable hyper-threading
If your Chromebook is powered by an Intel processor, there's a trick to get the most out of its CPU. Intel's Hyper-threading feature allows the computer to run multiple tasks at once on a single core, effectively making the most of the processor's capabilities.
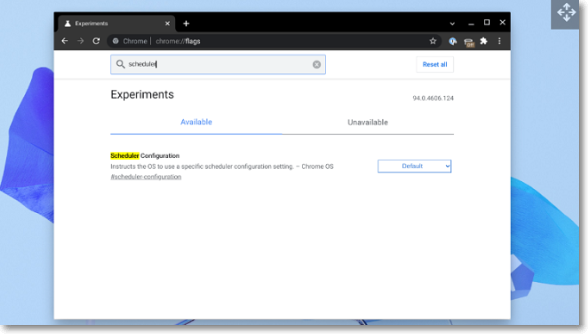
Chromebooks come with hyper-Threading is disabled by default on Chromebooks, meaning each core can only handle one task at a time. However, if you're willing to take on some extra security risks, you can enable hyper-threading, which allows multiple tasks to be processed simultaneously, but is currently deactivated on Chromebooks.
To enable Hyper-Threading on your Chromebook, go to the address bar of Google Chrome and type chrome:/flags, then hit Enter. Look for the "Scheduler Configuration" option and select "Enables Hyper-Threading on Relevant CPUs" from the dropdown menu. After making this change, restart your Chromebook to apply the settings.
Method 2. Automatically suspend inactive tabs on Chromebook
Limiting the number of active threads in your browser is likely the most efficient way to improve the speed of your Chromebook, as most of your work is done in open tabs and windows.
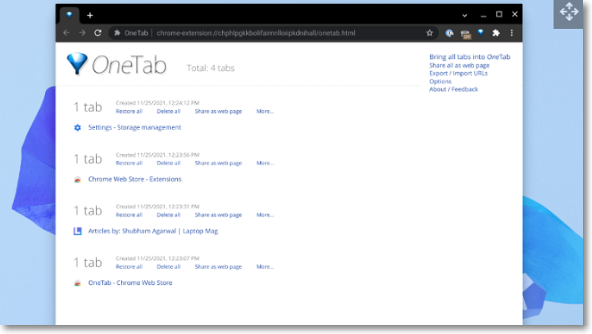
With the free OneTab browser extension, you can instantly suspend unused tabs and free up a huge amount of RAM, allowing you to browse the list of suspended pages when you want to restore them, making it easy to find the precise pages you're looking for without taxing your computer.
Method 3. Free up Chromebook storage
On a Chromebook, temporary data is used to load frequently used programs and websites quickly, but clearing local storage may be necessary if space runs low. To free up space, users can delete apps, which can be done by following the instructions on how to delete apps on Chromebook.
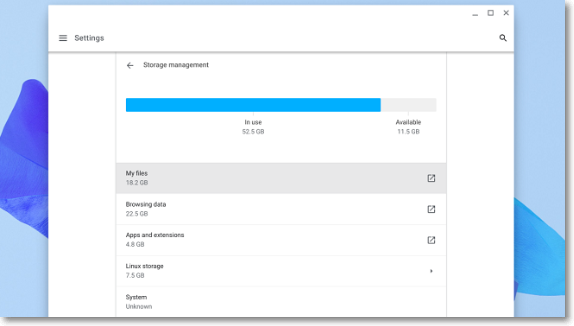
Step 1. Launch the "Settings" app on the Chromebook
Step 2. To free up storage space on your computer, go to the "Storage" section of your computer settings. Select "Storage management" from the menu, which will show you a summary of what's taking up space on your computer. Based on this information, you can take steps to clear up clutter and free up storage space.
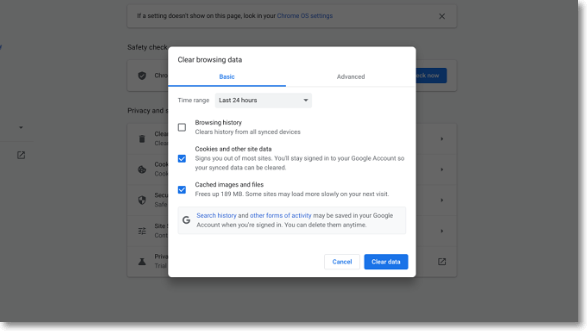
If there has been an excessive accumulation of browsing data, it may be necessary to clear the browser's cache and cookies to improve performance. This can be done by going to the browser's settings or preferences and selecting the option to clear browsing data.
Step 3. To clear browsing data, click on "Browsing data" and select the "Cookies and other sites data" and "Cache pictures and files" options from the pop-up that appears.
Step 4. 1. Clear your browsing history and cache to free up space on your device.
Step 5. On a Chromebook, you can remove any programs you no longer need by going to "Apps and extensions." On supported Chromebooks, you can also attach an external SD card to manage local files or connect a cloud storage account to move some things there.
You can easily add storage to a Chromebook by plugging in an SD card. When attaching or purchasing external storage, it's often necessary to format it for future use. If you need to format an SD card for your Chromebook, there are solutions available.
Method 4. Check with task manager
The Chromebook has a built-in task manager that shows a list of open programs and processes, along with the resources being used, such as memory, CPU, and network.
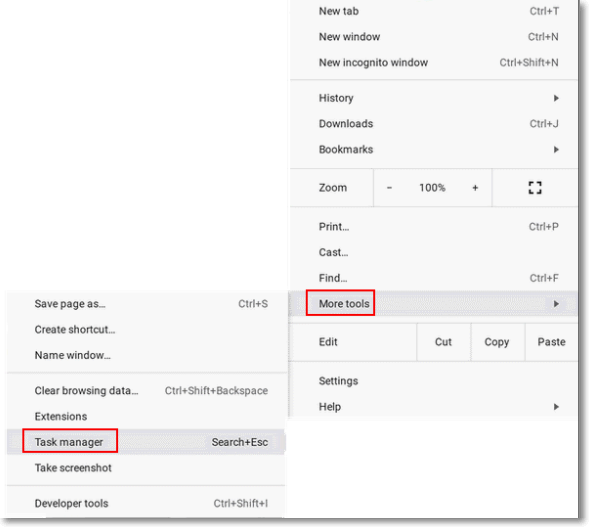
Step 1. The Chrome browser will launch; click on the Chrome menu button in the top right corner.
Step 2. To open the Task Manager, click on "More tools" and select Task Manager, or use the shortcut Search + Esc.
Step 3. To identify which program or process is consuming the most resources and can be shut down, check the currently running ones.
Step 4. To close an application, select it in the lower right corner and click the "End Process" button.
Method 5. Remove extensions
A Chromebook's poor performance can often be attributed to having too many extensions installed, so it's a good idea to review and remove any unnecessary ones. To do this, follow these steps:
Step 1. Launch Chrome web browser.
Step 2. Select the menu button in the top right corner.
Step 3. Browse to More tools.
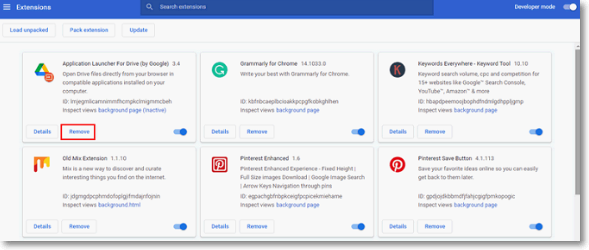
Step 4. To decide on extensions, you can either browse through the Chrome Web Store or enter chrome://extensions in the address bar. This will take you to a page where you can see all the extensions you have already installed, as well as the option to enable or disable them. You can also click on the "Get more extensions" button to browse through the Chrome Web Store and find new extensions to install.
Step 5. The installed extensions will be listed.
Step 6. Turning off the switch will stop extra extensions from being used, but we recommend selecting Remove to get rid of outdated extensions.
Final Verdict
If you're new to Chromebooks, the first section provides essential information, while the second section helps you identify why your Chromebook might be slow. The third section offers 5 practical solutions to speed up your slow Chromebook. It's hoped that this information will help you find a solution to your issue.
Chromebook FAQs
What is the purpose of the FAQs? The purpose of the FAQs is to provide a concise and easy-to-understand overview of the topic, making it accessible to a wide range of audiences.
1. How long does a Chromebook last?
Chromebooks typically last between 5-8 years and receive full updates to Chrome OS every 4 weeks for at least 5 years after release.
2. Why is a brand-new Chromebook so slow?
If your Chromebook is slowing down, it could be due to one or more extensions causing the issue, or it might be related to having multiple tabs open, not shutting down the device regularly, or running low on storage space.
3. How do I check my Chromebook performance?
To run diagnostics on a Chromebook, click the menu button on the lower-left corner of the desktop, type "diagnostics" into the search box, and press enter or click the Diagnostics symbol that appears.
Related Articles
- Recover Not Showing Up/Disappeared User Folder and Files in Windows 10
- [PS4 USB Format] How to Format USB for PS4
- Service Host: Local System High Disk, CPU and Memory Usage [100% Solved]
- How To Check Storage On Mac? [Step By Step]
- How to Fix com.apple.DiskManagement.disenter error 49153 [Ventura/Sonoma]
Are you experiencing the com.apple.DiskManagement.disenter error 49153 on macOS Ventura or Sonoma? This troubleshooting guide provides effective fixes to help you resolve the issue. - Guide on Diskpart Create FAT32 Partition | How to Create FAT32 Partition with Diskpart
To create a FAT32 partition using Diskpart, follow this guide.