Service Host: Local System High Disk, CPU and Memory Usage [100% Solved]
Dependent on your specific situation, you may need to choose a solution from the following options. Please review the available choices and select the one that best fits your needs.
If you see a process called Service Host: Local System taking up all of your computer or laptop resources in Task Manager, you can try stopping it by going to Services, finding the "Services Host: Local System" service, and stopping it. If that doesn't work, you can try disabling it.
What is Service Host: Local System?
You can quickly access the Task Manager by pressing Ctrl + Alt + Del, and then scroll down to find Service Host related processes, such as Service Host: Local System (Network Restricted), Service Host: Local Service, and Service Host: Network Service, on the first Process tab.
The term "Service Host: Local System" refers to a process in Windows 10 that hosts various system services, which can consume resources and cause 100% disk usage in Task Manager. This is often due to a malfunctioning or resource-intensive service, such as the Windows Search service, which can lead to excessive disk usage and slow system performance.
Service Host: Local System is a bundle of system processes, including Windows Auto Update, that can consume huge computer resources, especially after a Windows 10 update.

How to solve Service Host: Local System high disk usage, CPU usage or memory usage?
Solution 1. Restore hard drive health and optimize system
First. Download Qiling partition manager on your computer or laptop and launch it after installation.
Next. To complete the whole procedure of hard drive repair and system optimization, you can use software. First, you need to scan your hard drive for errors and bad sectors using a disk diagnostic tool.
# To restore hard disk health back to normal state:
The software should automatically detect and fix hard drive errors and system file errors that consume system resources, freeing up available resources.
# Continue to optimize your computer by removing redundant network data, files and system logs
1_ Click System Optimize under Tools in Qiling Partition Master.
Click one by one the options for Junk File Cleanup, Large File Cleanup, and Disk Optimization to resolve high disk, CPU, and memory usage issues. These solutions can help eliminate 99% or 100% usage of these system resources.
Solution 2. Directly disable Service Host Local System tasks
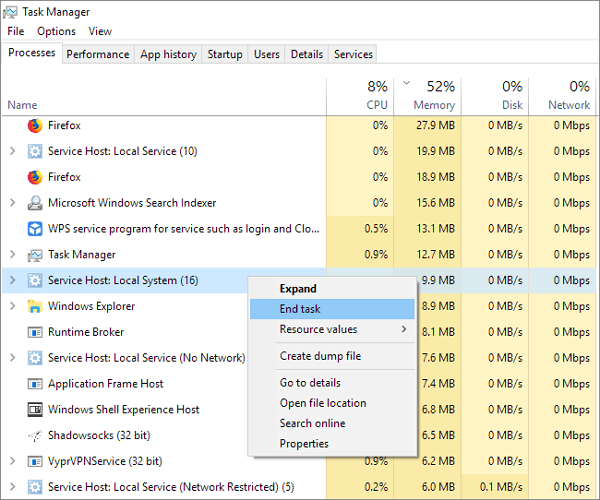
Step 1. To identify what items are using more disk, CPU or memory, expand the "Service Host: Local System" in the Task Manager, which will clearly display the usage of each item.
Step 2. Once you've identified the items consuming your computer's resources, right-click on the item and select "End Task" to stop it from running.
Step 3. Monitor CPU, disk, and memory usage in real-time, observing if the percentages are decreasing, to identify and suspend suspicious tasks until all percentages are low.
Step 4. Once you've identified the item causing the issue, right-click on it and select the "Open Services" option.
Step 5. Go through the services on Task Manager until you find the service with the same name, right click on it and then click Stop.
Step 6. To resolve the issue, find the problematic service, double-click on it, select "Disabled" from the "Startup type" menu, click "Apply" and then "OK".
Solution 3. Disable Backup Intelligent Transfer Service
Step 1. At Windows Task Manager, click Services tab.
Step 2. On the Services window, at the bottom, you will find the Open Services button. Click on it.

Step 3. To stop the Background Intelligent Transfer Service, open the Services window, navigate to the service called Background Intelligent Transfer Service, right-click on it, and select Stop.
Solution 4. Disable Superfetch Service
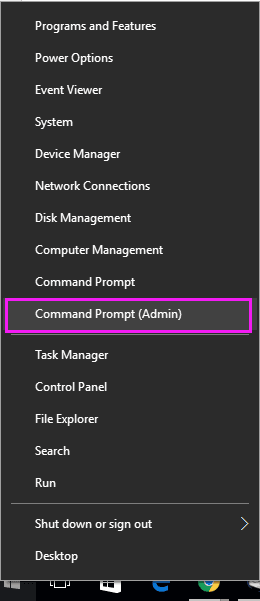
Step 1. To open the Command Prompt as an administrator, press the Windows key + X at the same time, then click on Command Prompt (Admin) from the menu that appears.
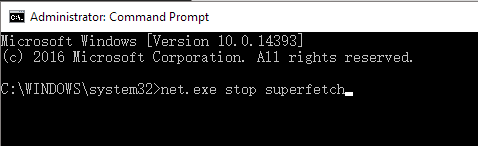
Step 2. To stop the SuperFetch service, open the Command Prompt, type the command "net.exe stop superfetch", and press Enter.
Solution 5. Disable Automatic Updates
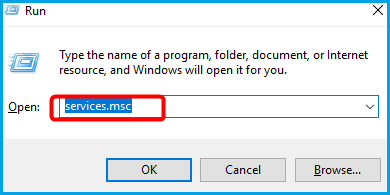
Step 1. To open the Services console, press the "Windows + R" keys to open the Run dialog, then type "services.msc" in the box and press enter.
Step 2. A window appears with a list of Services, and you need to find the Windows Update Service. Once you double-click on it, the Windows Update Service Properties screen will pop up.
Step 3. To disable the Startup type, go to the General tab, select Disabled from the drop-down list under Startup type, and click OK to apply the change.
Step 4. After disabling Windows Update permanently, you can then follow solution 2 to end the task of Service Host: Local System.
Related Articles
- How to Fix Corrupted Recycle Bin in Windows 10 and Restore Lost Data
- Restore Deleted/Crashed Notepad ++ Files from Backup
- Fix: Windows 10 Update Stuck Checking for Updates
- [Fixed] Destination Folder Access Denied You Need Permission to Perform This Action in Windows 10/8/7
- What Is Rufus? Your Best Answers in 2024
Do you need to install Windows on your system, and someone recommended Rufus? If you are wondering what is Rufus, it is a free tool to create bootable USB drives. Learn more about Rufus and its features in this article. - What Is VCRUNTIME140_1.DLL and How to Fix Issues with VCRUNTIME140_1.DLL
Learn what VCRUNTIME140_1.dll is and how to fix missing or not found errors. Repair Microsoft Visual C++ Runtime and affected apps.