Windows 11 Keeps Crashing - All Methods to Fix
If your Windows 11 is crashing, you're not alone - many users have experienced issues since its release. Some have struggled to find compatible drivers, while others have been unable to run it on their PCs.
And while most of those early-day problems are gone, some still cause Windows 11 to keep crashing. So, many people have their heads in their hands, wondering how to fix this issue.
If your Windows 11 keeps crashing, try restarting your computer, updating Windows, running a System File Checker, checking for malware, and disabling any recently installed software or drivers. You can also try resetting your PC, running a System Restore, or using the Windows Recovery Environment to troubleshoot and fix the issue.
Why Does My Windows 11 Keep Crashing
Here are possible reasons your Windows 11 keeps crashing:
- An outdated or bad driver installation
- A system update that might have caused issues
- An outdated Windows version or build
- Broken or corrupted system files
- Virus or malware attack
- Your computer is overheating
- Your graphics driver is outdated
- Your RAM is causing issues
Windows 11 crashing can be frustrating, but trying a few fixes can resolve the issue. The most common problems include faulty drivers, corrupted system files, and overheating issues. By updating your drivers, running a system file checker, and ensuring proper ventilation to prevent overheating, you can often resolve the crashing problem. These simple steps can help ensure your Windows 11 system runs smoothly and efficiently.
How to Fix Windows 11 Keeps Crashing
Now that you know what might be causing your Windows 11 to keep crashing, let's talk about fixes. It's important to understand that each issue has hundreds of fixes. However, we have narrowed it down to eight of the best and most probably fixes for this problem. So, let's talk about each of them.
- Fix 1: Check for Updates
- Fix 2: Check for Malware
- Fix 3: Run DISM and SFC Scan
- Fix 4: Perform a Clean Boot
- Fix 5: Fix Overheating Issue
- Fix 6: Update Graphics Driver
- Fix 7: Check Crash Log
- Fix 8: Reset PC to Factory Settings
Fix 1: Check for Updates
Checking for updates in your Windows is a great step to take, as an outdated build version can sometimes cause compatibility issues. To avoid this, simply check for updates to ensure your Windows is running with the latest build version. This can help prevent incompatibility issues and keep your system running smoothly.
Step 1: Open Settings on your PC.
Step 2: Head into the Update & Security option.
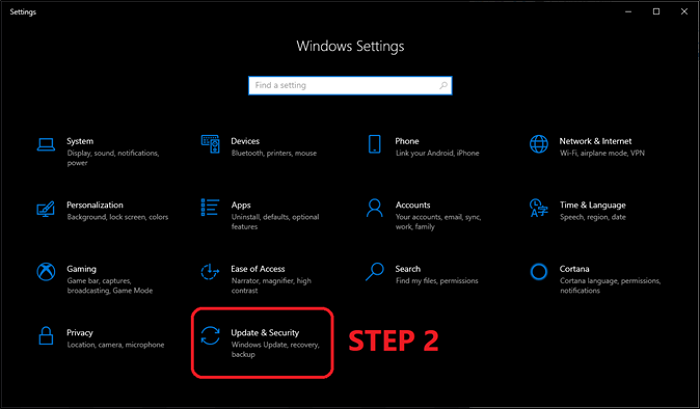
Step 3: Tap on the Windows Update tab in the sidebar.

Step 4: Let it check for updates.
Step 5: Download and install updates, if any are available.
The issue might be caused by outdated Windows, so checking for updates and installing any available ones could resolve the problem. However, if no updates are available, you can try other methods to fix the issue.
Fix 2: Check for Malware
To ensure your PC is secure, the next step is to check for malware. Since there isn't a lot of trusted software, using Windows Defender, Windows' own tool, is the best option to detect and remove any computer viruses or malware from your PC.
So, here's what you'll do to check for malware:
Step 1: Open the System Tray.
Step 2: Right-click on the Windows Defender icon.

Step 3: Tap Run a quick scan from the menu.
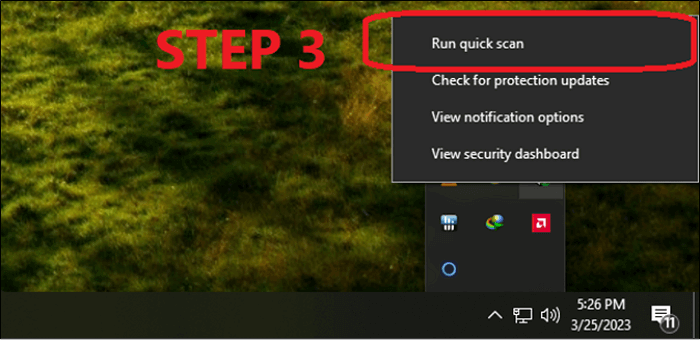
Step 4: Let it scan your PC.
Once the scan is over, restart your computer to complete the quick scan. If the restart is prevented, it's likely that Windows Defender is still scanning. After the restart, your Windows will be free of malware, and you can check if the problem persists. If it does, try the next fix.
Fix 3: Run DISM and SFC Scan
To fix Windows 11 keeps crashing, you can try running a DISM and SFC scan. These scans check for corrupted or missing system files, which may be causing the issue. To run an SFC scan, open Command Prompt as an administrator, type "sfc /scannow", and press Enter. This will scan and replace any corrupted system files.
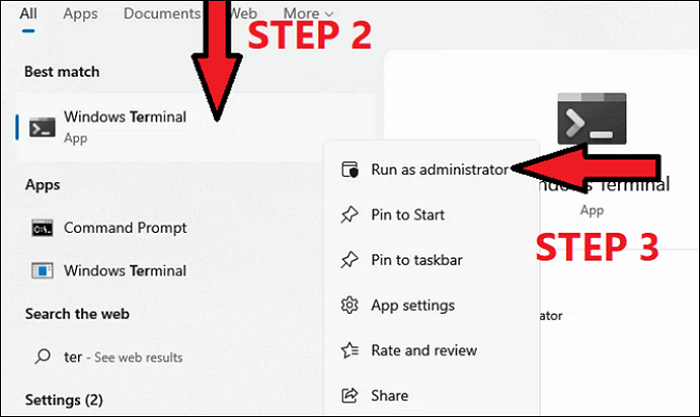
Step 1: Head into Start Menu.
Step 2: Type CMD/Windows Terminal.
Step 3: Launch Windows Terminal as administrator.
Step 4: Once CMD launches, enter the following command:
"SFC /Scannow"
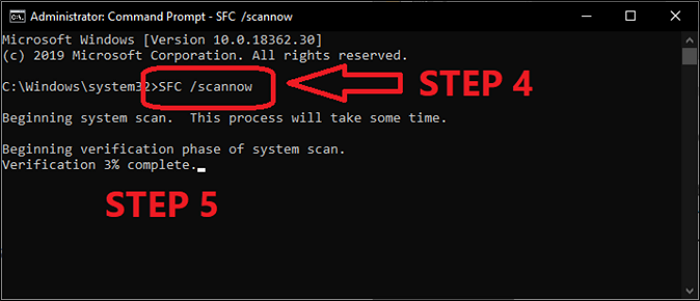
Step 5: Then hit enter and wait for the scan to finish.
If you find missing files on your PC, try running an SFC scan to check for any issues. If the SFC scan doesn't find any missing files, you can try using the DISM method, which involves following a series of steps to troubleshoot the problem.
Step 1: Run CMD/Windows Terminal as administrator.
Step 2: Then type the following command:
"DISM /Online /Cleanup-Image /CheckHealth"
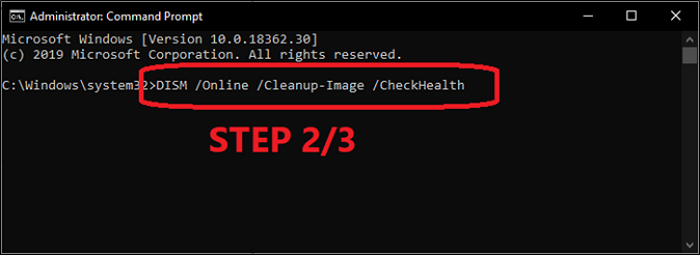
Step 3: Press Enter and wait for it to finish.
Step 4: Close CMD if no violations are found.
Step 5: Type the following commands if violations are found:
"DISM/Online/Cleanup-Image/RestoreHealth"
Step 6: Wait for it to restore your files.
After running the DISM and SFC scannow commands, you can also check the system files and then scan for memory-related errors using the memory diagnostic tool. To do this, click the run dialogue, type MDSched.exe, and hit enter, which will restart your computer and scan for memory errors.
Fix 4: Perform a Clean Boot
A clean boot is achieved by turning off all unnecessary apps and services, allowing the system to start with the bare minimum. To do this, you'll need to modify settings in System Configuration and Task Manager.
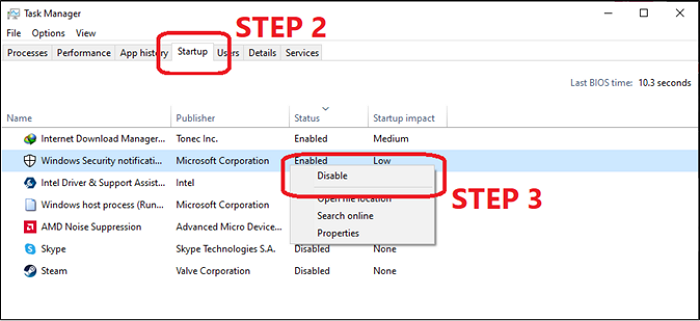
Step 1: Open Task Manager.
Step 2: Head into the Startup tab.
Step 3: Turn off/Disable all the apps one after the other.
Step 4: Now head into the Run command by pressing Windows + R on your keyboard. This will open a small window where you can type in a command to run a program or open a file.
Step 5: Type MSConfig and hit enter.

Step 6: In MSConfig, switch to Services Tab.
Step 7: Tap Hide all Microsoft services.
Step 8: Tap the Disable All button.
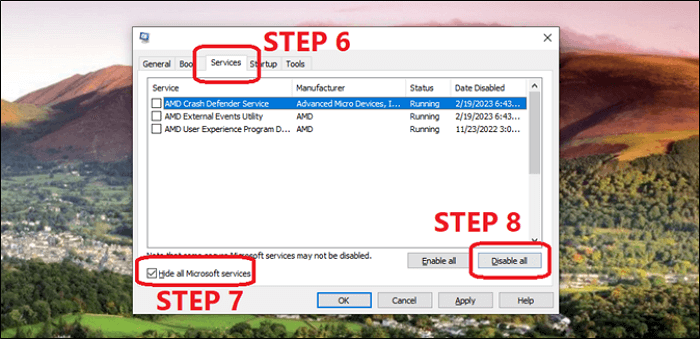
Step 9: Press Apply, then OK.
Step 10: Restart your PC.
If a newly installed software, driver, or service is causing the issue, disabling all recently installed items may resolve the problem. Once the issue is resolved, you can re-enable each service or software one by one to identify the culprit. This process can be repeated until the problematic item is found and removed or uninstalled.
Fix 5: Fix Overheating Issue
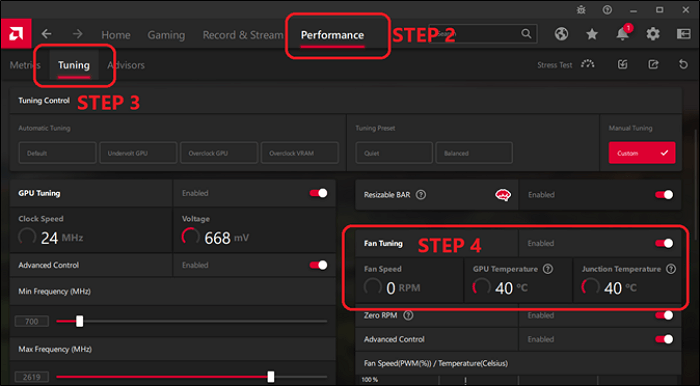
To troubleshoot your Windows 11 PC that keeps crashing due to overheating, you can use various tools to monitor the temperature and usage of your PC. If you're using an AMD GPU, you can check the temperature using the AMD Radeon Software, which can be accessed by right-clicking on the desktop, selecting "AMD Radeon Software," and then clicking on the "GPU" tab. This shows you the current temperature and usage of your GPU. You can also use other tools like GPU-Z, HWMonitor, or AIDA64 to monitor your PC's temperature and usage. Additionally, you can check your PC's cooling system, such as the CPU cooler or the case fans, to ensure they are working properly.
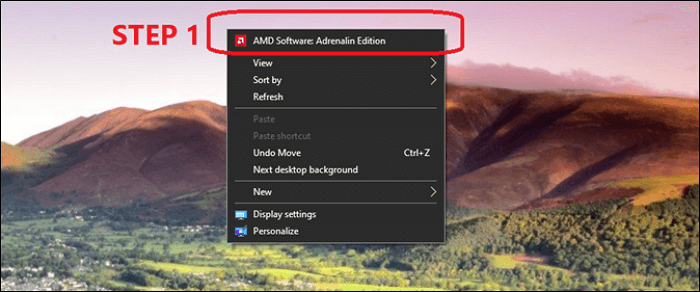
Step 1: Right-click on your Desktop and head into AMD Software.
Step 2: Inside AMD software, head into Performance.
Step 3: Then switch to Tuning.
Step 4: Finally, check the GPU temperatures under the Fan Tuning option.
You can try using similar tools for NVIDIA GPUs and Intel and AMD CPUs, such as:
- HWiNFO64
- Hardware Monitor
- GPU-Z
- NVIDIA Control Panel
Once you try these tools and if your system temps are above the charts, then you can try a few things, such as:
- Clean the dust off your PC with an air blower;
- Remove the carbon from RAM/CPU/GPU connectors with a rubber eraser;
- Replace the thermal paste on your CPU/GPU;
- Replace the thermal pads on your NVME heatsinks
- Apply thermal pads to your CPU and GPU heatsinks to improve heat dissipation and reduce temperatures. Replace the thermal pads on your CPU and GPU heatsinks with new ones to ensure optimal performance and prolong the lifespan of your components. Additionally, check the thermal pads on your chipset, motherboard, and other components to ensure they are in good condition and functioning properly. If they are old or damaged, replace them with new ones to prevent overheating and potential damage to your system.
Once you've tried all the above steps, check the temperatures of your CPU, GPU, and VRMs again. If all temperatures are within normal ranges, it's unlikely that there's a hardware issue.
Fix 6: Update Graphics Driver
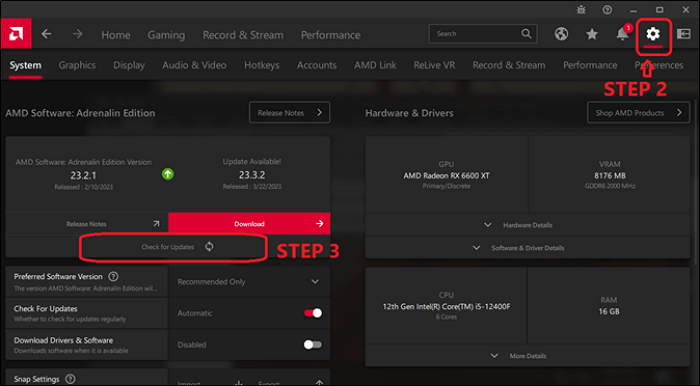
To resolve the issue, check for driver updates, especially if you're using an AMD GPU. You can try updating your driver through the AMD Adrenalin software, and visit the manufacturer's website (NVIDIA or Intel) to install the latest drivers if you're not using AMD.
But here's how AMD users can update their graphics driver:
Step 1: To access the AMD software, right-click on your desktop or open the AMD software through the system tray.

Step 2: Inside AMD Software, tap on the Settings cogwheel.
Step 3: Then find and click on the Check for Updates option.
Step 4: Then click on Download once the driver update pops up.
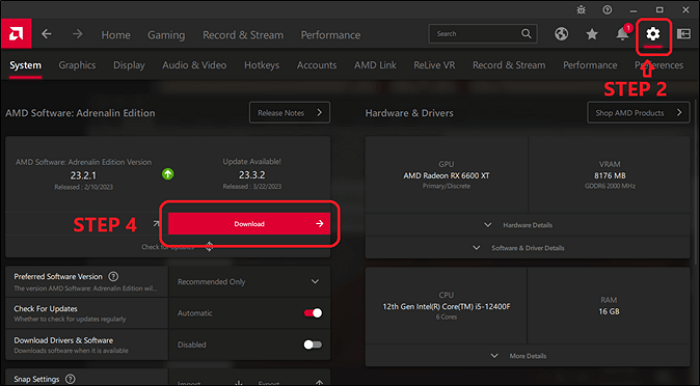
Step 5: Wait for it to download and install.
Step 6: Restart your computer.
You can update your AMD graphics device driver in a few minutes through the settings, then check the updated driver version. If you have Intel or NVIDIA graphics, download drivers from their website and update them through the executable file or the device manager on your Windows 11 PC.
Fix 7: Check Crash Log
The next step is to check the System Crash Log. This requires you to check the crash log to pinpoint what is causing your Windows 11 PC to crash. Whether it's an installed ram or an outdated driver, this method will help you know the issue. Here's how:
Step 1: Head into Control Panel.
Step 2: Find the System and Security.
Step 3: Click on Security and Maintenance.
Step 4: Check the Reliability Monitor.
Step 5: Check Critical Events.
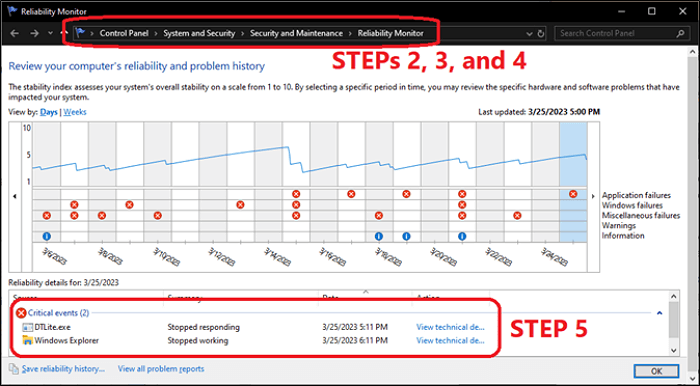
Step 6: Analyze what's causing the issue.
Uninstalling DTLite.exe might resolve the issue with the crashing software/program, as it is identified as one of the tools causing the problem.
Fix 8: Reset PC to Factory Settings
To reset your PC to factory settings, first back up all your data on the C drive and any drivers or software you want to keep, as this process will erase them. This will ensure you don't lose any important files or programs. Once you've backed up everything, you can proceed with the reset process.
Step 1: Head into System Settings.
Step 2: Find the Recovery tab in the sidebar and click on it.
Step 3: Tap on Get Started under Reset this PC.
Step 4: Select the Keep my files.
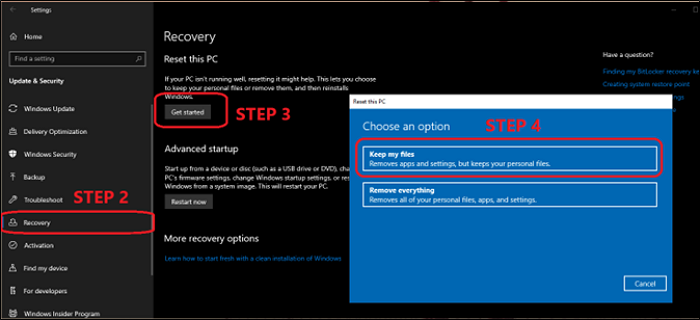
Step 5: Wait for your PC to restart and reset.
In that case, you can try resetting your Windows 11 PC to resolve the issue. This process will erase all data and settings, so make sure to back up any important files and information before proceeding. The reset process typically takes around 30 minutes to complete.
Bonus Tip: How to Backup Windows 11 PC to Prevent Data Loss
To prevent data loss, we'll focus on using Qiling Disk Master, a method that prioritizes data security. This approach ensures that your data is protected, unlike other methods that put it at risk. By utilizing Qiling Disk Master, you can safeguard your data and avoid potential losses.
Qiling Disk Master Pro is a backup software that allows users to create full, incremental, and differential backups of their entire computer, helping to prevent data loss, and also compresses backups to save storage space.
Here are the reasons to use Qiling Disk Master as your primary data backup software in one paragraph:
- It has a one-click backup option and easy recovery
- It allows you to install Windows on a hard drive for another computer.
- It offers 250GB of free cloud storage and a Security Zone to protect data.
- It allows you to clone a hard drive
- It can help you create an iso image of your operating system, which can be useful for backing up your system or creating a portable version of your OS.
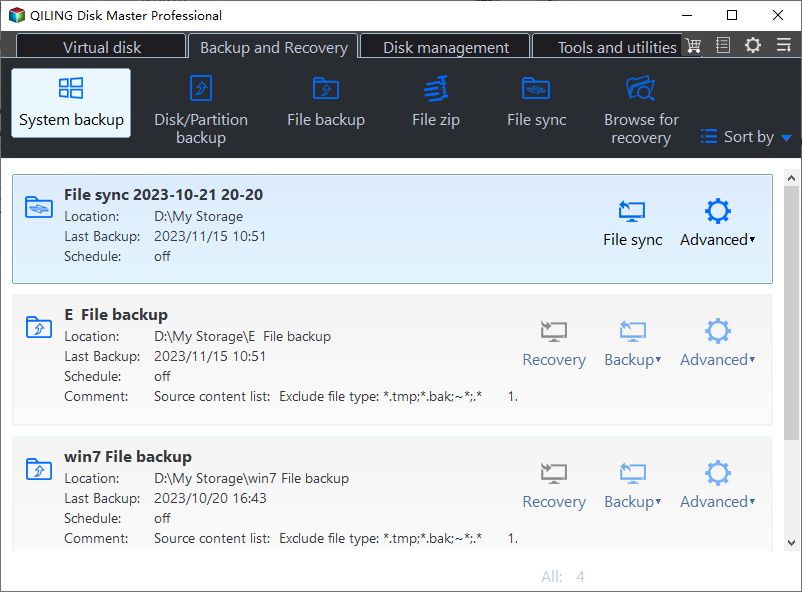
Here's how you can create a backup of your Windows 11 using the built-in tool:
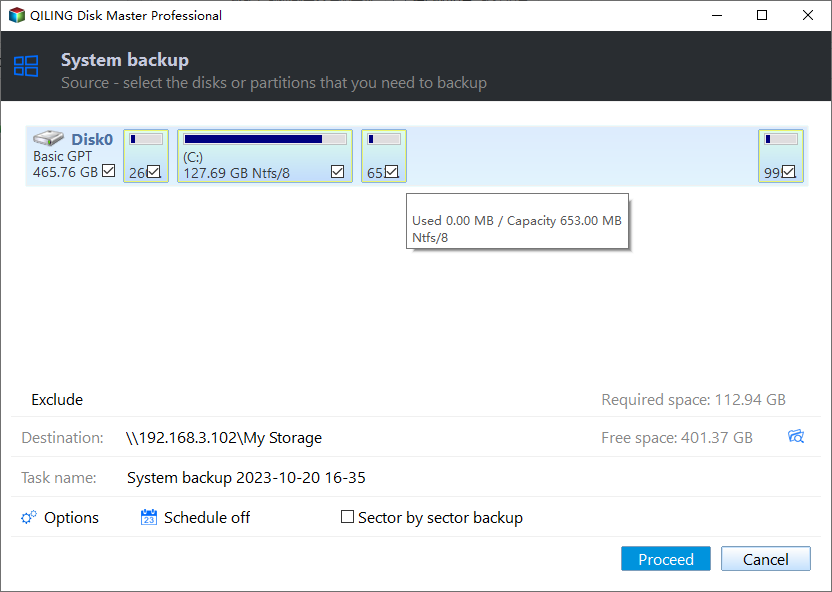
Step 1. On the main page, click "Select backup contents".

Step 2. Among the four available categories, click System backup.
Step 3. Qiling Disk Master will automatically select your system partition, requiring only the selection of the backup destination.

Step 4. You can save the backup file to either your local drive or a Network-Attached Storage (NAS) device.
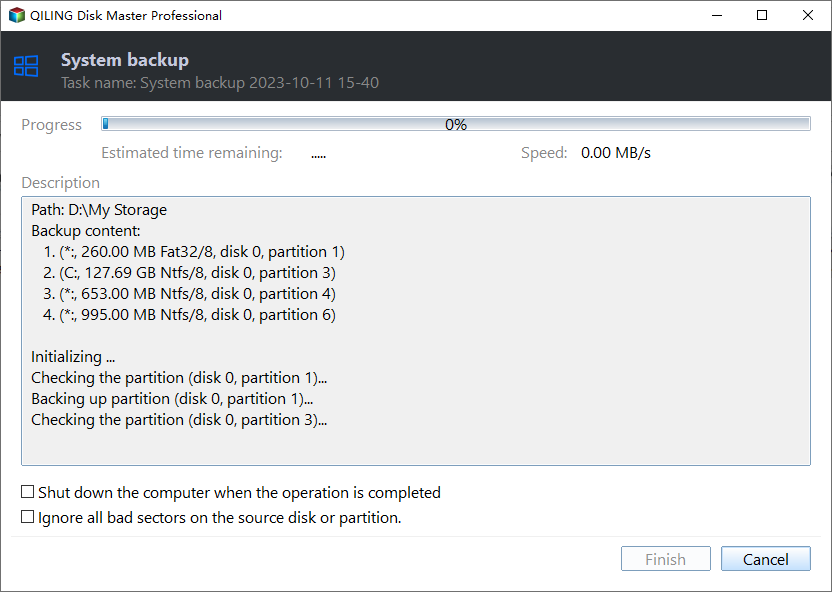
Step 5. After completing the backup process, you can check the backup status, recover, open, or delete the backup by right-clicking the backup task on the left.
To Wrap Things Up
To prevent Windows 11 from crashing, try the following eight fixes. Start by updating Windows, disabling any recently installed software, and running a System File Checker (SFC) scan. If the issue persists, run a DISM scan, disable any unnecessary startup programs, and check for malware. If none of these solutions work, consider resetting Windows 11, updating your drivers, or seeking professional help.
Before attempting any fixes, ensure you back up your important data using Qiling Disk Master to prevent data loss during the computer crashes.
FAQs on Windows 11 Keeps Crashing
1: Is it bad if your PC keeps crashing?
Repeatedly crashing your PC can cause hardware damage due to the constant power cycling, which can lead to irreparable harm to your computer components.
2: Why does Windows 11 have a blue screen error?
Blue screen or BSOD errors are typically linked to hardware issues like RAM, HDD, or graphics drivers, but can also be caused by unsupported apps, drivers, or services.
3: How do I know if my CPU needs replacing?
If your CPU is overheating and struggling with modern games or software, it might be outdated. However, if your CPU is still from the last 2-3 generations, it's probably still sufficient for your needs.
Related Articles
- Dish Hopper External Hard Drive Format: What Is the Best & How to Set [Ultimate Guide]
- How to Restore Backup From Google Drive to Every Device You Want
- How to Upload Files to Google Drive Automatically
- How to Fix Samsung SSD Slow Write Speed on Windows 10/8/7 [Step-by-Step Guides]
- Best 8 Windows Temperature Monitor Software Free Download
Find the best Windows temperature monitor tools to check CPU, GPU, and hard drive temperatures. Learn how to monitor PC heat and prevent overheating. - 6 Proven Ways to Fix Windows Update Download Error 0x80248007
Fix Windows Update download error 0x80248007. Reset update components, check services, and repair Windows update files.