How to Use Git Delete File [Full Tutorial for Git]
Delete File on Git Overview
Git, created in 2005, is widely used by developers for source code management. It effectively handles small and large files, enabling multiple developers to work on non-linear projects. Users often search for alternative methods to delete a file on Git.
The Git delete file feature can be used in three main methods: using the `git rm` command, deleting a file from the repository and then committing the changes, or using the `git rm` command with the `--cached` option. Additionally, when using GitHub, you can delete a file by going to the repository, clicking on the "Code" tab, selecting the file to delete, and clicking the "Delete" button. If you accidentally delete a file or folder, you can recover it by using the `git restore` command to restore the file from the last commit, or by checking the Git log to see if the file was deleted and restoring it from a previous commit.
How to Delete File on Git [Full Information]
After having a brief overview of Git, readers can understand the need to delete files on the platform. Whether it's due to running out of space or wanting to do some housekeeping, deleting files on Git is a detailed but simple process. Methods like using the "git rm command", deleting files recursively, and removing files from Git history can be employed to achieve this.
How to Delete Files Using git rm Command
The "git rm" command is used to remove files from a Git repository, allowing developers to get rid of unwanted files. This command can be used to remove either individual files or multiple files at once. It takes a safety precaution to prevent the removal of in-progress changes, detecting discrepancies between the "HEAD" version of a file and its working tree or staging index version to block removal.
To delete Git files using the "git rm" command, start by navigating to the repository where the files to be deleted reside. Next, use the "git rm" command followed by the file name(s) you want to delete, and confirm the deletion by typing 'y' when prompted.
Step 1. Use the "git is-tree" command to check the files tracked on the current system branch. The command is $ git is-tree –r master.

Step 2. To delete a file named "file1" from a Git repository and the filesystem, use the command "$ git rm file1" or "Rm 'file1'".
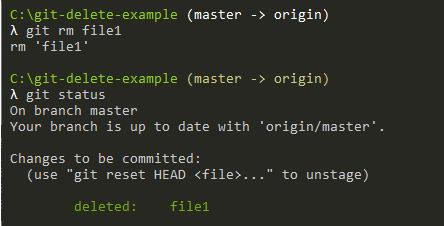
Step 3. The "rm" command is executed on the file, and a confirmation message is displayed, indicating that the file has been successfully removed.
Step 4. The file is deleted from the file system, but its entry remains in the index, making it unavailable for use.
Step 5. To complete the process, commit the changes made to the code and push them to the remote repository. This will update the online version of the project with the new modifications.
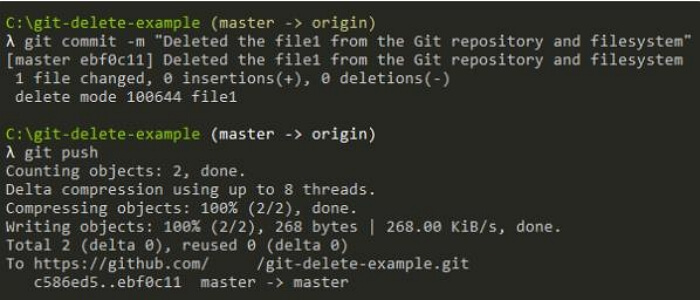
Step 6. To confirm the file deletion from the filesystem and the index, you can simply execute the "git ls-tree" command. This command will show you the file deletion by displaying a message indicating that the file is not present in the repository.

How to Delete Files Recursively on Git
The "git rm" command can be used to delete single or multiple files from a Git repository. For recursive deletion, use the "git rm" command with the "-r" option. This allows for the deletion of files and subdirectories, making it a useful tool for maintaining a clean and organized repository.
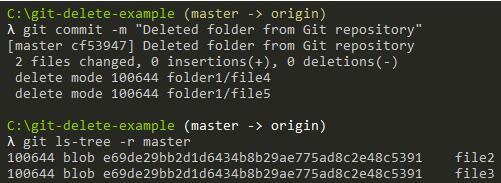
Step 1. To delete files recursively on Git, use the command `$ git rm –r`, followed by a commit with a message like "Deleted the folder from the repository" using `$ git commit –m "..
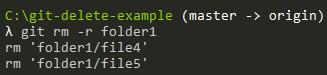
Step 2. You can use the command `rm -r folder1` to delete the folder "folder1" and all its contents from the current directory. This command will recursively remove the folder and everything inside it.
Step 3. To delete a folder and its contents from your Git repository, start using the "git rm" command with the "-r" option. The command for the same is $ git rm –r folder1.
Step 4. The changes made can be quickly committed using the following method.
How to Remove File from Git History
After going through the process of deleting files from Git recursively, many users may look to obliterate the files from Git history. Some of the reasons for the same include getting rid of sensitive information files, files having specific passwords, etc. We'll use the "git filter-branch" command and specify the command for all Git history branches. After this command is executed, it is necessary to specify the revision to execute changes from "HEAD", which is the last commit of the Git repository. The quick steps for the same are:
Step 1. The Git command used to execute the "git rm" command is $ git filter-branch - - force - - index-filter - - prune-empty "git rm - - cached - - ignore-unmatch " HEAD.
The different parts of this command are
- -force: The script forces the filter-branch to start without consent and makes temporary directories available in the document.
- -index-filter: It is used to rewrite the index and offer what is required in file deletion cases.
- "git rm" command: The command removes a file from the repository, ignoring files that don't match, and can be executed on different commits, revisions, or branches in the history.
- -prune-empty: It removes empty commits from repositories with no files, doing so right away.
Step 2. To delete "file1" from the repository, run the command: $ git filter-branch -f - - prune-empty - - index-filter "git rm -r - - cached - - ignore-unmatch ./file1" HEAD.
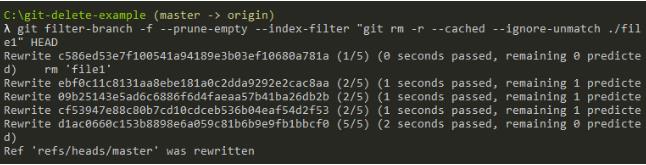
Step 3. The deletion of a commit can be confirmed with the "git log" command, which may also prune unnecessary commits.
How to Use GitHub Delete File
Developers seeking to free up space for big projects may turn to GitHub, but the confusion between Git and GitHub is common. To clarify, Git is a version control system used for managing changes in code, while GitHub is a web-based platform that hosts Git repositories, allowing developers to collaborate and share their code. Understanding this distinction can help developers effectively use GitHub to manage their projects.
Git and GitHub serve different purposes. Git is a local version control system installed on a user's computer, whereas GitHub is a cloud-based platform that hosts and manages repositories globally. While Git operates on a branching model, allowing users to work on different versions of code, GitHub facilitates data transmission, including revisions, edits, and other features, making it a powerful tool for collaboration and version control.
Git is a simple version control system that helps developers track and manage their source code history, while GitHub is a cloud-based hosting service that manages Git repositories. One key feature of GitHub is its ability to delete files, making it a useful tool for developers.
GitHub allows for easy deletion of files or entire directories in a few simple steps. However, modifications may be required depending on the file type.
- If you don't have permission to delete a file, GitHub can assist by sending a pull request to the original repository after you commit the change, allowing others to review and approve the deletion.
- If you're deleting a file with sensitive data, it won't be fully removed from the Git history until you delete it from the repository as well. This means the file will still be accessible through the Git history. To complete the deletion, you'll need to remove the file from the repository.
Here are the steps to delete a file from GitHub in one paragraph:
Step 1. Search the file in the GitHub you want to delete.
Step 2. Click on the top of the file and click the delete icon.
Step 3. "Update file to include changes from multiple authors."

Step 4. To check the email address linked to a GitHub account, simply look for the verified email addresses in the drop-down menu.

Step 5. Before pulling the request, you need to decide whether to add the commit to the new branch or the current branch. This decision will determine the next steps in the process.

Step 6. Click on the "Propose file change" option.

Recover Files and Folders Accidently Deleted by Git
Deleting files from Git or Github can be done through various methods, but accidents can happen, and important files or folders may be deleted. Fortunately, recovering these accidentally deleted files is relatively easy with Git. In cases where files are lost due to deleting with PowerShell or CMD, a tool like Deep Data Recovery can be a valuable resource for quick recovery.
Deep Data Recovery is a powerful tool that allows unlimited data recovery from various devices, including PCs, USB drives, SD cards, cameras, and more. It supports over 2,000 devices and 1,000 file formats, making it a versatile solution for recovering deleted files on flash drives or hard drives. Additionally, it can recover data not only from local PCs but also from network-attached storage (NAS) devices, making it a reliable option for retrieving lost data.
The process of recovering deleted files in Git is straightforward. It involves scanning internal and external storage to preview recovered files, and a single-click restore option allows for quick data recovery on your system.
Step 1. Launch Deep Data Recovery on your Windows computer. Select the file types you want to recover and click "Next" to begin the recovery process.

Step 2. To proceed, select the specific file location you want to scan and then click the "Scan" button.

Step 3. After the recovery process, select the "Deleted Files" and "Other Lost Files" folders in the left panel. You can then apply the "Filter" feature or click the "Search files or folders" button to locate the deleted files.

Step 4. After clicking the "Recover" button, save the restored files in a new location, ensuring the file names and paths are distinct from the original ones. This helps avoid any potential conflicts or overwriting of the original files.
Summary
Git allows for easy file deletion using commands like "git rm", which can delete files recursively, making it a powerful tool for source code management. In contrast, GitHub is a cloud-based repository service that also makes it easy to delete files, but its primary function is to host and manage repositories, not delete files.
Users can follow detailed steps to delete files on GitHub, understanding the distinction between Git and GitHub, and utilize tools like Deep Data Recovery for quick recovery in case of issues.
Delete File with Powershell FAQs
If you have questions about deleting files on Git or removing files from a Git repository, we've got you covered! We've compiled a list of frequently asked questions to help you find the answers without having to search elsewhere. Some of the questions include:
What is the Git command to delete a file?
The "git rm" command in Git is used to remove individual or collections of files. It can be used with or without the --cached option, which allows for the removal of files from the staging area without deleting them from the working directory. The command can also be used with the --ignore-missing option to ignore files that are not present in the working directory, and with the --force option to override any potential conflicts.
- To remove files from the staging index and the working directory, use the `git rm` command. This command removes a file from both the staging index and the working directory.
- To remove tracked files from the Git index.
How do I remove a file from a Git remote repository?
To remove a file from a Git remote repository, one of the easiest methods is to use the "git rm" command. This allows users to quickly select the file name for deletion and remove it from the entire filesystem in one step.
How do I delete files in Git but not locally?
To delete a file from a Git repository without removing it from your local machine, use the command "git rm –cached". This command removes the file from the repository's index, keeping the local file untouched. It's a cached version of the more commonly used "git rm" command.
What does git rm cached do?
The "git rm –cached" command removes a file from the staging area, but keeps a copy in the working directory, essentially deleting it from the index tracking of the Git project.
Related Articles
- Windows 7 Registry Backup Location [All You Need to Know]
- Fixed: Windows 10 Will Not Update with Error Code 0x80240fff
- Invalid Value for Registry JPG/JPEG/PNG Files on Windows 10? Fix it Now!
- How to Solve Hard Disk Error 303 and 305
- Fixes for Adobe Photoshop Has Stopped Working Without Losing Files
Received 'Adobe Photoshop has stopped working' error message? Cannot restore lost PSD files when Photoshop 2017 fails to work? Relax! Follow offered methods here to fix 'Adobe Photoshop 2017 has stopped working' error without losing PSD files. - 6 Ways to Fix C Drive Keeps Filling Up for No Reason
Does c drive keep filling up for no reason? You are going to learn six practical ways to fix C drive getting full automatically in Windows 7/8/8.1/10.