How to Make Mac Dark Mode [for macOS Ventura/Monterey/Big Sur]
Mac's Dark Mode is a theme mode that darkens the operation interface for users.
Many users prefer to switch to Dark Mode on their Mac devices when working or in low-light environments. This is because Dark Mode makes it easier to focus on content, as it stands out more against the darker background. Additionally, using Dark Mode at night can also help protect and ease eye strain.
To enable Mac Dark Mode, go to System Settings, and select the "Display" option. From there, you can toggle the "Use Dark Mode" switch to the "On" position. Alternatively, you can call Siri to say "Turn on Dark Mode" or "Turn off Dark Mode" to quickly switch between the two modes.
Before our written tutorial, you can also refer to an official video from Apple Support that guides you through switching to Dark Mode on your Mac. There are five important nodes to note.
- 00:00 Dark Mode overview
- 00:16 Open the System Settings
- 00:30 Click the light or dark
- 00:52 Dark Mode example
- 01:07 Switch the Dark Mode to Light Mode
How to Enable Mac Dark Mode on macOS Ventura/Monterey/Big Sur
To enable Dark Mode on your Mac, you can follow one of three methods: use the System Preferences, use the Apple menu, or use the Command + Shift + A keyboard shortcut. This will change the theme mode to Dark Mode, giving your Mac a darker and more modern look.
Enable Mac Dark Mode in System Settings
Most Mac users will change the settings in System Preferences. The Dark Mode option is enabled on macOS Ventura, Monterey, and High Sierra to OS X Yosemite.
Keep reading and check the detailed steps:
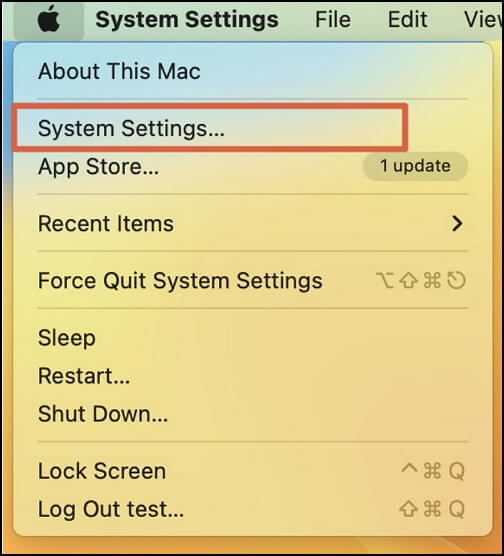
Step 1. Click the Apple menu and choose "System Settings".
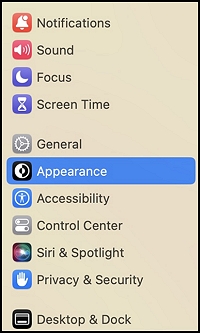
Step 2. Click "Appearance".
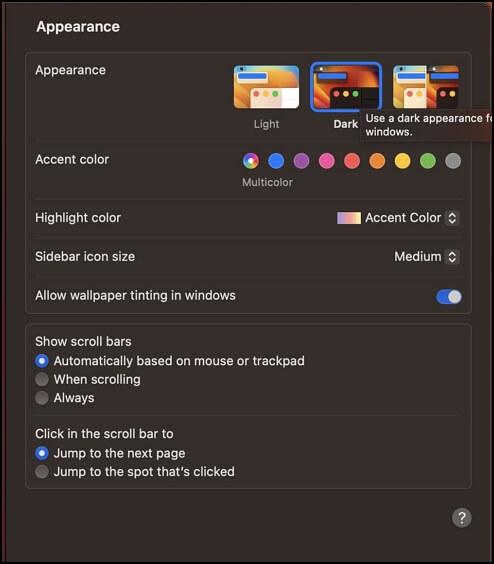
Step 3. You can change the appearance and choose "Dark".
Turn on Mac Dark Mode with Siri
The fastest way to turn on Mac Dark Mode is to use Siri, a virtual assistant for Apple devices that can recognize your order, change settings, set an alarm, search for information, or open Apps without any taps.
You need two steps to turn on Mac Dark Mode with Siri.
Step 1. Hold the key with a microphone icon until Siri shows up.
Step 2. Say "Turn on Dark Mode" to Siri.
Make Mac Dark Mode in Control Center
On macOS Big Sur and later versions, you can switch between Dark Mode and Light Mode using the Control Center, making it easy to toggle between the two modes.
To make Mac Dark Mode in Control Center, you can follow these steps. First, click on the Apple logo in the top left corner of the screen and select System Preferences.
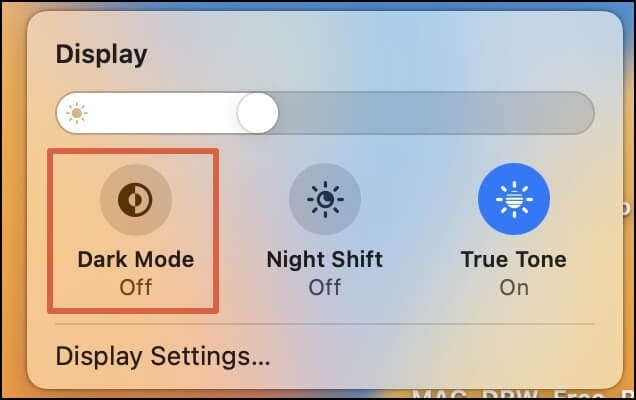
Step 1. Click the icon we framed in the Apple menu bar.
Step 2. Choose "Display".
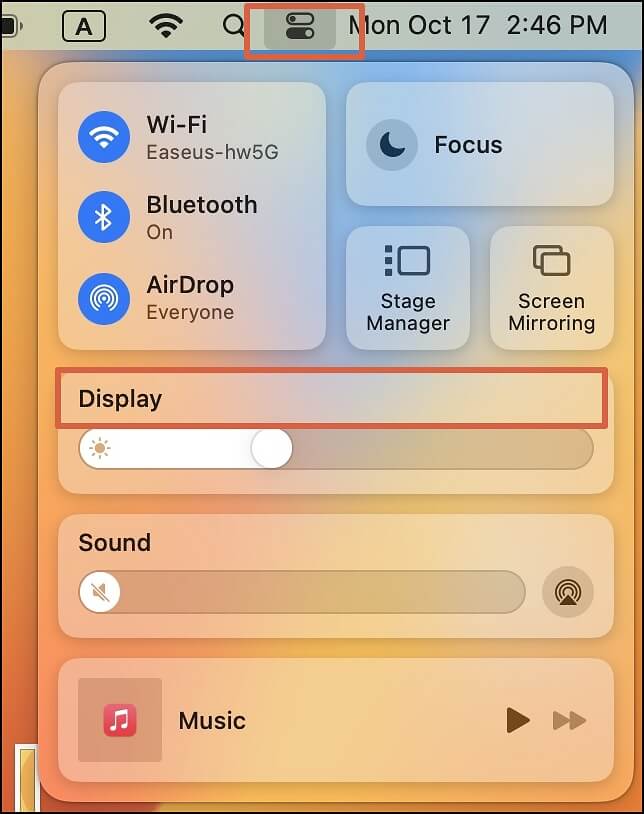
Step 3. To turn on Dark Mode, click on the "Dark Mode" button, and the feature will be activated instantly.
How to Turn on Mac Dark Mode or Light Mode in Apps
Some macOS Apps allow you to use different theme modes from your Mac, and we'll show you how to switch between Light Mode and Dark Mode in Apps like Maps, Mail, Safari, Notes, and TextEdit.
- Maps: To use the Light Mode in Maps while your Mac is applying Dark Mode, open Maps, go to Preferences and select "Always use light map appearance".
- Mail: To use a light background in Mail on Mac, deselect "Use dark backgrounds for messages" in Mail's Preferences.
- Safari: To visit a website that doesn't support Dark Mode, you can use Safari Reader to read the content in Dark Mode.
- Notes: To use a light background in Notes while your Mac is set to Dark Mode, go to Notes' Preferences and deselect the option for "Use dark backgrounds for note content".
- TextEdit: When Mac's Dark Mode is enabled, you can switch to Light Mode in TextEdit by disabling the "Use Dark Background for Windows" option.
If you've accidentally cleared the cache or deleted important files on your Mac while adjusting the Dark Mode in apps, a data recovery tool can help you recover the deleted files.
Deep Data Recovery for Mac is a tool that can help recover lost data caused by various issues, such as accidental deletion, virus attacks, system crashes, or physical damage. It can assist users who need to recover deleted messages, photos, or documents on their Mac.
2
How to Turn off Mac Dark Mode on macOS Ventura/Monterey/Big Sur
Turning off Mac Dark Mode on macOS is a straightforward process that's essentially the reverse of turning it on. You can accomplish this in three different ways.
To turn off Dark Mode on a Mac, you can go to System Settings, click on "Display" and toggle off Dark Mode, or click the Apple menu bar and choose "Display" to make the change. Alternatively, you can simply ask Siri to turn off Dark Mode by saying "Turn off Dark Mode" or "Turn on Light Mode".
If you've forgotten how to find the button, we suggest checking the video or the first part of the content for a refresher.
Make Mac Dark Mode FAQs
Here's a summary of how to make Mac Dark Mode in one paragraph:
How do I get Dark Mode on my Mac?
You can get Dark Mode on your Mac in three ways. You can turn it on in System Settings, click the Apple menu bar and choose "Display" to enable it, or simply ask Siri to "Turn on Dark Mode".
Is Dark Mode better for your eyes Mac?
When working in a low-light environment, the screen light can be overwhelming, but switching to Dark Mode can help ease eye strain and improve focus.
Why is dark mode so popular?
Many apps now offer a Dark Mode option, allowing users to switch to a darker interface that can help reduce eyestrain and improve focus. This can be especially helpful for users who spend extended periods of time on their devices.
Related Articles
- How to Reinstall Windows 10 Without CD (3 Ways)
- Computer Freezes When Playing Games in Windows 10
- How to Free Download Candy Crush Saga on PC/Android
- How to Check RAM Health with Windows Memory Diagnostic Tool [Full Guide in 2023]
- Seagate NAS Cloud Backup and Most Reliable Alternative Solutions
Learn about Seagate NAS cloud backup and practical alternatives. Compare NAS backup options for file storage, data protection, and remote access. - Complete Introduction to Searchindexer.exe
This article discusses searchindexer exe, why it is running, and how it affects your system performance. In addition, you will learn all you need to know if you decide to disable or trim it down for RAM or CPU conservation.