How to Check RAM Health with Windows Memory Diagnostic Tool [Full Guide in 2023]
RAM (Random Access Memory) is the computer's working memory that enables it to perform various functions by loading and processing programs and data. Faults in RAM can lead to issues like application crashes, system unresponsiveness, or Blue Screen of Death (BSOD).
To check the health of your system's RAM, you can use the Windows memory diagnostic tool, a built-in tool that can help identify any issues. This article will walk you through the tool's functionality, benefits, and step-by-step instructions on how to use it.
Overview of Windows Memory Diagnostic
It is a built-The Windows Memory Diagnostic tool is a utility available in all Windows versions after Windows 7 that allows users to check the health and identify issues with their RAM. Regardless of the Windows version on your device, you can access this tool and run a test to diagnose any potential problems with your RAM.
This tool is completely free and doesn't require registration. It's suitable for users with basic system knowledge and is helpful in identifying memory-related issues. It's a good option for resolving RAM problems.
How to Check RAM with Windows Memory Diagnostic?
Before using the tool to check RAM, save your files and be prepared for a quick restart. This is necessary to avoid data loss, as any unsaved changes will be irretrievable.
To analyze your RAM using Windows Memory Diagnostic tool, follow these steps: Firstly, insert your Windows installation media or ensure that your Windows 10/8/7 is updated. Then, open the Command Prompt as an administrator. After that, type the command "mdsched.
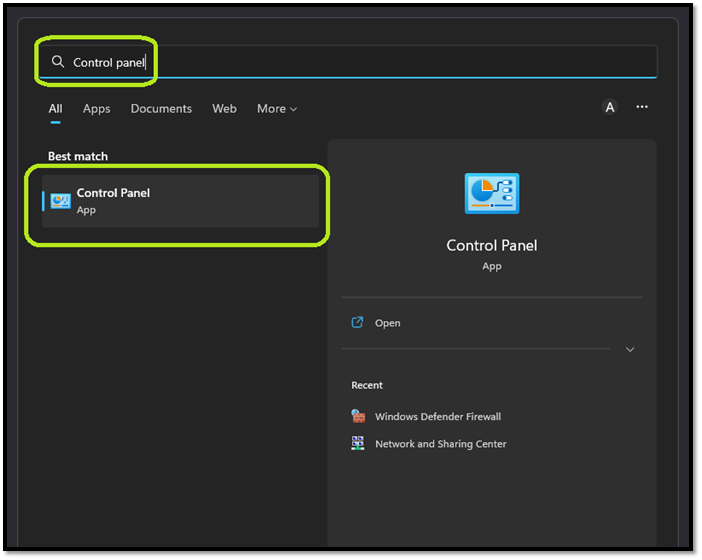
Step 1. To open the Control Panel of your system, click on the "Windows Icon" located at the bottom left corner of the screen. This will bring up a menu with various options, and selecting "Control Panel" from this menu will open the Control Panel window, where you can access various system settings and tools.
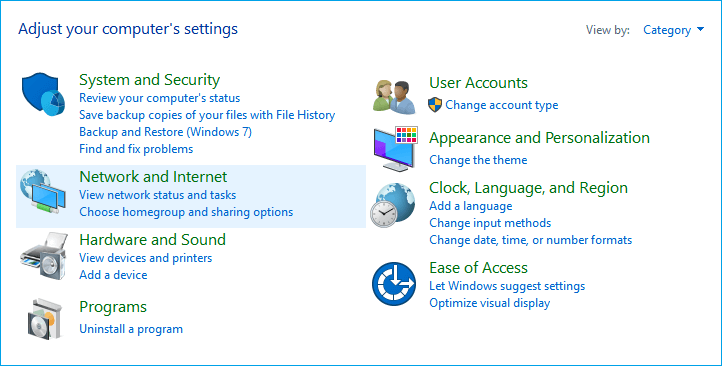
Step 2. Go to Settings, then tap on System and Security.
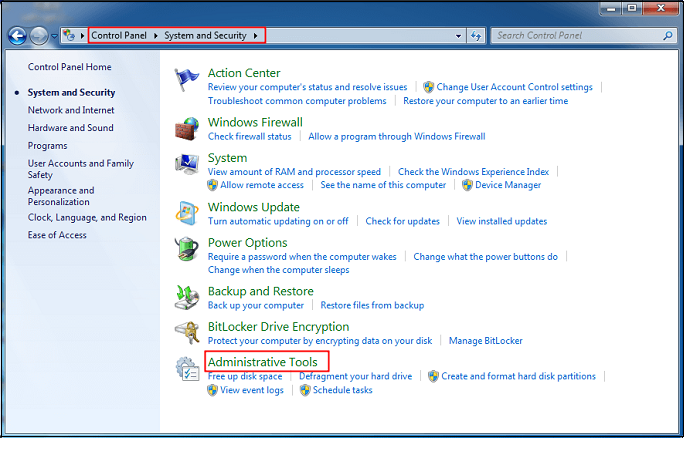
Step 3. To access the Administrative tool, look for it in the list of available tools on your device's window. It's usually found under a section labeled "System" or "Settings," and may also be accessible through a search function.
Step 4. Click on "Diagnose your computer's memory problems" just below that option to run a test that will help identify any potential memory issues with your computer.
Step 5. A small window will pop up with the option to restart the computer and check for any problems.
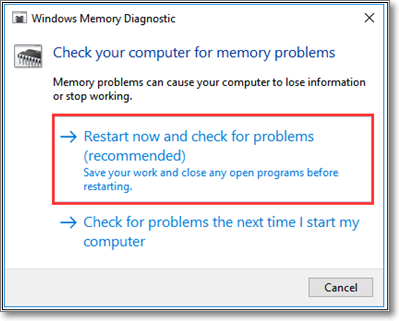
Step 6. Click on that option to restart the device
To run this test, simply reboot your device, which will automatically open it in the Windows memory diagnostic environment. The tool will then run a series of tests, including LRAND, CHCKR3, and others, simultaneously to analyze your device's RAM.
There are alternative methods to access the tool, which don't require extensive knowledge of the system's technical specifications. Using different keys, you can quickly open and run the test. I can also provide you with those methods.
Using Run Keys
Step 1. Press the Windows button and R simultaneously
Step 2. It will open a dialogue box
Step 3. Search for "mdsched" and tap on the "OK" button
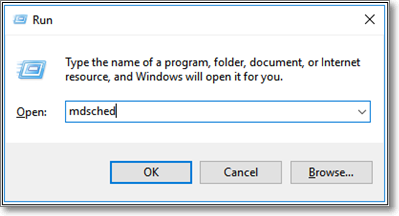
Step 4. Wait until you get the short window with "Restart now and check for problems"
Step 5. Click on that option to run this test
Using CMD Keys
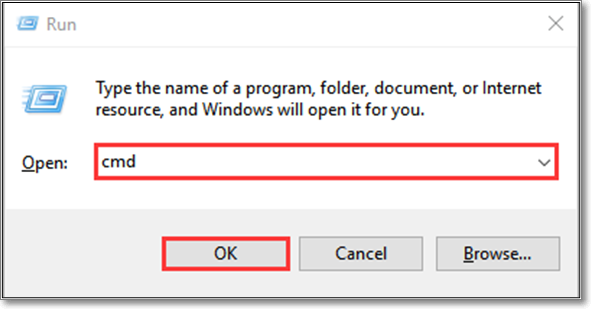
Step 1. Press Windows and R simultaneously
Step 2. To search for "cmd" in the box, type "cmd" in the search bar and click on the "OK" button. This will open the Command Prompt window.
Step 3. Type mdsched in the opened black window
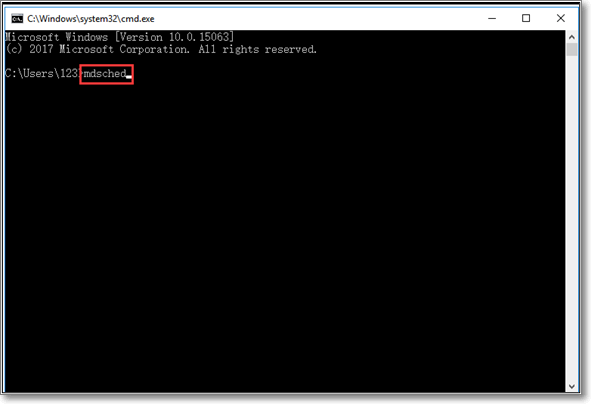
Step 4. Tap the "Enter" button available on your keyboard
Step 5. The Windows memory diagnostic test will start and complete in a few minutes, checking the system's memory for any issues.
How to Find Windows Memory Diagnostic Results?
Regardless of which method you used to run the test, the process to check the results will be the same, with no differences between them. You can choose any of the methods to run the tool and wait until your device restarts a few minutes after completion.
To check the results of the Windows memory diagnostic tool test, follow these steps:
Step 1. Go to the Windows search bar
Step 2. Type eventvwr.exe in the search bar
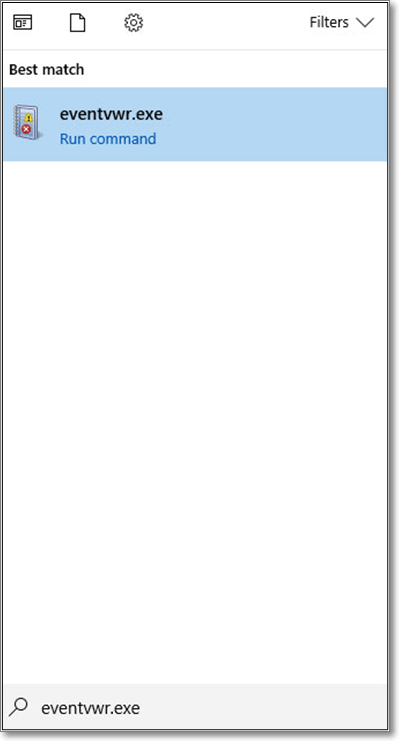
Step 3. Click on the first option shown on the screen
Step 4. The program will display a window with various options in the left vertical bar, allowing the user to navigate and select the desired functionality.
Step 5. Expand the "Windows Logs" folder by clicking on it
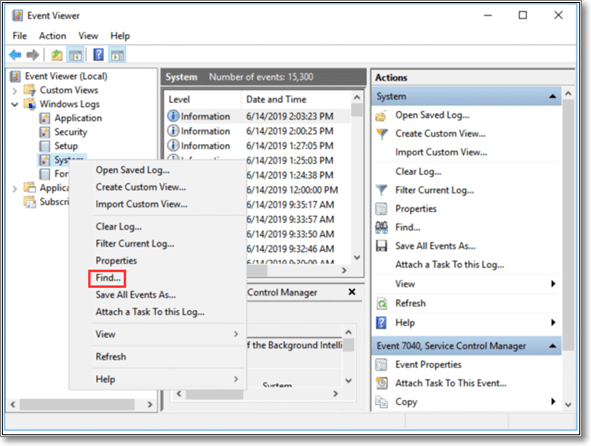
Step 6. To access the System option, right-click on it in the dropdown menu.
Step 7. Now, click on the "Find" option given there
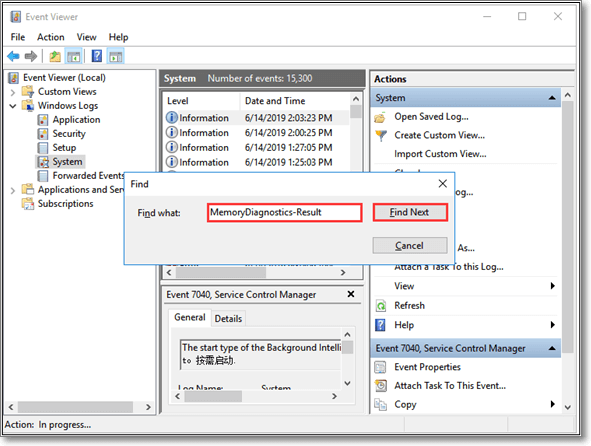
Step 8. Type MemoryDiagnostics-Results and tap on "Find Next"
Step 9. To view the results in the form of a message, simply double click on the file with the name that was provided. This will allow you to see the outcome of the process in a clear and concise format.
Bottom Line
This blog has provided a comprehensive guide on using the Windows memory diagnostic tool, including various methods to run the test and analyze the results, allowing users to effectively check their device's memory.
But it is recommended to follow the steps with the care mentioned above. The reason is a minor mistake in the inserted keys will run another test with which you may be unfamiliar.
Related Articles
- (4 Solutions) How to Fix Windows 7 Startup Repair Not Working
- Fix Invalid Partition Table Error in Windows 10/8/7
- Solved: Getting Files Ready for Installation Stuck at 0%, 1%, 10%, 100%
- How to Factory Reset Laptop without Password? [Everything You Should Know]
- How to Fix An Error Occurred While Installing the Selected Updates
On macOS Ventura, Monterey, or other versions, you might encounter the error 'An error occurred while installing the selected updates.' This can be caused by a lack of storage space on your Mac, which can be resolved by installing Deep Data Recovery for Mac to quickly free up space. - An Error Occurred While Processing Your Request [How to Fix]
The 'an error occurred while processing your request' issue can be resolved by understanding its cause and following the steps outlined in this article. If data loss occurs during the troubleshooting process, using Deep Data Recovery may be a helpful solution.