(4 Solutions) How to Fix Windows 7 Startup Repair Not Working
What Is Windows 7 Startup Repair
Windows Startup Repair is a built-in tool that helps fix issues preventing a computer from booting into the operating system, providing a solution to common problems.
Startup Repair is a tool that repairs Windows 7 by replacing damaged operating system files and automatically scans and fixes issues when the PC fails to boot properly, but it cannot detect or solve hardware failures or defend against computer virus attacks.
Why Does Windows 7 Startup Repair Fail
Startup Repair, a practical feature on Windows 7, may not work as expected, resulting in two common issues: the inability to automatically repair the computer and the feature getting stuck. Several factors can trigger this problem, making Windows 7 Startup Repair failure a common issue.
- Disk write errors.
- Corrupted BCD.
- Problematic update.
- Power outages
- Virus or malware attack.
Now that we know the potential causes of System Repair not working on your Windows 7 PC, it is time to discuss the troubleshooting methods, which include running the System File Checker, checking for malware, and booting in safe mode to isolate the problem.
4 Ways to Solve Windows 7 Startup Repair Not Working
If the Windows 7 Startup Repair fails, you can try four solutions to solve the issue. These methods may require a Windows 7 installation disk, which you can create if you don't have one. The solutions include using the installation disk to boot into the Windows Recovery Environment, running the System Restore tool to restore Windows to a previous point, using the System File Checker tool to scan and replace corrupted system files, and performing a System Restore to a previous point when Windows was working properly.
- Method 1. Run CHKDSK on Boot Volume
- Method 2. Run sfc/scannow Command
- Method 3. Run Bootrec Command to Rebuild Corrupted BCD
- Method 4. Disable Automatic Restart
Method 1. Run CHKDSK on Boot Volume
CHKDSK is a utility on Windows systems that scans hard drives for file system errors and repairs them, helping to resolve issues that may cause Windows 7 Startup Repair to fail due to bad sectors and file system errors on the hard drive.
Step 1. Insert the Windows 7 installation disc into your computer's CD/DVD drive, then restart your computer and enter the BIOS settings. Set the computer to boot from the CD/DVD drive first, then save the changes and exit the BIOS settings.
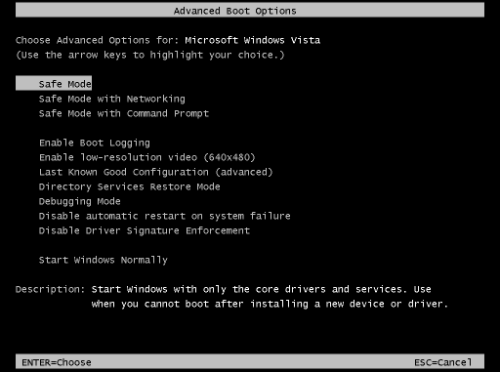
Step 2. To enter Safe Mode, press the "F8" key when your computer boots. This will allow you to access the system in a minimal environment, with only the most basic drivers and services running.
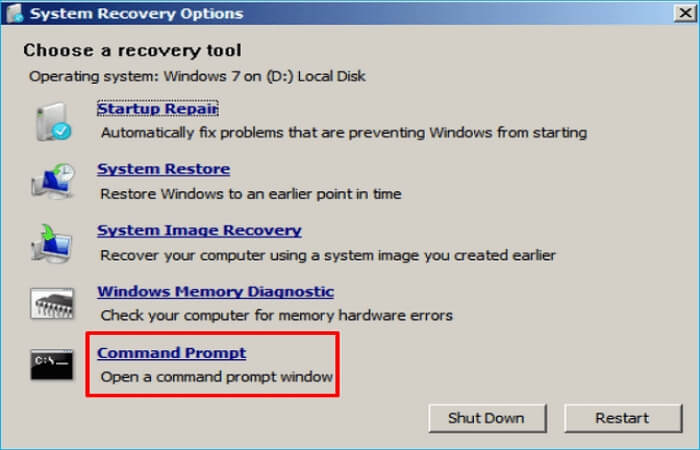
Step 3. Select "Repair Your Computer" among the advanced boot options.

Step 4. Select "Command Prompt" under the System Recovery Options menu.
Step 5. Input the following command and press "Enter" to check the hard drive for file system corruption.
chkdsk C: /f /r
("c" is the letter of your Windows installation drive)
Method 2. Run sfc/scannow Command
The SFC Scannow command can be used to check and fix corrupted system files, and it can be run without a Windows installation CD, only requiring a computer to be started in Safe Mode with Command Prompt.
Step 1. Restart your computer.
Step 2. Pressing the "F8" key will bring up the "Advanced Startup Options" screen, allowing you to access the boot menu and select a different operating system to boot into. However, this may not work on all systems, and you may need to consult your computer's manual or contact the manufacturer for specific instructions.
Step 3. Select "Safe Mode with Command Prompt".
Step 4. Type the following command when Command Prompt appears, and press "Enter".
sfc /scannow /offbootdir=d:\ /offwindir=d:\windows

Step 5. Restart your PC when the process is done.
Method 3. Run Bootrec Command to Rebuild Corrupted BCD
To use Bootrec, you need to create a recovery disk, which can be done by inserting the Windows installation media into the computer and following the on-screen instructions. Once the recovery disk is created, you can boot from it and access the Command Prompt. From there, you can run the Bootrec tool by typing "Bootrec" and following the prompts to select the appropriate option, such as repairing the MBR or BCD. Keep in mind that Bootrec requires a recovery disk to function, so make sure you have one created before attempting to use it.
Step 1. To install Windows 7, insert the installation disc into your computer's CD/DVD drive, and restart your computer. The computer will boot from the disc, and you will be taken through the installation process.
Step 2. Press the "F8" key when your computer boots to enter Safe Mode.
Step 3. Select "Repair your computer" among the advanced boot options.
Step 4. Select "Command Prompt" under the System Recovery Options menu.
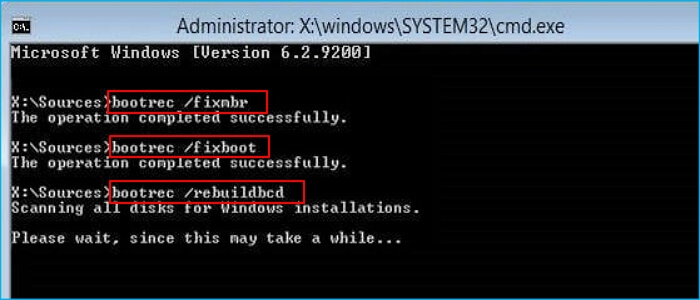
Step 5. Execute the commands below one by one and press "Enter".
bootrec /fixmbr
bootrec /fixboot
bootrec /rebuildbcd
Method 4. Disable Automatic Restart
To fix Windows 7 Startup Repair not working, try disabling automatic restart. This allows you to see the complete error message, which can aid in resolving the boot error. To do this, press the Windows key + R, type "msconfig," and press Enter. In the System Configuration window, go to the Boot tab, uncheck the box next to "No GUI Boot," and click OK.
Step 1. Restart your computer.
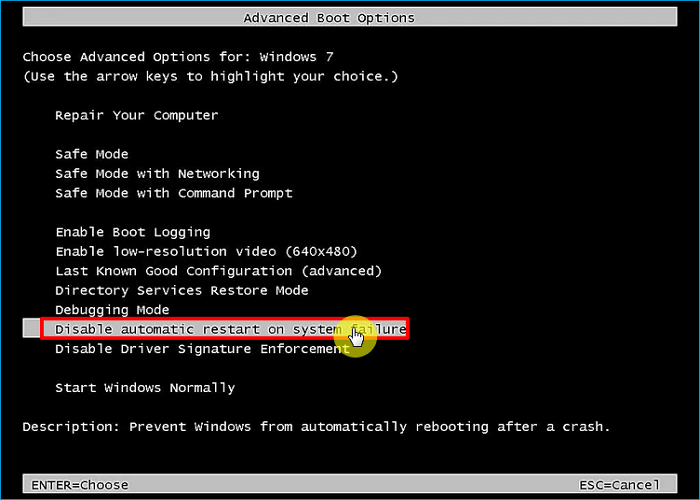
Step 2. Press the "F8" key until the Advanced Boot Options menu appears. This will allow you to access the boot menu and select the operating system you want to boot into.
Step 3. Select "Disable automatic restart on system failure". Then press "Enter".
Step 4. Wait for your computer to boot.
Step 5. Record the STOP Code from the Blue Screen of Death.

Note: 0x1A STOP (0x00000000, 0x00000001, 0x00000002, 0x00000003) (0x00000004, 0x00000005, 0x00000006, 0x00000007) (0x00000008, 0x00000009, 0x0000000A, 0x0000000B) (0x0000000C, 0x0000000D, 0x0000000E, 0x0000000F) STOP (0x00000010, 0x00000011, 0x00000012, 0x00000013) (0x00000014, 0x00000015, 0x00000016, 0x00000017) (0x00000018, 0x00000019, 0x0000001A, 0x0000001B) (0x0000001C, 0x0000001D, 0x0000001E, 0x0000001F) STOP (0x00000020, 0x00000021, 0x00000022, 0x00000023) (0x00000024, 0x00000025, 0x00000026, 0x00000027) (0x00000028, 0x00000029, 0x0000002A, 0x0000002B) (0x0000002C, 0x0000002D, 0x0000002E, 0x0000002F) STOP (0x00000030, 0x00000031, 0x00000032, 0x00000033) (0x00000034, 0x00000035, 0x00000036, 0x00000037) (0x00000038, 0x00000039, 0x0000003A, 0x0000003B) (0x0000003C, 0x0000003D, 0x0000003E, 0x0000003F) STOP (0x00000040, 0x00000041, 0x000000
Bonus Tip: How to Backup Your PC to Prevent Data Loss
Corrupted, invalid, or deleted system files can be the root of the Windows 7 Startup Repair not working issue. To prevent such problems, it's crucial to make a system image so that you can restore the system to a working condition when issues arise. A professional backup utility like Qiling Backup can be a remarkable presence in the backup and recovery niche, helping you to create a reliable backup and ensure system stability.
Qiling Backup Home is a reliable tool that runs smoothly on Windows 11/10/8/7, providing users with an excellent backup and recovery solution. It enables users to back up files, disks, partitions, and systems, as well as create a recovery partition, and even allows for repairing Windows 7 without a CD. Overall, it's an indispensable helper for computer users.
- The script creates different backup modes, including full, incremental, and differential backups, allowing for various levels of data protection and recovery options.
- Create an iso image from the existing operating system.
- Clone a hard drive.
- Provide Security Zone to store your backups.
- Install Windows on the new SSD without a USB.
- Create a Windows 7 recovery disc.
- 250G free cloud storage.
To create a system backup, follow these steps: Connect your computer to a backup drive or external hard drive, then click on the Start menu and search for "Backup" or "Backup and Restore" (Windows 10) or "Backup" (Windows 7). Select the drive you want to back up to, choose the files and folders you want to include, and set the backup schedule.
Step 1. Launch Qiling Backup on your computer, click System Backup on the home screen to start the backup process.

Step 2. On the next step, Windows will automatically select all system-related files and partitions, and you will need to choose a location to save the system image backup by clicking on the illustrated area.

Step 3. The backup location can be a local drive, external hard drive, network, cloud, or NAS, with external physical drives or cloud services being recommended for preserving system backup files.

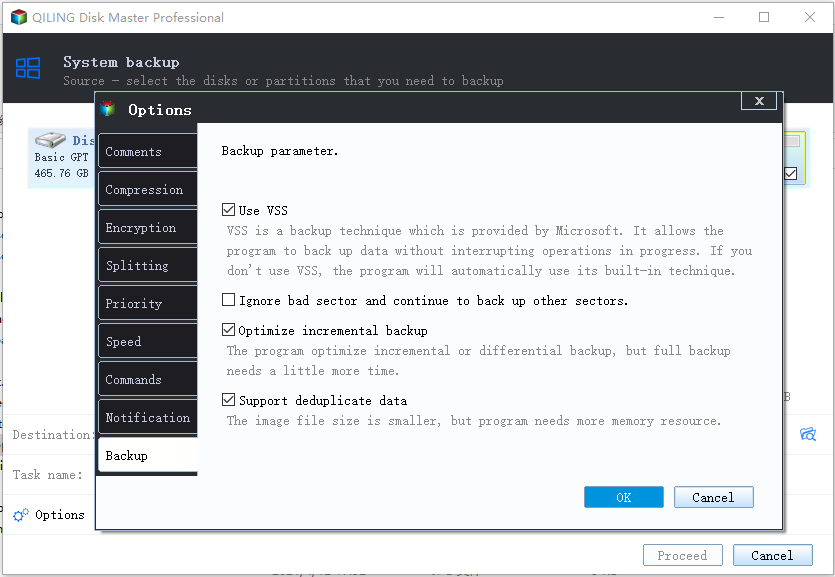
Step 4. Customization settings like enabling an automatic backup schedule in daily, weekly, monthly, or upon an event, and making a differential and incremental backup are available in the Options button. Clicking "Proceed" begins the Windows system backup process, which displays the completed backup task on the left side in a card style.
The Bottom Line
If you're experiencing issues with Windows 7 startup repair not working, don't worry - you can try various solutions to resolve the problem. The article provides troubleshooting steps to help you fix the Windows 7 startup repair failure error, so you can get your computer up and running smoothly again.
It's a good idea to regularly back up your computer, and Qiling Backup is a top choice for this purpose. Suitable for free, home, and business users, it's a great option that you won't regret trying.
FAQs
1. What kind of problems can startup repair not fix?
Startup Repair may fail to fix problems due to bad sectors and file system issues, so running CHKDSK can help fix the issue by checking a volume's integrity and correcting logical system faults.
2. Is there a Windows 7 repair tool?
If your computer won't start, you can use the Windows 7 installation disc or USB to access Startup Repair and other recovery options, which can help get Windows 7 running again.
Related Articles
- How to Increase Transfer Speed of External Hard Drive
- How to Backup SD Card on the Go with Every Possible Way
- How to Factory Reset Mac Without Keyboard? Keyboard Not Working
- Linux File Backup - 5 Best Softeware for Linux Desktop and Server
- How to Fix DRIVER_IRQL_NOT_LESS_OR_EQUAL Error | 10 Ways on Windows 11/10
The DRIVER_IRQL_NOT_LESS_OR_EQUAL error, which appears on a Blue screen with the stop code 0x000000D1, typically occurs when a system's built-in drivers, such as network adapters, incorrectly use a memory address while executing their task. - How to Fix Dynamic Mirror Showing Failed [Three Working Solutions]
This guide is designed to help users understand and resolve the dynamic mirror showing failed error. The error typically occurs due to various reasons.