How to Enable Windows Auto Login without Password
To avoid having to enter a password every time you log into Windows 10, you can enable Windows Auto Login, which allows you to bypass the password requirement and automatically log in to your system. This feature is convenient for users who are the only ones accessing their Windows system and want to avoid the hassle of entering a password multiple times a day. However, it's worth noting that enabling Windows Auto Login may compromise your system's security if someone else has access to your device. Therefore, it's essential to weigh the benefits of convenience against the potential security risks before making a decision.
Enabling Auto Login on Windows 10 allows the system to automatically log on to the desktop without asking for a password. This feature can be enabled in various ways, and by doing so, you can skip entering your password each time you start your computer.
Is a Password Required for Windows System?
Windows 10 requires a password to log in due to increased hacking and data theft, providing a default security feature to protect your system. This is especially important in shared computer environments where multiple people have access to the same device. A strong password serves as a first line of defense against unauthorized access or data tampering, safeguarding your essential data and preventing potential security breaches.
How to Setup Windows Auto Login without Password?
Windows 10's password feature is great for security, but can be a hassle if you log in frequently. To avoid entering your password every time, you can disable it and enable Auto Login, which allows you to log in automatically without needing to enter a password. There are two methods to enable Windows Auto Login, which can be used to simplify the login process.
- Method 1: Enable Windows Auto Login via Netplwiz
- Method 2: Turn on Windows Auto Login with Registry Editor
Method 1: Enable Windows Auto Login via Netplwiz
To enable Windows Auto Login using Netplwiz, an advanced user account management tool, follow these steps. Netplwiz allows for a short and straightforward process of enabling Windows Auto Login, making it easy to set up. The steps include using Netplwiz to enable Auto Login Windows 10, making it simple to set up.
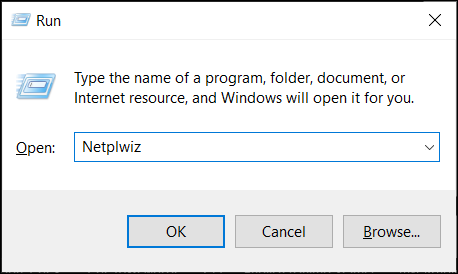
Step 1: To open the Run dialogue box, press the "Win + R" keys on your desktop screen. Once it opens, type "Netplwiz" and click on "OK" to proceed.
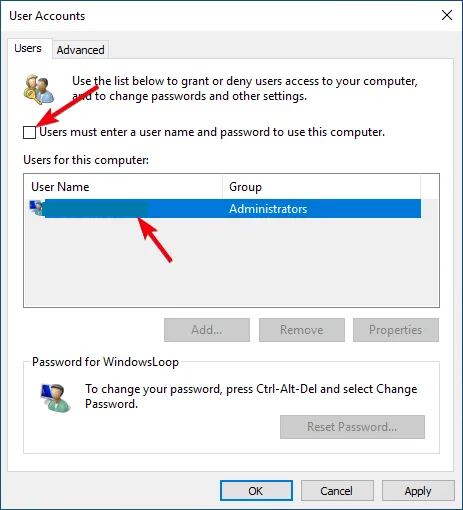
Step 2: To enable Auto Login Windows 10, select your user account among the users, uncheck the "Users must enter a username and password to use this computer" box, and click "Apply".
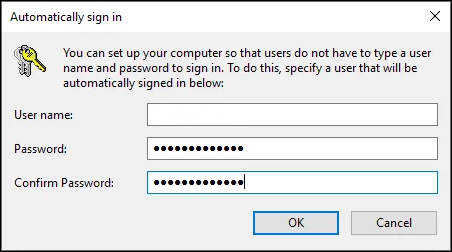
Step 3: After clicking "Apply", a window will appear, requiring you to enter your system password twice to confirm the changes. This confirms the Windows Auto Login, and you can verify this by restarting your computer.
Method 2: Turn on Windows Auto Login with Registry Editor
To enable Windows Auto Login using Registry Editor, follow these steps: navigate to the Registry Editor, create a new DWORD value named "AutoAdminLogon" under HKEY_LOCAL_MACHINE\SOFTWARE\Microsoft\Windows\CurrentVersion\Authentication\LogonUI\, and set its value to 1, then restart your computer to apply the changes. This will allow you to sign in to your account without needing a password.
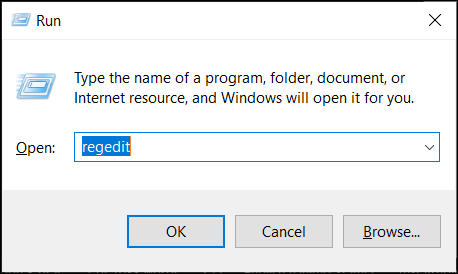
Step 1: To open the Run dialogue box on your Windows 10 system, press the "Win + R" keys simultaneously, and then type "regedit" into the box that appears. This will open the Registry Editor.
Step 2: To access the registry key, open the Registry Editor, copy and paste "Computer\HKEY_LOCAL_MACHINE\SOFTWARE\Microsoft\Windows NT\CurrentVersion\Winlogon" into the address bar, and press "Enter."
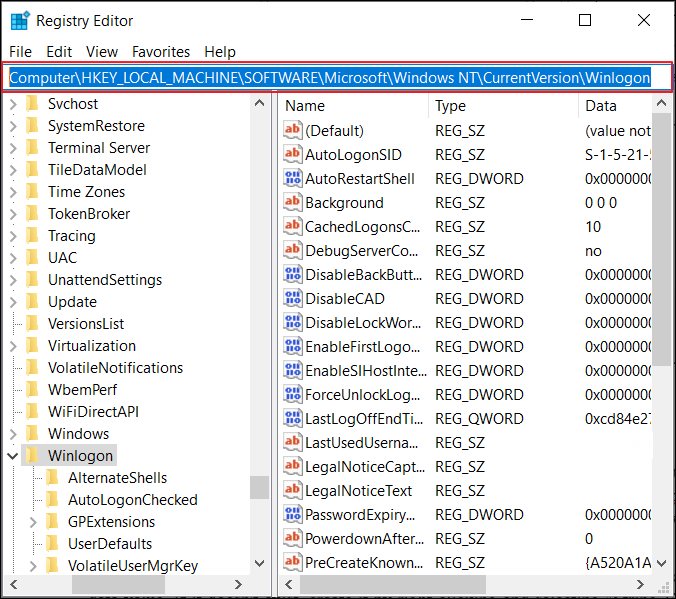
Step 3: In the Winlogon key, find the "DefaultUserName" value and verify that its value data matches your user account name. If it doesn't exist, create a new string value named "DefaultUserName" and set your username as its data.

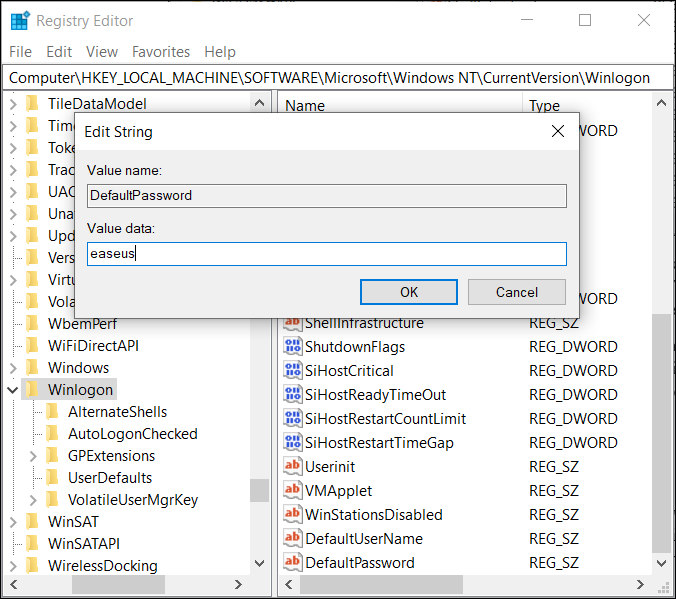
Step 4: To update the "DefaultPassword" value, first, navigate to the "HKEY_LOCAL_MACHINE\SOFTWARE\Microsoft\Windows\CurrentVersion\Group Policy\State\User" registry key. If the "DefaultPassword" value does not exist, create it by right-clicking and selecting "String Value" from the "New" menu, then rename the new file to "DefaultPassword". Next, double-click on the "DefaultPassword" value to open its properties window, and in the "Value data" field, enter your system password. Ensure that the "Base" field is set to "String" and click "OK" to save the changes.
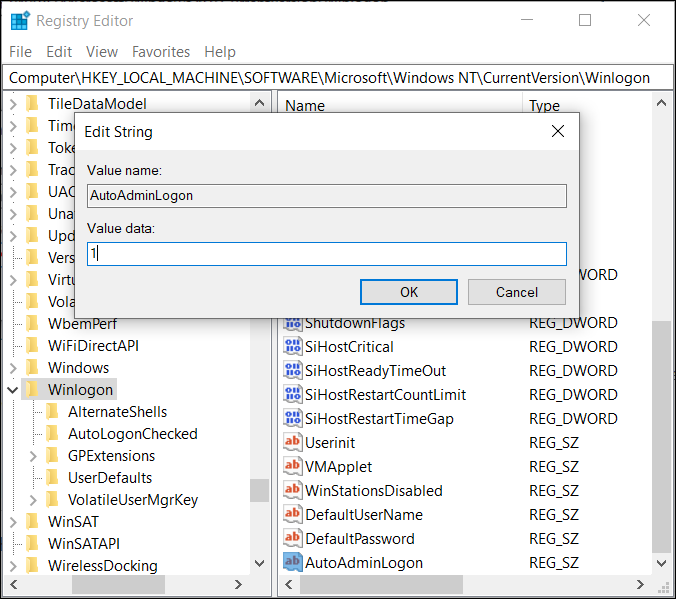
Step 5: To enable Auto Login Windows 10, look for the "AutoAdminLogon" value in the registry panel. If it exists, change its data value to "1". If it doesn't exist, create a new string value with the name "AutoAdminLogon" and set its data value to "1". This will enable the Auto Login feature. After making the change, restart your system to confirm the changes.
Windows Auto Login FAQ
If you're still unsure about using the auto login feature on Windows 10, don't worry - we've got you covered. We've outlined some frequently asked questions (FAQs) that should address any remaining concerns you may have about this feature. By understanding how auto login works and its benefits, you'll be able to use it with confidence and enjoy a more streamlined and convenient Windows 10 experience.
1. Is there any way to bypass the password of a computer?
Windows 10 does not allow you to reset your password using the "forgotten password" option, so if you forget your password, you'll have to reset your entire Windows 10 system, which will erase all your data. This will restore your computer to its original state when you first bought it.
2. What is Netplwiz in Windows?
Netplwiz is an advanced user accounts management tool in Windows that allows you to change a user name, verify user credentials, and enable Auto Login. It can be accessed using the Run dialogue box or the Search feature.
3. How you can use the Autologon feature?
To use Autologon on your system, simply download it and run the Autologon.exe file. Fill in the dialogue box with your credentials and press "Enable." The next time you start your system, Autologon will automatically add your password, eliminating the need for manual input.
4. How can you change or manage your system password?
To change your password on Windows, click on "Start" and open "Settings." From there, select "Accounts," go to "Sign-in Options," and tap on "Password" to update the password of your account.
Wrap Up
Enabling Windows Auto Login can save time and increase working speed, especially if you don't perceive any threats to your system, and can be done using various methods, which were explained in the article.
Related Articles
- Windows 10 System Restore Points Gone and Missing
- 2022 Tips| Are You Sure You Want to Copy This File Without Its Properties [Fixed]
- Short DST Failed! How to Fix Hard Disk DST Short Test Failed
- Command R Not Working? 6 Ways to Fix It on macOS Ventura/Monterey/Big Sur
- eMMC VS HDD: Which Is Better & What's The Difference
Compare eMMC and HDD storage by speed, capacity, durability, price, and best use cases. Learn which option is better for your device. - [10 Fixes] Error 0x800701b1 Troubleshooting on Windows 11/10
If you're experiencing Error 0x800701b1 on your Windows PC and struggling to copy files, don't worry! This guide provides a simple solution to fix the issue.