Change Backup Location Windows 7: Manage Backup File & Space Saving
Why Do You Need to Change Backup Location?
The built-in backup tools in Windows 7 save backup files to a default location, which can lead to storage space depletion on the backup drive as more files are created over time.
To change the backup location in Windows 7, go to the Control Panel, click on System and Security, then select Backup and Restore. From there, click on the "Change the backup disk" button and select a new location for your backups. Alternatively, you can also change the backup location when creating a new backup set by selecting a different drive or folder in the backup settings.
You may want to change your backup location for various reasons, such as needing more storage space, wanting to free up local disk space, or switching to a cloud-based backup service for added security and accessibility.
- Consider using an external hard drive or a cloud storage service to store backups of your important files, freeing up space on your primary drive. This can help maintain a clutter-free and efficient computer experience.
- Improve performance by storing backups on a faster drive, such as a solid-state drive (SSD), which can significantly reduce backup times and enhance overall system speed.
- Store backups in a secure, offsite location to protect against data loss due to physical disasters or unauthorized access.
To change the backup location, go to Settings > Accounts, then select the account for which you want to change the backup location. Tap on the three dots next to the account, then select "Manage account". Scroll down to the "Backup" section and select the new location from the list of available options.
Change Backup Location Windows 7/10
If you've created backup files with Windows' built-in tools File History and Backup and Restore, you can change the backup location settings by following these steps.
To change the backup location in Windows 7/10, you can do so either through the Backup and Restore tool or by accessing the Control Panel.
1. Change Backup Location via Backup and Restore (Works in Windows7/10)
To change the backup location via the Backup and Restore tool, go to Start, type "backup" in the search bar, and select the Backup and Restore (Windows 7) application. Then, click on "Change settings" and select the "Backup location" option. From there, you can choose the new location for your backups.
Step 1. To open the Backup and Restore tool, go to Start, then click on All Programs, next click on Accessories, then System Tools, and finally click on Backup and Restore.
Step 2. On the left side of the window, click on "Change settings".
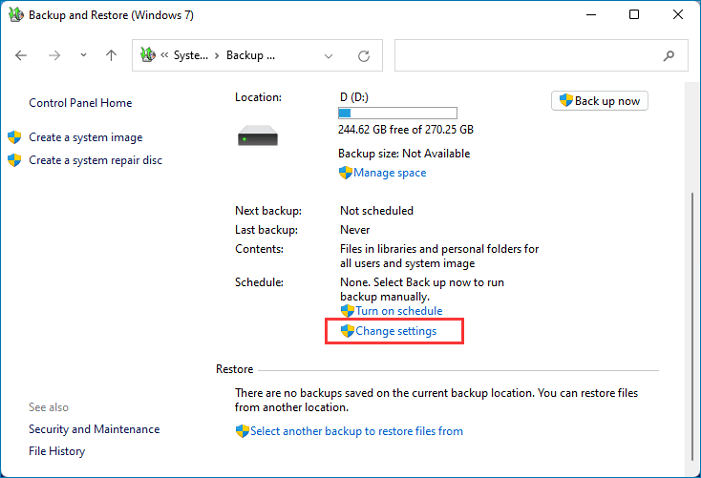
Step 3. It will prompt you to re-evaluate what you want to back up and where to save your backup files.
Step 4. To change the backup location, open the Backup and Restore (Windows 7) Control Panel applet and click on "Change settings" in the left-hand side of the window. In the window that opens, select the drive you want to use as your new backup location and then click on "Next".
To create a new folder for your backups, click on "Create a new folder" and enter a name for it, then click "Next".
Step 5. Once you've confirmed the destination for your backups, click on "Start backup" to begin backing up to the new location.
2. Change Backup Location in Control Panel (Works in Windows 8/10)
You can access Windows built-in change the default backup location in Windows, you can go to the Backup and Restore (Windows Backup) tool in the Control Panel. From there, you can select the location where you want your backups to be stored by default. This allows you to easily switch between different backup locations as needed.
Step 1. To access the Control Panel, you can either type "Control Panel" into the search box after pressing the Start button, or navigate to it through the Start menu by going to Start > All Programs > Accessories > System Tools > Control Panel.
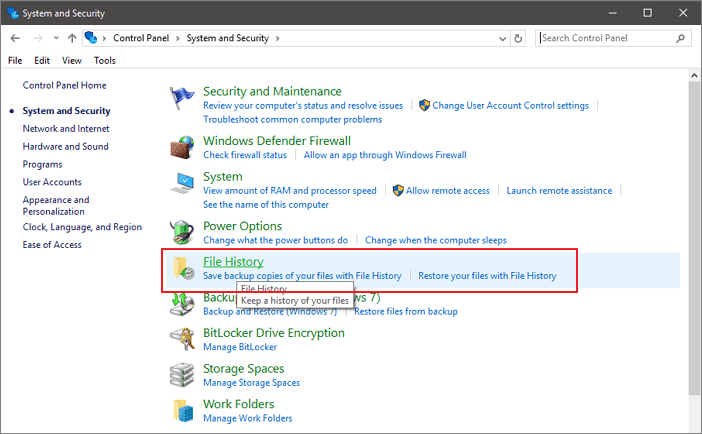
Step 2. In the Control Panel, look for the "System and Security" category and click on it, then click on "File History".
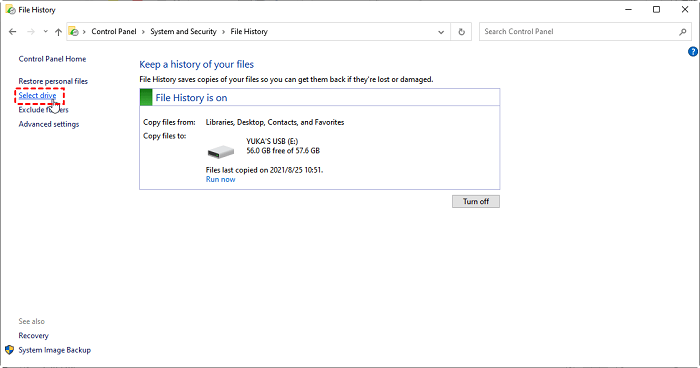
Step 3. In the window that opens, click on "Select drive".
Step 4. Select the drive you want to use as your new backup location and then click on "OK".
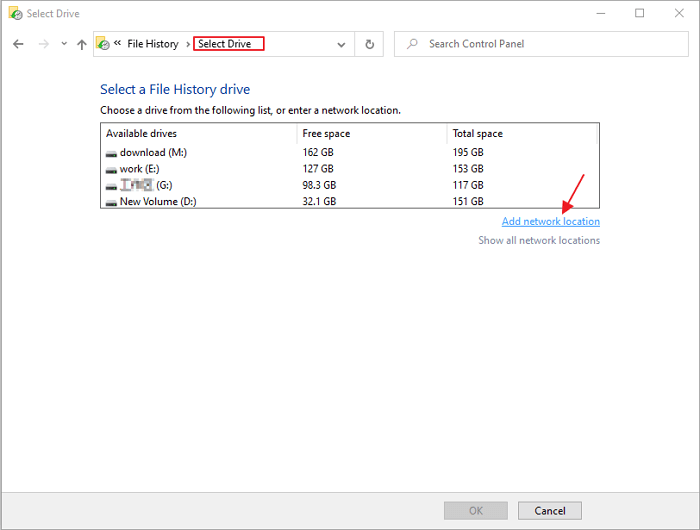
Once you've confirmed your new backup location, File History will start creating a backup on the new drive, and from then on, it will automatically create a backup every time you connect the drive to the computer.
Backup File Management Tool & Creator - Qiling Backup
Users need to change their backup location due to a full disk, prompting a switch to a new one, and third-party backup tools offer solutions to manage backup files.
With the help of backup tools, users have more flexibility in storing their backup files, allowing them to choose from local hard drives, cloud drives, and NAS. This also enables them to set up a backup plan that includes deleting old backup files to save drive space, ensuring a more efficient use of storage.
With so much third-When choosing a party backup software, consider a tool that is easy to use, powerful, compatible with common operating systems, and cost-effective. Based on these criteria, Qiling Backup is a recommended choice.
2. You have various backup location options: local/external drive, cloud drive (Google Drive, Dropbox, OneDrive...), and NAS.
3. You can set to delete old backup files automatically
4. You can back up more content than using built-in tools
5. You can clone Windows OS to a new SSD with Qiling Backup (Paid)
To create backup files and set up backup plans with Qiling Backup, download it from the button below and launch it on your computer. This will allow you to start the process of creating backup files and setting up backup plans.
Step 1. When using Qiling Backup for the first time, select File backup on the home screen to back up files, allowing you to choose pictures, videos, documents, and other file types to save.

Step 2. To backup files, folders, or directories, follow the paths to locate them, then select them all.

Step 3. To select a backup location, click on the "Browse" button next to the "Backup location" field. This will open a file explorer window where you can navigate to the desired location on your computer or network.

Step 4. Qiling Backup allows users to save backups on various devices, including local hard drives, external USB drives, SD cards, network drives, NAS drives, and Qiling cloud drives. We recommend storing important backups on cloud drives for their greater accessibility, flexibility, and safety.

Step 5. If you're interested in setting up an automatic and intelligent backup schedule for the next file backup task, go to the "Options" setting. There, you can customize the backup to encrypt confidential files, compress the backup image size, or schedule the next backup to start at a specific time. This allows the software to run the backup task automatically and efficiently.

Customize an advanced and automatic backup task here:

Step 6. Click "Proceed" to start the file backup process, and the completed backup files will be displayed on the left in a card style.

FAQs
1. How to change the backup location on Windows 7?
1. Open Control Panel
2. Select System and Security
3. Select Backup and Restore (Windows 7)
4. Under "Where do you want to save your backup?" click Change
5. Browse to the location where you want to save your backup, and then click OK
6. Click Save settings and run backup
2. Where is my Backup file stored in Windows 7?
In Windows 7, the default location for backup files is C:\Users\username\AppData\Local\Microsoft\Windows.
To change the location of backup files, follow the steps above. For more information, you can check the post "Where Are the Backup Files Stored?"
The Bottom Line
To change the backup location in Windows 7, follow these steps: go to Control Panel, click on System and Security, then select Backup and Restore. From there, click on Change backup settings, and select the new backup location by clicking on Add a drive. You can then select the drive you want to use as your new backup destination.
If you want to simplify your backup management and free up storage space, consider using a third-party backup tool like Qiling Backup. This tool allows you to schedule backups and automatically delete old files, making it easier to keep your backup files organized.
If you have any questions, please feel free to contact us. We're here to help.
Related Articles
- Comprehensive Tips: Keep Your Data Backup Safe
- Backup WD Hard Drive with Best Free Backup Software
- Quick Answer: Is Virus Protection Necessary
- Windows Backup Problem: Windows Backup Stuck at 97%
- Best Disk Image Creator for Windows - Qiling Disk Master
If you want an easy and fast way to create a disk image in Windows, read this article patiently to get the best Windows disk imager to help you. You can keep reading to learn detailed information. - Fixes: DISM Error 87 the Parameter is Incorrect/Unknown
If you're experiencing DISM error 87, which indicates that the parameter is incorrect, don't worry - this guide has got you covered. The error can occur when trying to use the dism cleanup-image option, which is unknown. To fix this issue, you can try a few troubleshooting steps.