Create A Bootable Clone to Upgrade Mac HDD/SSD to A Bigger Disk
Can I clone to upgrade Mac HDD/SSD without boot problem?
To clone and upgrade a Mac hard drive or SSD to a larger disk without boot problems, follow these steps:
I've purchased a new SSD and am considering replacing my current disk by cloning all data onto the new one. However, my research suggests that directly cloning the disk to the new SSD may lead to boot failure issues.
To create a bootable clone and upgrade the Mac HDD or SSD, you can use a tool like SuperDuper or Carbon Copy Cloner to clone your existing drive to a new, larger one. This will ensure that your Mac is restored to its original state on the new drive, and you can then replace the old drive with the new one. Alternatively, you can also use the built-in Disk Utility in macOS to create a bootable clone, but this method may not be as reliable as using a dedicated cloning tool. Once the clone is created, you can then replace the old drive with the new one and boot up your Mac from the cloned drive. This process will ensure that your Mac is upgraded to the new, larger drive with minimal disruption.
If you're looking to clone your Mac's hard drive to a new SSD or HDD securely and without boot issues, professional Mac clone software can effectively help.
Free download Mac clone software to create bootable clone of Mac hard drive
If you don't want to waste time selecting and identifying Mac clone software, you can try Qiling Backup for Mac, which allows you to create a bootable clone of your Mac disk to a new disk (HDD or SSD) without any boot problems.
Qiling Backup for Mac allows you to not only upgrade your Mac's SSD to a bigger one or add a hard drive, but also backup specific folders, hard drives, and even change the iTunes backup location on macOS Sierra or Mac OS X with just a few clicks. To clone your Mac disk and upgrade to a HDD/SSD without any boot issues, simply download and install the software, and follow the three-step process.
3 steps to create a bootable clone to upgrade Mac HDD/SSD
- Note:
- The destination disk should be as large or larger than the current Mac disk to ensure a successful migration.
If the destination disk is smaller than the original disk, you may lose some important data.
To create a bootable clone of a Mac disk on a bigger HDD/SSD without boot issues, you can use the built-in Disk Utility app on your Mac. Start by connecting the new HDD/SSD to your Mac, then launch Disk Utility and select the source disk (the original Mac disk).
Step 1. Erase and prepare new HDD/SSD ready for bootable clone
1. Connect the new HDD/SSD to your Mac computer, then go to the Applications folder, open Utilities, and select Disk Utility.
2. Click Repair Disk, then check if the S.M.A.R.T Status is supported or not supported, and if the partition Mac scheme is formatted or unformatted.
3. If the old SSD is not recognized, go to Erase, select the new SSD as the format target in the Format column, click Erase, and then confirm the formatting by clicking Erase again.
4. The Partition Map Scheme has changed from MBR to GUID Partition Table if the disk has a partition table that uses globally unique identifiers (GUIDs) to identify each partition, rather than the traditional MBR method of using a single partition table that contains a list of partition entries. This change typically occurs when a disk is converted from a traditional MBR partitioning scheme to a GPT partitioning scheme.
5. To initialize a new SSD to GPT disk, go to Partition > Choose Mac OS Extended (Journaled) > Select GUID Partition Table and click OK, then click Apply to apply the changes.
Step 2. Create bootable clone and upgrade Mac disk to bigger HDD/SSD
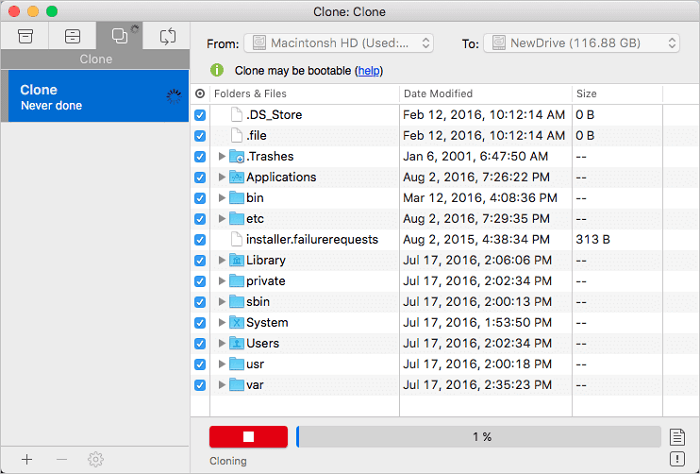
After making destination disk - new HDD/SSD ready, you can connect the new disk to your Mac computer and let Qiling Backup for Mac help you create the bootable clone now:
1. Connect a new HDD/SSD to your Mac computer and run Qiling Backup for Mac to ensure the new drive is properly configured and backed up.
2. Select Clone from the dropdown list and choose the old Mac disk as the source disk at the From column and the new SSD or HDD drive as the destination disk at the To column.
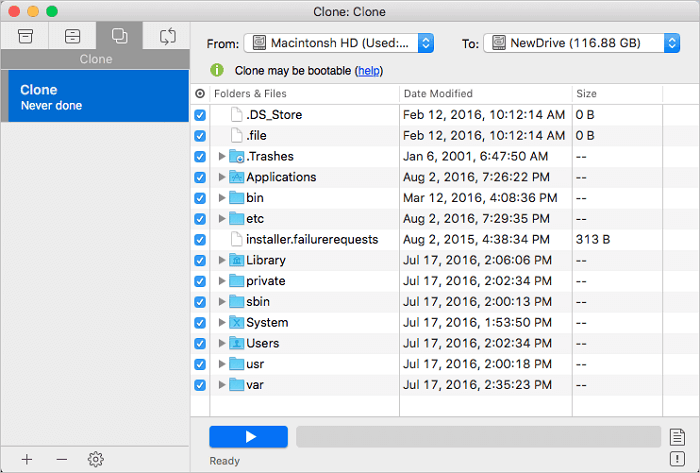
3. To set up the SSD clone properties, select all data from the old Mac disk to be cloned to the new HDD/SSD. This involves setting up the clone properties to ensure a successful transfer of data from the old disk to the new one.
Click the blue "Start" button to begin the process of upgrading and cloning the Mac SSD to a new SSD drive.
Step 3. Set Mac to boot from new HDD/SSD without boot problem
After Step 2, you can then change and replace old Mac disk with newly cloned HDD or SSD and follow below tips to set Mac boot from new disk without any problems now:
1. Keep both your old Mac disk and the new SSD or HDD drive connected to your Mac computer. This will allow you to transfer files and settings from the old drive to the new one.
2. To change the startup disk to a new SSD or HDD drive, go to System Preferences, click on Startup Disk, and select the new drive as the new boot drive.
3. To replace the old Mac drive with a new HDD or SSD, right-click on the old Mac hard drive in Finder and select "Eject Only Macintosh HD".
4. To upgrade your Mac's storage, you'll need to shut it down, install a new SSD drive, and then reboot the computer again. This process will allow you to take advantage of the faster storage and improved performance that a solid-state drive offers.
After completing the bootable clone process and upgrading your Mac's disk to a new HDD/SSD, you can now use and enjoy macOS running smoothly on your Mac computer, taking advantage of a faster-responding speed and higher working efficiency.
Related Articles
- 2 Methods to Change iTunes Backup Location on Mac
- Transfer Files and Applications to New Mac without Migration Assistant
- How to Upgrade and Change Mac Bootcamp Drive?
- How to Upgrade, Change and Replace Mac SSD to A Bigger SSD?
- Powerful Samsung SSD Image Software to Protect Data
Are you looking for Samsung SSD image software to back up Samsung SSD? Qiling Disk Master will be a great choice, which allows you to make disk image automatically and regularly. - Best Seagate Dashboard Alternative - Qiling Disk Master Freeware
Read this post to learn about Seagate Dashboard and fix its problems. You should try one of the easy-to-use and free Seagate Dashboard alternatives if it's not working. It helps you find the best way to perform backup, restore and disk cloning.