How to Upgrade, Change and Replace Mac SSD to A Bigger SSD?
How to upgrade Mac SSD to a bigger one without losing data?
Question: Can you upgrade or replace a MacBook Pro SSD? How?
"You can upgrade or replace a MacBook Pro SSD drive without losing any data, as long as you follow the correct steps. The process involves cloning or duplicating the existing SSD drive to the new one, then swapping the drives. This way, your MacBook Pro will boot normally from the new drive, and all your data will be preserved. It's recommended to use a cloning software, such as SuperDuper or Carbon Copy Cloner, to ensure a successful transfer.
You can transfer data from the old SSD to the new one using a few methods. One way is to use a USB cable to connect both SSDs to your computer, then use software like Qiling Disk Master to clone the old drive to the new one. Another way is to use a cloning tool like Samsung's Magician or Crucial's Storage Executive, which can help you transfer data from the old SSD to the new one. You can also use the built-in Windows feature called "Disk Management" to transfer data from the old SSD to the new one."
Mac computers and devices are designed with SSD drives, resulting in a fast running speed and a seamless user experience.
The Mac SSD has a significant drawback - its small storage capacity, often limited to 120 or 128GB. This can leave users with limited space for installing programs, software, and games, making it easy to run out of space and requiring regular cleaning and file removal. However, users now have a viable solution: upgrading the Mac SSD to a larger capacity drive, which can be achieved by following a series of steps.
3 steps to change and upgrade Mac SSD to a bigger SSD
To upgrade your Mac's SSD drive to a bigger one, follow these steps. You can directly apply them without worrying about data loss.
Step 1. Erase and prepare new SSD ready for SSD upgrade
1. To connect a new SSD drive to a Mac computer, go to the Mac Application, then Utilities, and finally Disk Utility.
2. Click Repair Disk, then check if S.M.A.R.T Status is Supported or Not Supported and if Partition Map Scheme is Formatted or Unformatted.
3. If the drive is not recognized, go to Erase and select the new SSD as the format target in the Format column. Click Erase and then click Erase again to confirm the formatting.
4. The Partition Map Scheme has changed from the Master Boot Record (MBR) to the GUID Partition Table (GPT) if the disk has a GPT partition table. This change indicates that the disk has been converted to use the GPT partitioning scheme instead of the traditional MBR scheme.
To initialize the new SSD to a GPT disk, go to Partition > Choose Mac OS Extended (Journaled) > Select GUID Partition Table and click OK. Then click Apply to finalize the initialization.
Step 2. Upgrade SSD to bigger SSD with all data by cloning without losing data
To avoid unexpected data loss trouble while upgrading your Mac's SSD drive to a new drive, it's best to clone your Mac drive using a powerful Mac disk clone software. This ensures that your data is safely transferred to the new drive, minimizing the risk of data loss during the upgrade process.
Qiling Backup for Mac allows you to easily clone your entire SSD drive, including Mac OS, files, and folders, to a new drive with just a few clicks. It's compatible with macOS 10.12 (Sierra) and earlier OS X systems. Simply download and follow the steps to upgrade and clone your Mac SSD drive to a larger one without losing any data.
1. To run Qiling Backup for Mac, connect a new SSD to your Mac computer and proceed with the backup process.
2. Select Clone from the drop-down list, choose the old Mac SSD as the source disk in the "From" column, and select the new SSD drive as the destination disk in the "To" column.
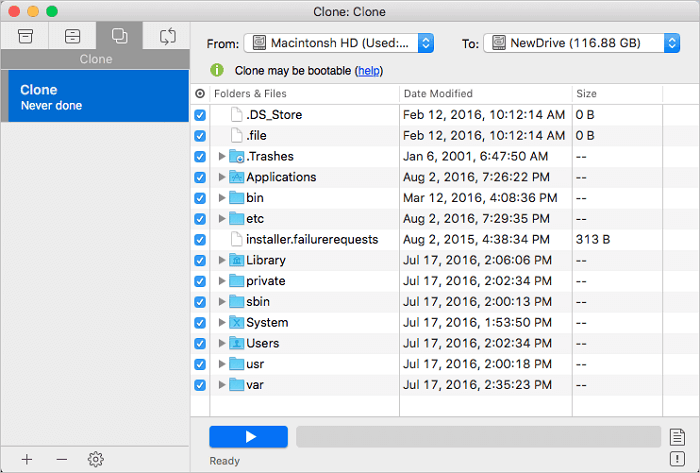
3. Set up the SSD clone properties, selecting all data from the old SSD to be cloned to the new SSD, to create a precise replica of the original drive.
Click the blue "Star" button to start upgrading and cloning your Mac SSD to a new SSD drive.
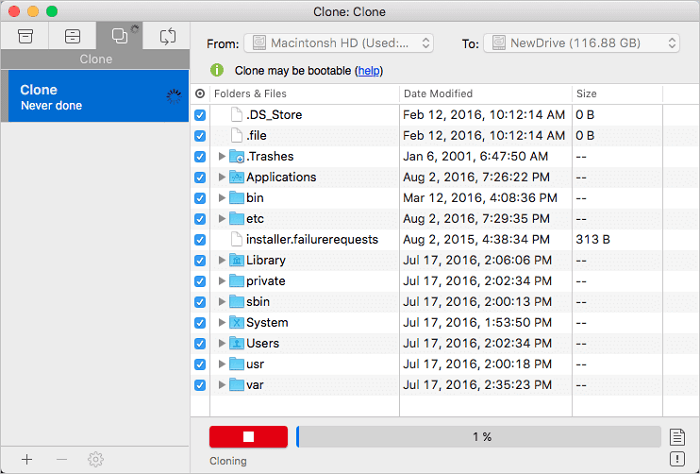
After cloning all your old Mac SSD data to the new SSD drive, you'll have a complete copy of your old drive on the new one. However, don't switch to the new drive just yet - you still need to set your Mac to boot from the new SSD. To do this, follow the next step.
Step 3. Change startup settings and replace old SSD with new SSD drive
1. To keep both old and new SSD drives connected to your Mac computer, you can follow these steps:
2. To set the new SSD drive as the startup disk, go to System Preferences, click on Startup Disk, and select the new SSD drive as the new boot drive.
3. Right-click on the old SSD drive in Finder, select "Eject Only Macintosh HD".
4. To upgrade your Mac's storage, shut it down, install a new SSD drive, and then reboot the computer again. This process will allow you to take advantage of the faster storage and improved performance that the new SSD drive provides.
After upgrading your Mac's SSD drive to a bigger new one, you've successfully completed the process without losing any data. This achievement is a great solution to your problem of changing Mac drive or extending Mac storage space with a bigger drive. Now, you can just follow the steps to tackle your storage needs with ease.
Related Articles
- Transfer Files and Applications to New Mac without Migration Assistant
- How to Fix Mac Migration Assistant Stuck or Frozen
- How to Upgrade and Change Mac Bootcamp Drive?
- How to Back Up Mac without Time Machine?
- [SOLVED] Laptop Keeps Freezing and Crashing
Laptop users often experience frustration when their device freezes and crashes, disrupting their work or entertainment. Fortunately, we can help you identify the causes of this issue and provide practical solutions to resolve it. - Laptop Screen Broken! How to Get Data off?
If your laptop's screen breaks, it can be a challenge to access your data, but there are steps you can take to retrieve it.