How to Move Microsoft Teams to Another Drive
How to Move Microsoft Teams to Another Drive?
As a result of IT advancements, businesses have shifted towards virtual teams and online working, particularly during the Covid pandemic. This led employers to seek out apps that facilitate online communication and collaboration, with Microsoft Teams emerging as the top choice for connecting with teams remotely.
Microsoft Teams is a cloud-based collaboration tool that enables real-time communication and teamwork, allowing users to chat, share files, and work on projects together, both for business and personal purposes.
Some users may want to move Microsoft Teams to another drive, either for storage or to free up space on their device. Fortunately, it is still possible to transfer Microsoft Teams to another location, and the process can be initiated by those who are curious about a way to move Microsoft Teams.
Move Microsoft Teams to Another Drive via Qiling Disk Master
Qiling Disk Master is a reliable solution for users to move Microsoft Teams to another drive, allowing them to transfer installed programs, system settings, and user data from one computer to another, even between different Windows operating systems, such as from Windows 10 to Windows 11.
Qiling Disk Master offers a range of features that make it a standout solution for users. It allows for automatic data transfers and provides an emergency disk for system crashes, making it a reliable tool for managing data and system stability.
The app allows you to transfer all installed programs in one click, ensuring no data loss, and also provides an easy way to back up your precious data.
To move Microsoft Teams to another drive using this intelligent software, follow these steps: 1. 2.
Step 1. Run Qiling Disk Master on both PCs
On the source PC, select "File sync" on the main screen of Qiling Disk Master and proceed.

Step 2. Connect two computers
1. Connect your target PC via its IP address or device name and click "Connect".
2. Enter the login password of the target PC and click "OK" to confirm.
If you didn't see the target PC in the listed devices, you can also manually connect the target PC by clicking "Add PC" and inputting its IP address or device name.

Step 3. Select apps, programs, and software and transfer to the target computer
1. You can pick and choose what you want to transfer from your current computer to the target PC.
2. Select the desired applications and programs, then click "Transfer" to initiate the transfer process.

Move File in Microsoft Teams to Another Drive
To quickly move your Microsoft Teams to another drive, follow these super-easy steps. You can explore this solution further by reading another related text. By following these simple steps, you can transfer your Microsoft Teams to a different drive, giving you more storage space and a clutter-free experience.
Step 1. Open Microsoft Teams on a desktop browser or website.
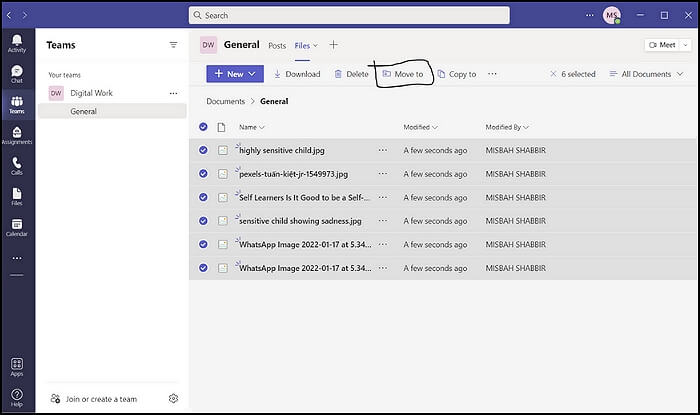
Step 2. To move a file, click on the "Files" tab on the left side of the screen, then click on the file you want to move and select the option to move it to the desired location.

Step 3. To move the selected object, click the "More Options" icon (it looks like three dots) and select "Move" from the dropdown menu.
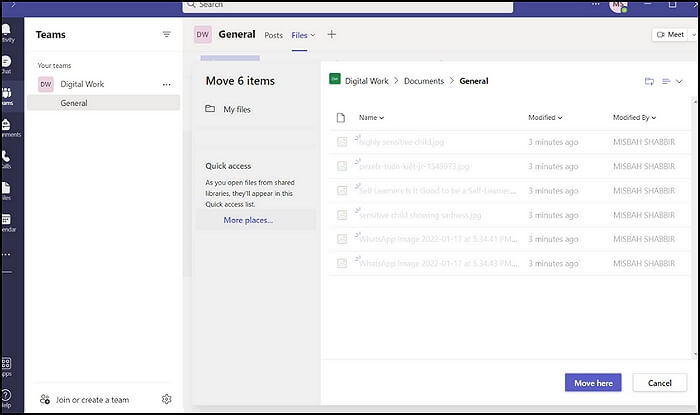
Step 4. Choose the destination for the file and click "Move."
Bonus Tip: Move Microsoft Teams to Another Drive Manually
To manually move Microsoft Teams to another drive, you'll need to export your data from the current drive, then import it to the new drive. This process allows for a smooth transition of your Teams data to the new location.
Office 365 is a subscription service that includes Microsoft Teams, making it accessible to those with a Microsoft account or subscription.
To move Microsoft Teams to another drive, you'll need to migrate Microsoft Office 365. This process involves transferring all Teams-related data, including channels, conversations, and files, to a new location.
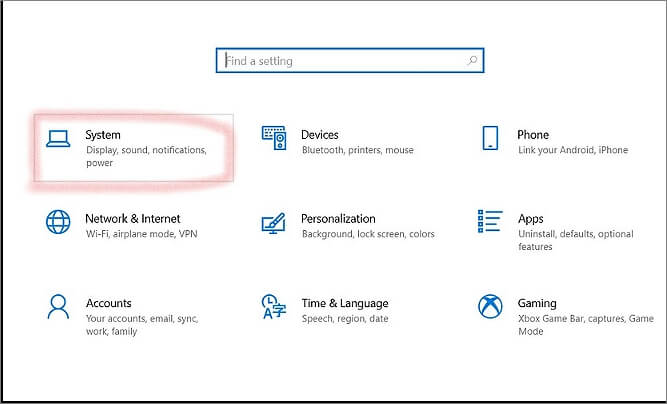
Step 1. Click the "Settings" app and tap on "System."
Step 2. Go to Settings, then select "Storage" and choose the drive where you want to move Microsoft Teams.
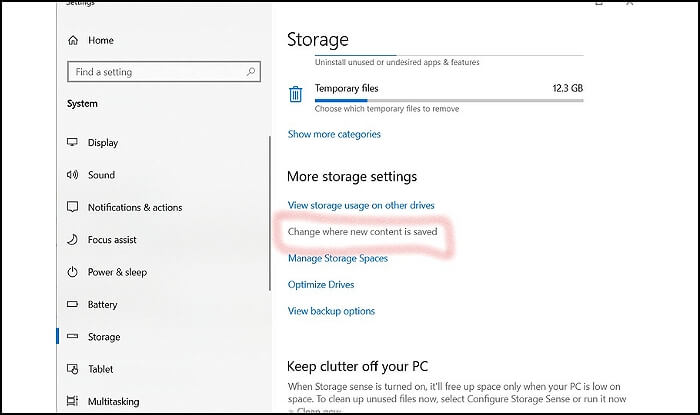
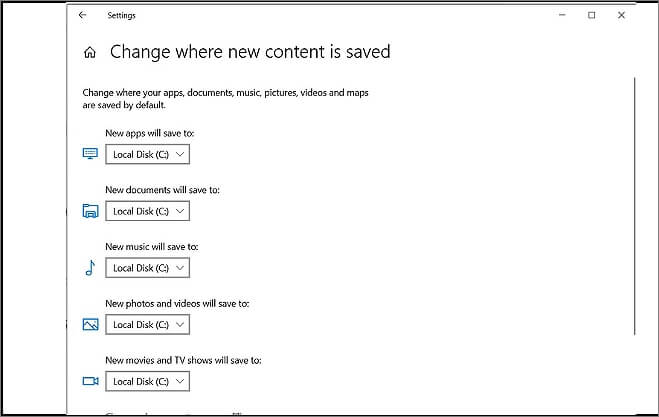
Step 3. Under the "New apps will save to" section, select the new location for Microsoft Teams.
Step 4. Exit the Settings app and restart your computer.
After completing these steps, Microsoft Teams will automatically move to the new location.
If you want to manually move your files, you can do so by following these steps. First, locate the files you want to move and select them.
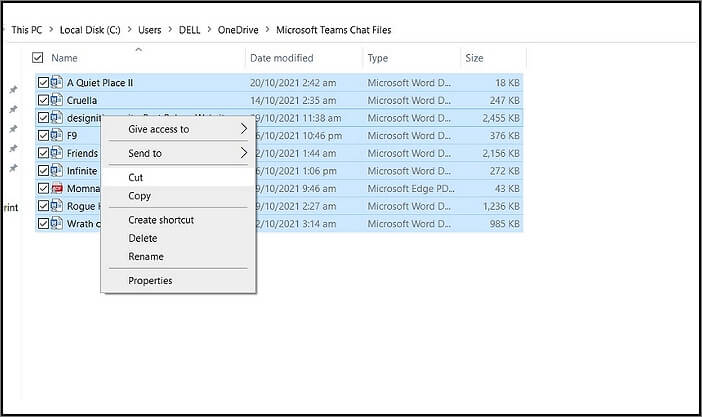
Step 1. To access the Microsoft Teams folder, open File Explorer and navigate to the "C:\Users\%USERNAME%\AppData\Local\Microsoft\Teams" location.
Step 2. Select files and folders inside the "Microsoft Teams" folder. Right-click and select "Cut" to remove them.
Step 3. Paste the files into the new location. The process may take time, depending on how big the Microsoft Teams folder is.
Step 4. Once the transfer is complete, open the Microsoft Teams folder in the new location, then double-click the Update.exe file to update the app.
These are some super-To move your Microsoft Teams to another drive, follow these simple steps: First, close Microsoft Teams and any other apps that might be using the drive. Then, navigate to the drive where Teams is currently stored (usually C:\Users\[username]\AppData\Local\Microsoft\Teams) and copy the entire Teams folder to the new drive.
Conclusion
Microsoft Teams is a reliable and beneficial collaboration app for business and personal use, but to keep data and business secure, it's recommended to move it to another drive. Qiling PCtrans is an all-in-one solution that can help move Microsoft Teams to another drive without any data loss, making it a safe and secure option.
Related Articles
- 2 Safe Ways to Migrate QuickBooks to New Server
- Does Windows 11 have Easy Transfer?
- How to Transfer Adobe Flash Player to Another Computer?
- How to Copy MS Office from Laptop to Pen Drive/USB (Windows 11 Available)
- How to cloud backup for Windows 7 | 2022 Detailed Guide
Learn how to create a cloud backup for Windows 7. Back up files or the system to cloud storage with Qiling Backup or other safe methods. - Cloud Download or Local Reinstall Windows 11/10? Check Differences
Compare Cloud Download and Local Reinstall when resetting Windows 10 or 11. Learn the differences, pros, cons, and which option to choose.