How to Install/Run Applications from an External Hard Drive (New)
To install and run Windows 10 apps on an external hard drive or second drive, you can use the built-in settings to redirect new program installations to the desired location. This can be done by creating a new library in the "This PC" section of File Explorer, assigning a drive letter to it, and then setting the default installation location for new apps to that drive. Alternatively, you can also use the "Move" feature in the "Properties" window of a drive to relocate existing apps to the external drive. This way, you can free up space on your C drive and keep your apps organized on an external device or secondary internal drive.
Part 1. Install Windows 10 Apps to an External or Second Drive
Connect your external hard drive to your PC, then navigate to the drive in File Explorer. Right-click on the drive and select "New" > "Folder" to create a new folder for your programs. Move the programs you want to install to this folder.
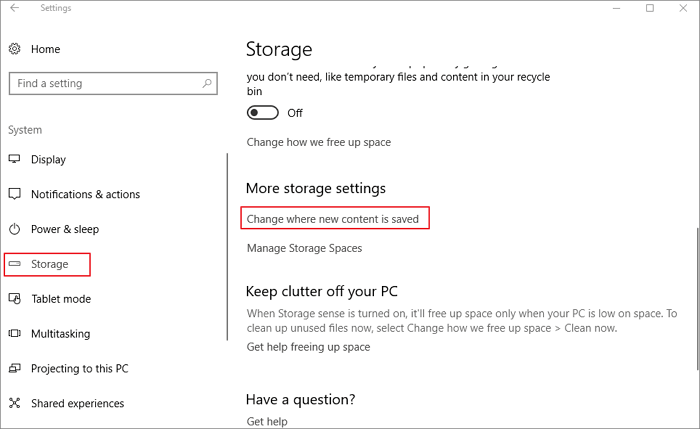
Step 1. Click the Start menu and select Settings (the gear icon).

Step 2. To change where new content is saved on your computer, go to the "System" section, then click on "Storage", and finally select "Change where new content is saved".
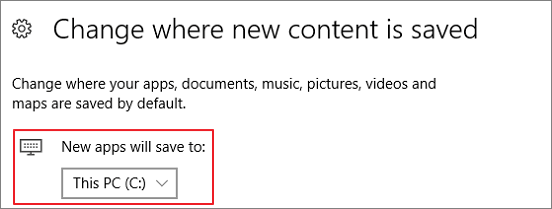
Step 3. To select your external drive, navigate to the "New" apps will save to dropdown menu and choose your external drive from the options available.
Part 2. Run Application from an External Hard Drive
To move installed applications to an external hard drive, you'll need to back up the application's installation files, registry entries, and any other relevant data. This can be done using a tool like the built-in Windows Backup and Restore feature or a third-party backup software. Once backed up, you can uninstall the application from your primary drive and reinstall it from the external drive. To run the application from the external drive, you'll need to add the drive's letter to the system's PATH environment variable, or use a tool like the External Drive Launcher to launch the application directly from the drive.
Purposes of this part
- Qiling Disk Master is a Windows easy transfer software that I highly recommend. It's a user-friendly tool that allows you to easily transfer files, programs, and even operating systems from one computer to another.
- To highlight its reliable product feature, the company emphasizes its ability to seamlessly transfer programs to an external storage device, ensuring users can easily access and manage their data.
- Many Windows users are likely experiencing a slow computer due to accumulated data and programs taking up valuable hard drive space, which can be addressed by trying out this feature. By doing so, you can potentially improve your computer's performance and free up some much-needed memory and space.
Solution implementation
- On your computer, download and install Qiling Disk Master.
- To bring an external hard drive, USB flash drive, or a memory card, you can simply take one that you already have available to you. This could be a device you use for personal or professional purposes, such as storing files, backing up data, or transferring information between devices.
Tip: You can transfer a large executable file from a Windows machine to an external storage device, unless the drive is too small to hold it.
First, move your apps to the external hard drive.
Step 1. Connect your external hard drive to your computer, then open Qiling Disk Master and select the "File sync" option.

Step 2. Select the apps you want to transfer by choosing the "Yes" option next to each desired application. You can select multiple apps at once.
To move apps to an external hard drive, click the triangle icon and choose your external hard drive as the destination to store the apps.

Step 3. Moving programs to an external hard drive involves connecting the drive to your computer, opening Windows Settings, and clicking on "System" or "Storage" to select the programs to move. You'll then click "Proceed" to transfer the programs to the external hard drive, which may take time depending on the size of the programs and computer speed.

Second, plug the external drive back into your computer.
- The application location has been changed to a cloud-based platform. It is no longer installed on the local disks on your computer, but rather accessed remotely through the internet. This change is intended to improve the application's availability, scalability, and security.
- On the day you want to use the application, bring the drive with you, connect it again.
Third, get ready to run the application from the external drive.
- Go to the Windows File Explorer, open the external storage.
- Double-click on the application.exe file.
- You can see the application will begin to prepare it to set up.
- You can run the application from the external hard drive in the same way as it's on the local hard disk.
Conclusion
To free up space and change the installation place, select Part 1, and to move installed applications to an external hard drive, refer to Part 2.
Related Articles
- Qiling Disk Master Pro 12.2/11.0/10.0 Full Version Crack
- Windows Server Transfer | How to Transfer Applications from One Windows Server to Another
- How to Move Riot Games to Another Drive on Windows 11 (2022 Fixed)
- Best Method to Transfer Files from PC to PC without USB
- Seagate One Touch VS. Seagate Expansion: Which is Better
Compare Seagate One Touch and Seagate Expansion drives by design, backup features, storage options, and use cases to choose the better drive. - Home Office Setup: Setting Up Home Office for Remote Work
If you're working from home due to COVID-19 or other reasons, setting up a home office can help you stay productive. Follow these DIY home office setup tips to create a space that mirrors your office and allows you to work efficiently.