Server Migration: Everything You Need to Know | 2022 Complete Guide
Applies to: Migrate Server content in Windows Server 2022/2019/2016/2012/2012 r2/2008/2008 r2/2003, etc.
Server Migration is the process of transferring data, applications, or entire systems from one server computer to another. This process involves several steps, including preparing the source and target servers, configuring network settings, and transferring data and applications.
What Is Server Migration
Server Migration Server migration is the process of transferring data, software, and user information from one server to another using specialized tools or software. This involves applying a tool or advanced server transferring software to migrate the necessary components from the original server to the new one, ensuring a seamless transition with minimal disruption.
Server migration is necessary when there is a need to upgrade or replace an existing server due to various reasons such as hardware failure, outdated software, increased traffic, or scalability issues. This process involves transferring data, applications, and settings from the old server to a new one, ensuring minimal disruption to users and maintaining business continuity. The goal of server migration is to improve server performance, increase storage capacity, and enhance overall system reliability, ultimately leading to better user experience and reduced maintenance costs.
- Server computer gets old and slow.
- The Server is running out of space to store data and applications, resulting in insufficient storage capacity.
- The server is outdated, and you need to upgrade the server data to a newer one. This will ensure that the system is running smoothly and efficiently.
- Protect company data from Server crashes or outdated Server machines.
- Speed up Server computer, optimize company website loading performance.
To resolve the issue of running out of disk space in Windows Server, freeing up disk space is a temporary solution, but a permanent fix involves migrating to a new server.
What Are the Windows Server Migration Tools
Server managers can apply various tools and methods for server migration, in addition to the built-in Windows Server Migration Tools in Server Manager. These tools and methods enable the migration of data, files, and even applications between two Windows Server computers.
To transfer data from one Windows Server to another, you can use various tools such as PowerShell, Robocopy, SQL Server Management Studio, and Active Directory Users and Computers, among others. These tools enable you to migrate files, databases, and other data to a new server, ensuring a smooth transition and minimizing downtime.
- Windows Server Migration Tools in Server Manager
- Windows Server Migration Software - Qiling Disk Master Technician
- Server Data Migration via Cloud Drive
- Data Transfer via USB or External Storage Devices
How Long Does Server Migration Take
The duration of server migration can vary significantly depending on several factors, including the size of the data, complexity of the server setup, network bandwidth, and the expertise of the migration team. Experienced Windows Server experts agree that these factors can impact the speed of server data migration, making it essential to carefully plan and execute the migration process to ensure a smooth and efficient transition.
- Data amount
- Network speed
- File type - files, pictures are faster than videos, audios
- USB 4.0 and USB 3.0 are significantly faster than USB 2.0 when it comes to external storage drives, offering much quicker data transfer speeds.
- The more free space on the target drive, the faster server migration speed will be.
- The file transfer speed of Cloud drives may be different.
The time it takes for each Server Migration Tool to transfer files, apps, etc., to a new Server computer would be dependent on various factors, including the size of the data, network bandwidth, and the efficiency of the migration tool. Without specific details on these factors, it's difficult to provide a precise estimate. However, in general, the process can take anywhere from a few minutes to several hours or even days, depending on the complexity of the migration and the resources available.
A comparison table helps determine the fastest method for server data migration by listing the transition speed of four recommended methods, making it easier to choose the quickest option.
| Tools for Server Migration | Speed for File Transfer | Transfer Duration for 1TB of Data |
|---|---|---|
| Windows Copy/Paste |
|
|
| Cloud Drive |
|
|
| Windows Server Migration Tools | 100MB/s | 2.9 hours |
| Qiling Server Migration Software | / | / |
- Notice:
- Qiling Server Migration Software - PC Transfer connects two computers via a network, but the transfer speed is influenced by factors such as the hard drive's network stability, file amount, and read/write speed, resulting in varying transfer speeds on different computers.
When to use server migration tools and how to use them? First, check the tutorial guide below to transfer files and content from Server to Server successfully.
How to Perform Server Migration and Migrate Files/Data, Apps
We've put together a comprehensive guide to help you master the art of file transfer, covering methods from simple to complex. This guide will walk you through the recommended techniques, making it easy to understand and learn how to use them effectively.
Looking for a reliable tool to make server migration a breeze? Look no further!
#1. Migrate Data Between Servers via External Storage Devices
- Device: A big USB or external hard drive with sufficient free space is needed, as well as two Server computers.
- Tools: Windows Copy & Paste
- Transfer Content: Files and folders stored on Server computers, Database content, etc.
How to Transfer:
Step 1. To connect a USB or external hard drive to the source server, simply insert the drive into a readily available USB port on the server, or connect it using a suitable cable to an available port on the server. Ensure the drive is securely attached to the server to prevent any potential disconnections during data transfer.
Step 2. To prepare for migrating files and folders to a new server, copy the necessary ones into an external storage device. This will ensure they are safely transferred and available for the migration process.
Step 3. Disconnect the external storage drive from the old server, then connect it to the new server.
Step 4. Copy and paste files and folders to the new Server's target location.

#2. Transfer Files, Apps, User Account & Settings to New Server via Server Migration Software
- Device: Two Server computers, network connection in the same LAN
- Tools: Server Migration Software - Qiling Disk Master Technician
- Transfer Content: Files, folders, applications, Server users' accounts, and settings.
Qiling Disk Master Technician is a reliable and trustworthy tool for Server users to migrate almost everything to a new Server computer. With its simple and user-friendly interface, this tool allows users to download, install, and apply it to migrate old Server data to a new computer within just a few clicks.
#1. Transfer Data to New Server
Step 1. Open Qiling Disk Master on both of your server computers. Choose "File sync" to go to the next step.

Step 2. To connect the current PC to the target PC, enter the target computer's account password or verification code. On the target computer, you can also turn on "Connection Verification" in the top right corner of the "PC to PC" main screen. This will allow the connection to be verified.

Step 3. To transfer files to another Server computer, select the desired files by clicking on "Files" and check the ones you want to transfer. Once you've chosen the files, click "Proceed" to initiate the migration process.

Step 4. Wait for the process to finish, and PCTrans will transfer files quickly, taking a short time.
#2. Migrate Apps, Software to Another Server
Step 1. Run Qiling Disk Master on both PCs
On the source PC, select "File sync" on the main screen of Qiling Disk Master and proceed.
Step 2. Connect two computers
1. Connect to a target PC via its IP address or device name by selecting it and clicking "Connect".
2. To confirm the login password of the target PC, enter the password and click "OK".
If you didn't see the target PC in the listed devices, you can manually connect the target PC by clicking "Add PC" and inputting its IP address or device name.
Step 3. Select apps, programs, and software and transfer to the target computer
1. You can choose what you want to transfer from the current computer to the target PC, giving you control over the contents of the transfer.
2. After choosing the desired applications and programs, click "Proceed" to initiate the transfer process.
You May Also Feel Like to Learn:
How to Transfer User Account to a New PC
This tutorial article provides a step-by-step guide on how to transfer a User Account with password to a new computer in Windows 10/8/7 with just a few simple clicks.
#3. Transfer Server Content to a New One Using Cloud Drive
- Device: Two Server computers, cloud drive account
- Tools: OneDrive, Dropbox, Google Drive, pCloud, etc.
- Transfer Content: Files, folders, and desktop content in Server computer.
How to Transfer Server Files:
Step 1. Launch the cloud drive app on the Server computer or open the cloud website via browser.
Step 2. Log in with your cloud drive account and password.
Step 3. Click "Add" or "Upload" to add files or documents from your computer to upload.
Step 4. Launch the cloud drive app on the new Server computer, log in, and select files to download to the new Server once the migration is complete.
#4. Export Server Data and Import to a New Server via Windows Server Migration Tools
- Device: To set up a backup system, you would need two Server computers and an external USB drive with sufficient free space to store backups. This setup would allow you to create a redundant system where data is backed up on both servers and the external drive, ensuring that data is safe in case one server fails or is compromised.
- Tools: Windows Server Migration Tools
- Transfer Content: Files, folders, and desktop content in Server computer.
Windows Server Migration Tools is a built-in tool in Windows Server Manager that allows advanced server experts to migrate files between servers.
How to Use Windows Server Migration Tools for Server File Transferring:
Step 1. Enable Windows Server Migration Tools in Server Manager:
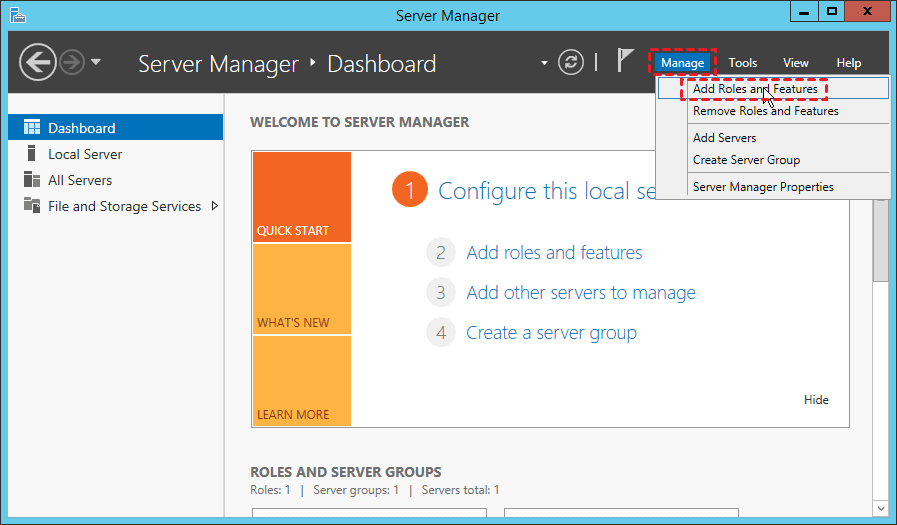
To add roles and features to the server, open Server Manager, click on "Manage", and then select "Add Roles and Features".
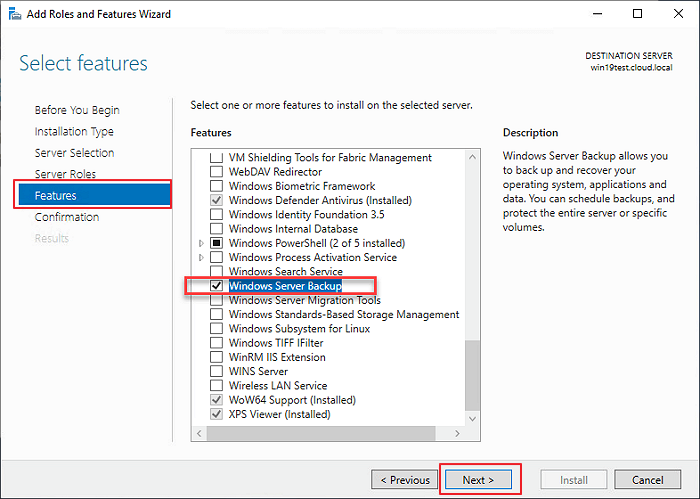
Check the "Windows Server Migration Tools" and click "Next". Then, click "Install" to proceed.
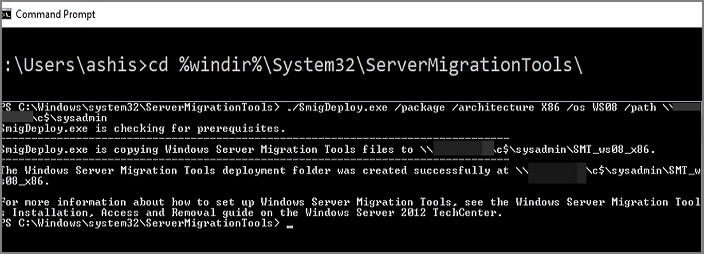
Step 2. Create a deployment folder on the target server computer:
Open "PowerShell" , type the following command lines and enter each time.
- cd %Windir%\System32\ServerMigrationTools\
- SmigDeploy.exe /package /architecture X64 /os WS08 /path
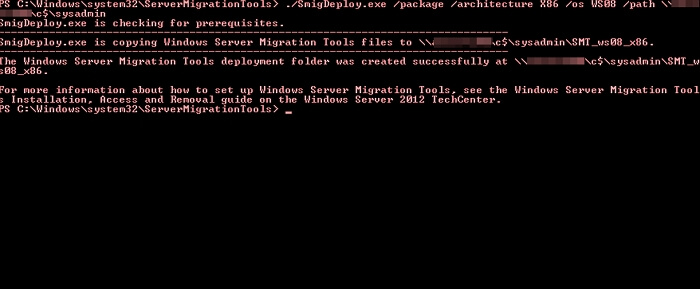
Step 3. Register Windows Server Migration Tools on the source Server computer:
- Copy the deployment folder to a local drive of the source computer shortly
- Open Command Prompt, type .\Smigdeploy.exe, and hit Enter.
Step 4. Migrate Server Data from Server to Server
- To migrate a server, open Windows Server Manager on the source server and click to open Windows Server Migration Tools.
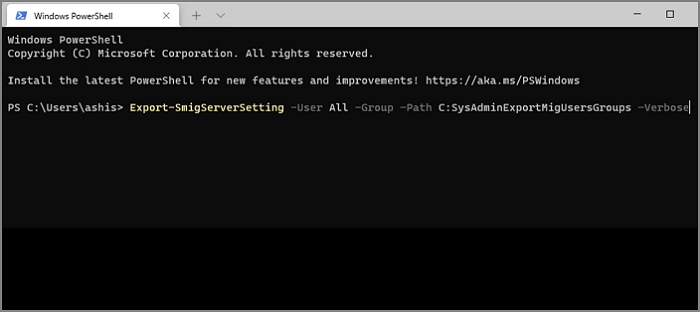
- Open PowerShell and type `Export-SmigServerSetting -User All -Group –Path C:SysAdminExportMigUsersGroups –Verbose`, then hit Enter. This command will export the user and group settings for all users and groups to the specified path.
To export files from the source Server computer, you can use the following command in the command prompt: `robocopy
- To start the Server Migration Tools on the target Server computer, open Server Manager, navigate to Tools, and then select Windows Server Migration Tools.
- Open Powershell and type Import-SmigServerSetting–UserEnabled–Group-PathC:SysAdminExportMigUsersGroups -Verbose, hit Enter.
This command imports the exported Server data to the new Server computer.
What process needs to complete?
Server Migration Is Easy, and You Can Be an Expert with the Right Solution
Server Migration is the process of transferring data from one server to another. For users of all levels, there are various tools available to facilitate this process.
- For the simplest method, try using Windows Copy and Paste via an external storage device. This method allows you to copy and paste files between your computer and an external device, such as a USB drive or external hard drive, without needing to physically move the files.
- For a seamless migration of all data and applications to a new Server computer, Qiling Disk Master Technician is a reliable solution.
- For experienced Server users, Windows Server Migration Tools is a cost-effective option for migrating Server files.
Related Articles
- How to Change Adobe Photoshop CC Install Location?
- 3 Tips to Uninstall Programs in Windows Server [2022 New]
- How to Transfer Files from iCloud to Google Drive Step by Step
- How to Connect Two Computers In Multiple Ways
- 5 Best Free Windows 10 Imaging Software [Updated 2022]
This article will introduce some best free Windows 10 imaging software to you. Imaging software can help safeguard the safety of your data on a computer. After reading this post, you can know some knowledge about five free Windows 10 imaging software. - Windows 10 Incremental Backup | Wise Backup Method
Learn how to create incremental backups in Windows 10 and protect changed files efficiently with backup tools and schedules.