Step-by-Step Guide: How to Turn Off Windows Backup
Windows backup can be useful in case of data loss, but it can quickly fill up your hard disk drive, especially on smaller drives, with automatic system backups that include older Windows update files. To prevent this, you can disable Windows backup, which will stop Windows from creating useless backup files. Here's how to do it.
Overview of Windows Backup
Windows backup allows users to create data backups and retrieve lost, corrupted, or erased data from earlier backups, a feature reinstated in Windows 10 after being discontinued in Windows 8 and eliminated in Windows 8.1, enabling users to copy data and create an operating system image.
Windows backup may be installed on your PC, but instead of running a backup, it may be consuming system resources, causing your PC to slow down significantly. This can be due to various reasons such as software conflicts, scheduled backups, or other unique components that are not easily replicable, leading to the "backup in process" message, even though no actual backup is being performed.
How to Turn Off Windows Backup?
The best option for turning off Windows backup is to use "Services". It is the most common approach to disable Windows 10 backup. You may do it in this manner if you follow the guidelines below.
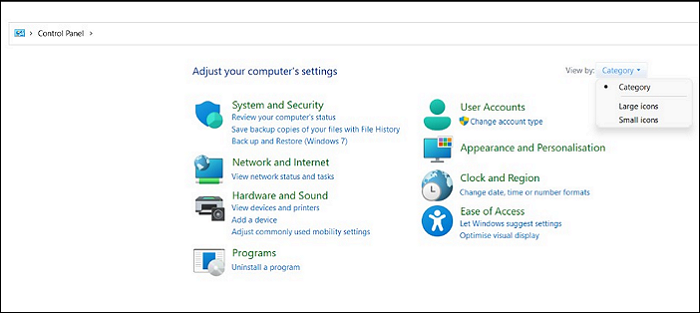
Step 1. To access the Control Panel, open it and click on the "View by" option located at the top right corner. From there, change the "View by" option to either large or small icons, whichever you prefer. This will allow you to view the Control Panel in a more user-friendly format.
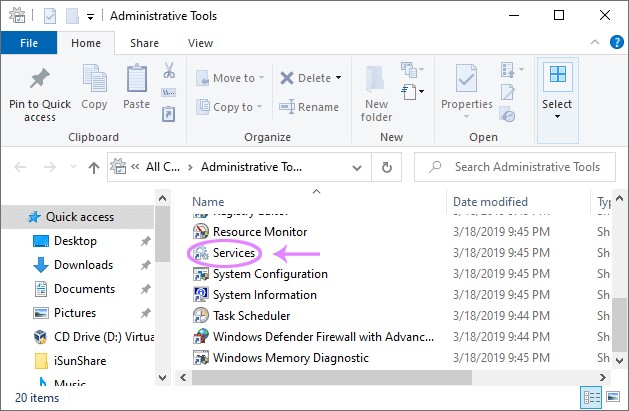
Step 2. To access the Administrative Tools category, select it from the list to open the window.

Step 3. To continue, navigate to the Name column and double-click on the "Services" option.
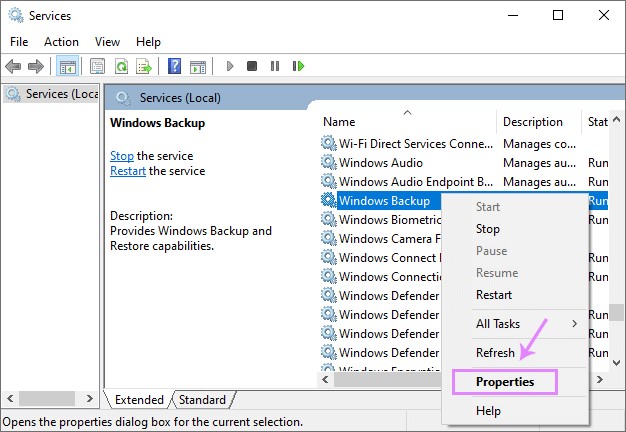
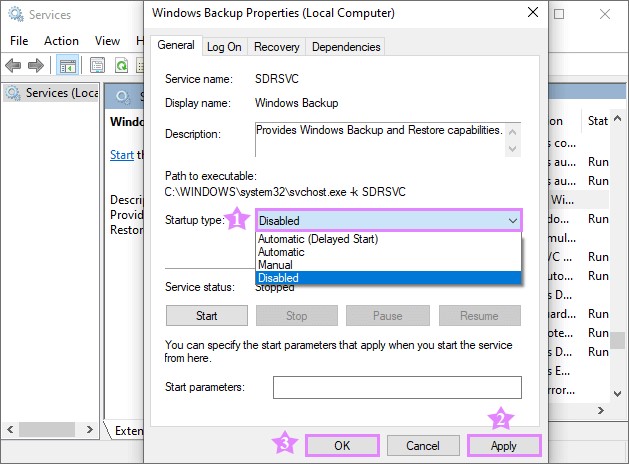
Step 4. To locate the "Windows Backup" option, open the "Services" window, right-click on it, and select "Properties" from the drop-down menu.
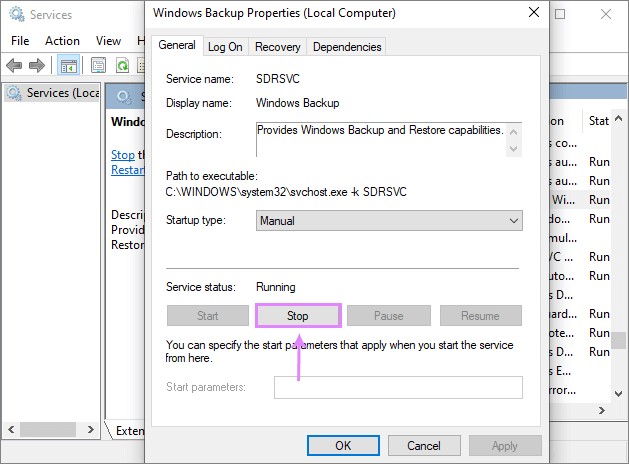
Step 5. You need to stop the service if its status is showing "running".
Step 6. To disable the Windows Search service, you need to click on the "Services" option in the Start menu. Then, you need to click on the "Windows Search" service and select the "Properties" option. After that, you need to click on the "Startup type" to expand the drop-down menu, select the "Disabled" option, and click on the "OK" option to save the changes. This will disable the Windows Search service.
Our article presents two easy ways to back up Windows 10 OS, making it a valuable resource for those looking to protect their operating system.
Customize Your Backup Plan
Maintaining a backup plan can help avoid terrible situations by providing a convenient option for recovery in case of malware attacks, lost files, disk corruption, system malfunctions, or even offsite backups in extreme scenarios like building fires.
Qiling Backup is a freeware backup program that allows users to back up their system disk, specific files, folders, and entire hard drives with ease. To get started, simply select the type of backup you want to generate, and the rest will be taken care of by this efficient data backup tool. The program offers several advantages, including the ability to back up important data, protect against data loss, and provide peace of mind.
1. Here are the options for creating backups in one paragraph:
- A complete backup
- Incremental backups: Changes based on previous backups
- Differential backups: Changes based on the initial full backup
2. These backups can restore individual files, folders, the entire hard disk, Windows operating system, email, a different partition, or the entire computer.
3. This program enables you to compress backup images and combine multiple images into a single, smaller file, thereby freeing up space on your hard drive.
4. Qiling Backup will attempt to store your incremental backups to a network drive, NAS disc, OneDrive, GoogleDrive, Dropbox, or the Qiling cloud.
5. The service now provides users with an online backup solution that allows them to access their backups from anywhere using only their account, offering convenience and flexibility in managing their digital data.
6. Qiling Backup may set up a smart schedule to detect certain files or folders every half-hour and produce a fresh backup image if any changes have been made within that time frame. It supports differential, incremental, and full backups.
- To back up regularly changing database files
- To create a backup of shared files that are constantly being modified by multiple users, which can be a complex task due to the need to track and synchronize changes made by various individuals.
- To generate numerous restoration points for recovery or a rollback.
Step 1. To start a backup, click the "File backup" button in the "Backup and recovery" page.

Step 2. The tree view displays a list of local and network files, which can be expanded to select the files to be backed up.

Step 3. Follow the instructions on the screen to select the location where you want to store the backup.

Step 4. In the Backup Options, clicking on Options allows you to encrypt the backup with a password, providing a range of customizable features to tailor the backup operation to your specific needs.
To specify the backup schedule, go to Backup Scheme and choose the desired schedule. You can select from various options such as daily, weekly, or monthly backups.

Step 5. Backups can be stored locally, in Qiling's cloud service, or on a network attached storage device (NAS).

Step 6. Qiling Backup offers customers the option to back up their data to either a third-party cloud drive or the company's own cloud storage.
To back up your data to a third-party cloud drive, select Local Drive, scroll down to add Cloud Device, and enter your account information.
Step 7. To start a backup, select the "Proceed" option. Once the backup is complete, it will be displayed as a card on the left-hand panel. You can then access the backup job details by clicking on it.

Conclusion
Windows Backup can be beneficial, but it also has the potential to slow down your device and interfere with your work, requiring you to disable it to maintain proper functionality.
To efficiently deactivate Windows 10's backup process, follow these steps. Alternatively, consider using Qiling Backup software, a reliable backup solution that allows multiple backup features and can assist in backing up and restoring important files and data without disrupting your workflow.
Related Articles
- Top 3 Qiling Backup Options You Should Know
- Simple & Easy: Backup External Hard Drive to Cloud
- How to Install Windows 10/11 on NVMe SSD Drives (99% Have Learned)
- 10 Best Windows Backup Software of 2022 (Features, Pros & Cons)
- How to Use SSD as External Storage | Find Your Answer Here!
To use an SSD as external storage, you can follow these steps: search for a solution online, and then follow a detailed tutorial on how to use your SSD as an external drive to store or back up your data. This will provide a better way to safeguard your important files and keep them easily accessible. - Data Backup and Partition Manager Tutorials
Data Backup and Partition Manager Tutorials