Transfer Data with Windows 11/10 Migration Tool
Why you need a Windows 11/10 migration tool
To keep your personal data, installed programs and settings after updating your computer from a former operating system to Windows 11/10 or buying a new computer with Windows 11/10, a Windows 11/10 migration tool is essential. Without it, you'd have to manually transfer each file and reinstall all applications individually.
Upgrading the hardware of your computer, such as replacing the disk or getting a new computer, requires transferring the Windows 11/10 system, a time-consuming and tedious process.
Get ready to migrate with us, whether you're moving to Windows 11 or 10, we've got two tools to make the process smooth.
What is the best Windows 11/10 migration tool
1. Transfer programs, data, settings to another computer.
To avoid manually transferring files and programs, it's essential to find a reliable Windows 11/10 migration tool. We highly recommend using Qiling Disk Master, a powerful PC transfer software that simplifies data transfer in Windows 11/10. With just a few clicks, you can easily transfer all your data and installed applications from Windows XP/7/8 to Windows 11/10 or from an old computer to a new one with Windows 11/10.
2. Transfer system to the new pc.
Here are two cases you may want to know:
Case 1: transfer Windows 11/10 system to new pc.
Case 2: transfer Windows 11/10 system to new disk.
System migration is not easy as the file migration. Qiling Backup can be the best helper for you. A user-complimented software committed to move/clone your newly Windows 11/10 system to create a better operating environment.
How to transfer data and applications with Qiling Windows 11/10 migration tool
Qiling is a secure and easy way to transfer data between Windows 11/10 computers. The tool allows for a seamless transfer of files and apps between two computers, making it a convenient option for those looking to upgrade or switch operating systems. The process is straightforward and can be completed by following the steps outlined in the article. If you need to transfer files between different operating systems on the same computer, refer to the article on transferring files from Windows 7 to Windows 11/10 instead.
Step 1. Launch Qiling Disk Master on your source and target computers, and connect both PCs via the internet.
1. At the "Backup and recovery" section, click "File sync" to proceed.

2. Select your target computer via its device name, then enter its account password or verification code, and choose the transfer direction. Click "Connect" to proceed.
You can check the verification code on the right top of the "PC to PC" main screen on the target computer.

Step 2. To transfer data via the internet, select the categories of Applications, Files, and Accounts. This will allow you to move and sync your chosen data across devices, ensuring that your information remains up-to-date and accessible.
To transfer data selectively, click "Edit" under each category and choose the specific items you want to transfer.

Step 3. To transfer your apps/files/accounts from one computer to another computer via the Internet, click "Proceed" to initiate the process. This will allow you to securely move your digital content to a new device, ensuring a seamless transition.
If your machine runs out of space, it may affect Windows 11/10 upgrading. To resolve this, you can use the App Migration feature to move apps from your SSD to your HDD, which can help free up space and make upgrading easier.
How to transfer system with Qiling Windows 11/10 migration tool
Case 1: Transfer system to another pc via Windows migration tool
Qiling Backup provides a System Transfer feature that allows users to migrate their system to a new computer, ensuring the hardware runs normally only under the corresponding driver.
Step 1. Create an Emergency Disk to USB
1. Connect an empty USB flash drive or external hard drive with over 100GB of free space to your PC.
Note: Initialize the USB or external hard drive as MBR, creating two partitions in the process. Set the first partition as FAT32, and the second partition as NTFS.
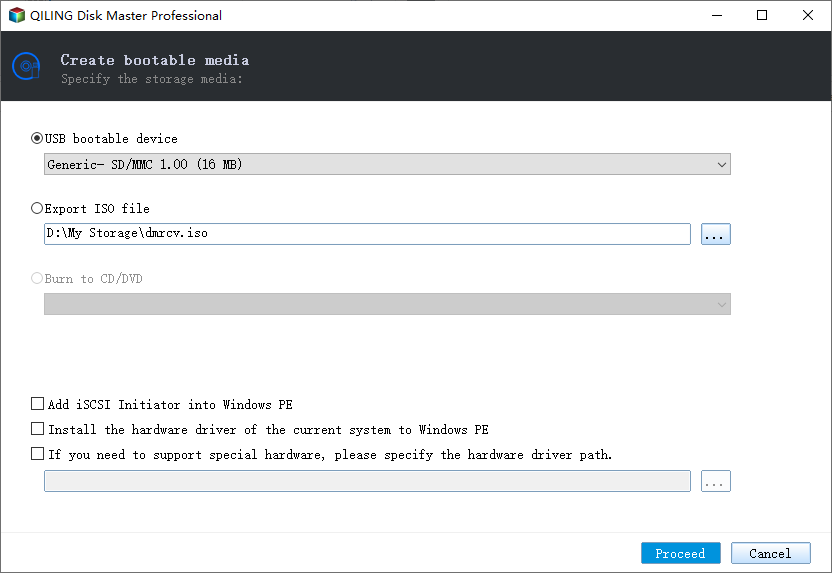
2. Run Qiling Backup and click "Tools" > "Create bootable media".
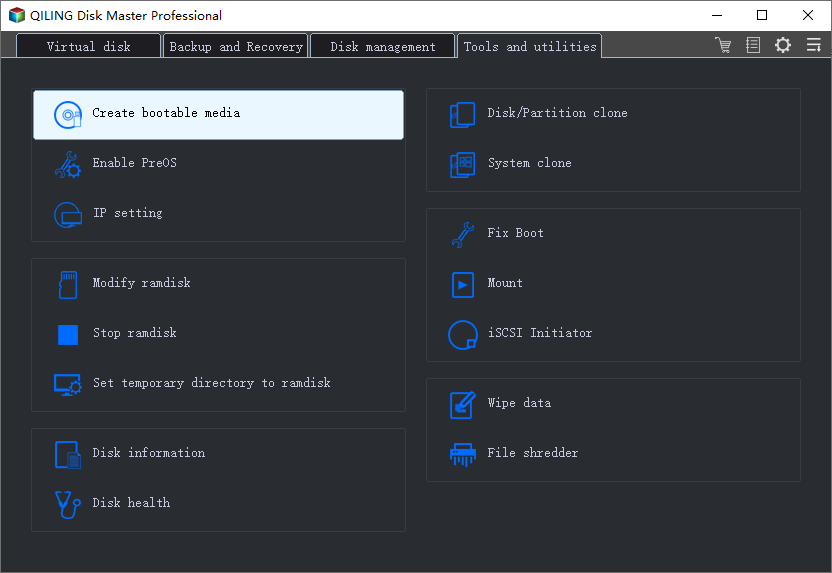
3. Choose USB as the disk location to create the emergency disk and click "Create".
The bootable disk allows you to boot a computer and transfer a system image to a new PC.
Step 2. Create System Backup Image on Source Computer
1. To create a system backup, click on the "System backup" option on the main page, and Windows OS will be selected by default.
2. In the Disk Management utility, select the second partition of the USB drive that contains the emergency disk to save the system image.
You can also save the system backup image to another empty external disk, which must be equal to or larger than the system C drive.

3. The process of creating a system backup image to the target device can be initiated by clicking the "Proceed" button, which will start the system backup process.
Step 3. Boot Target Computer from Qiling Backup Emergency Disk
1. Eject Qiling emergency disk and system backup image USB and connect it to the new computer.
2. Restart PC and press "DEL/F2/F10/F12" to boot into BIOS.
3. To resolve the issue, go to the boot menu and set the computer to boot from the Qiling Backup emergency disk.
To restore the system image to a GPT disk, you'll need to change the boot mode to EUFI in your BIOS settings. This will allow your computer to enter the Qiling Backup main interface, allowing you to proceed with the restoration.
Step 4. Transfer System to the New Computer
Note: To restore a system image to a new computer, be aware that it will erase the existing data on the target disk. Therefore, it's essential to back up any important files beforehand or use an empty disk to prevent data loss. This ensures a smooth and safe restoration process.
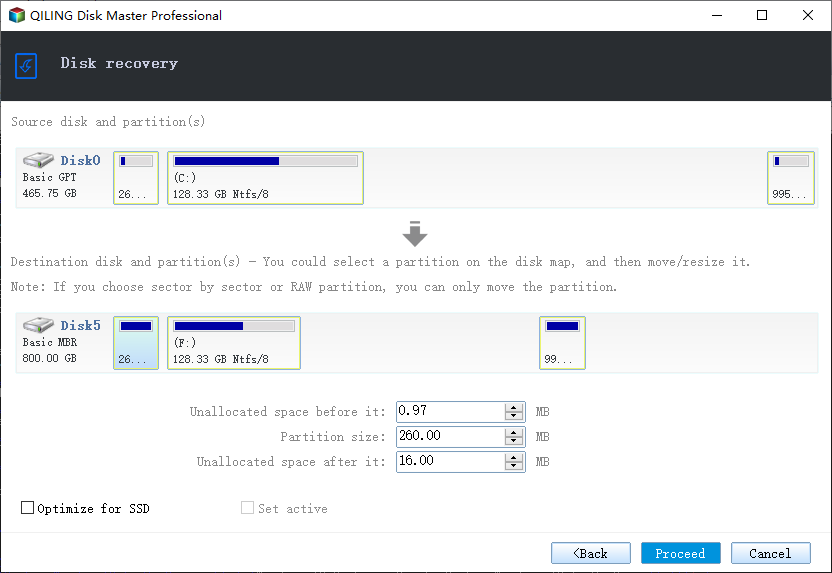
1. On Qiling Backup main interface, click "Backup and recovery" page.

2. Connect your USB external drive to your computer, select the system image on the drive, and click "OK" to proceed.

3. To transfer the system to a new computer, click "Proceed" after selecting the new computer as the destination. This will initiate the transfer process.
Step 5. Restart PC with transferred system
1. Enter BIOS and set computer to boot up from the drive with the transferred system.
2. Save all changes and restart your computer.
3. Update all drive drivers and programs to ensure a smooth transition to the new computer by installing the latest versions of drivers and software. This helps prevent compatibility issues and ensures that all hardware and software components work together seamlessly.
Case 2: Transfer system to another disk via Windows migration wizard
The hard drive plays a crucial role in a computer's normal functioning, impacting its overall use.
To change your disk without reinstalling the system, you can use the System Clone feature of Qiling Backup, which allows you to clone your Windows 11/10 OS to a new SSD.
Steps: To proceed with the system clone, select the target drive and click "Proceed" on the System Clone window.
Related Articles
- How to Move Overwatch to Another Drive or Another PC Quickly
- Is It Possible to Easy Transfer Windows 10 to Windows 11? Yes!
- How to Transfer Photos from Google Photos to Gallery? Follow the Guide!
- How Do I Transfer Microsoft Silverlight from Windows 10 to Windows 11
- Moving Server to Cloud, What To Consider and How to Do It [2022 Complete Guide]
Are you looking for a complete and safe guide that can insist you moving Server to Cloud without losing any data? This page will give you a full guide on what you need to consider and how to move Server to Cloud with detailed instructional steps. - NAS Backup Server: How to Back Up All Data from Server Computer to NAS
This article provides a comprehensive guide on backing up a Windows Server computer to a Network-Attached Storage (NAS) device. It covers the process of backing up sensitive files, programs, and account settings to the NAS server, ensuring that important data is safely stored and easily recoverable in case of a system failure or other disaster.