How to Delete Photos from iCloud in 3 Quick and Simple Ways
Summary
Here are three easy ways to delete photos from iCloud: you can delete them directly from the Photos app on your iPhone, use the "Optimize Storage" feature to remove photos from iCloud, or use the iCloud website to delete photos. Additionally, if you accidentally deleted photos, you can use Qiling MobiSaver to recover them.
One of the most incredible features of your iPhone is iCloud, which offers automatic data backup and prevents anxiety when accidentally deleting a file, allowing you to store photos taken on your iPad or iPhone in the cloud.
To delete unwanted images from iCloud, browse through your photos, select the ones you want to remove, and delete them, freeing up storage space.
This article explores the various methods to delete photos from iCloud, as well as the recovery of deleted photos using Qiling MobiSaver.
What Is iCloud and How to Access iCloud Photos
Apple's iCloud platform allows users to sync and back up data, ensuring that deletion doesn't result in permanent loss. It's accessible and easy to manage, providing a convenient solution for Apple users to safeguard their data.
To access iCloud photos, you can use either a PC or a mobile device. Additionally, iCloud syncs with other Apple native applications, such as Find My and Books.
There are three ways you can access iCloud images. These are:
- Visit www.icloud.com and view the images
- Choosing Mac and Windows to access iCloud
- Download the iCloud App
Here are the methods to access iCloud photos in one paragraph:
Three Ways to Delete Photos from iCloud
You can delete images from iCloud by going to iCloud.com, signing in, clicking on "Photos," selecting the images you want to delete, and clicking the "Delete" button. Alternatively, you can delete images from your iPhone or iPad by going to the Photos app, selecting the images you want to delete, and clicking the "Delete" button. You can also delete images from iCloud by using the iCloud for Windows app, which allows you to manage your iCloud content on your Windows computer.
- Method 1. Delete Photos from iCloud via Web Browser
- Method 2. Delete Photos on iPhone/iCloud via iCloud Photos
- Method 3. Delete Pictures from iCloud via Photo Stream
Method 1. Delete Photos from iCloud via Web Browser
Step 1. Log in to "icloud.com".
Step 2. Select the Photos App.
Step 3. Tap on "Photos" or "Moments".
Step 4. To delete unwanted images, select them by either clicking on the images you want to delete or double-clicking on an image to get it selected.
Step 5. Press the "Delete" option.
![]()
Step 6. To confirm the deletion of images from iCloud, click on the "Delete" button again. This will ensure that the images are completely removed from your iCloud account.

Method 2. Delete Photos on iPhone/iCloud via iCloud Photos
iCloud Photos automatically backs up every photo taken on your phone, allowing you to access them on different Apple devices through the iCloud Photo Library. Enabling iCloud photos ensures that your images are backed up to the cloud, giving you peace of mind that your photos are safe.
To delete unwanted photos from iCloud photos, go to the Photos app, browse through the images, and select the ones you want to delete.
Note: Deleting images from the Photos app on an iPhone ensures they are removed from iCloud, but they can still be recovered from the "Recently Deleted" folder within 30 days.
Tip 1. Do Photos Stay on iCloud if Deleted from iPhone
When iCloud Photos is enabled, deleting photos on your iPhone will also delete them from iCloud. However, if iCloud Photos is disabled, deleting photos on your iPhone won't delete them from iCloud, and they will remain on your iCloud account.
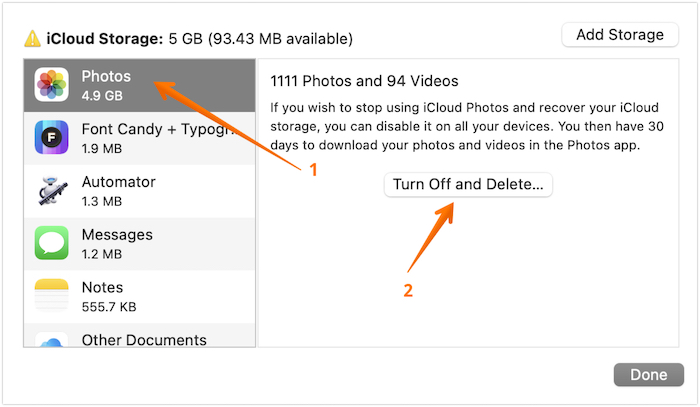
To disable iCloud Photos on your iPhone, go to Settings, then tap on your name at the top, and select "iCloud". From there, toggle off the "Photos" switch.
Step 1. Go to "settings" > Click on "User name".
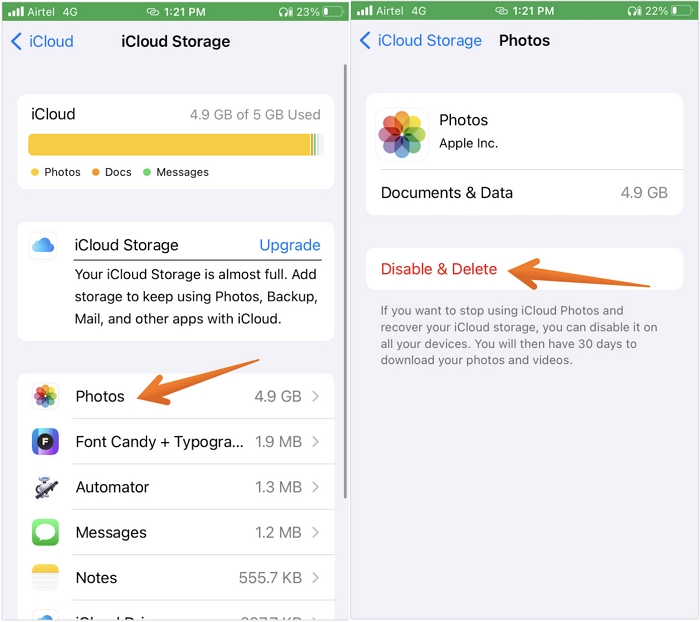
Step 2. Select iCloud and then click on "Manage Storage".
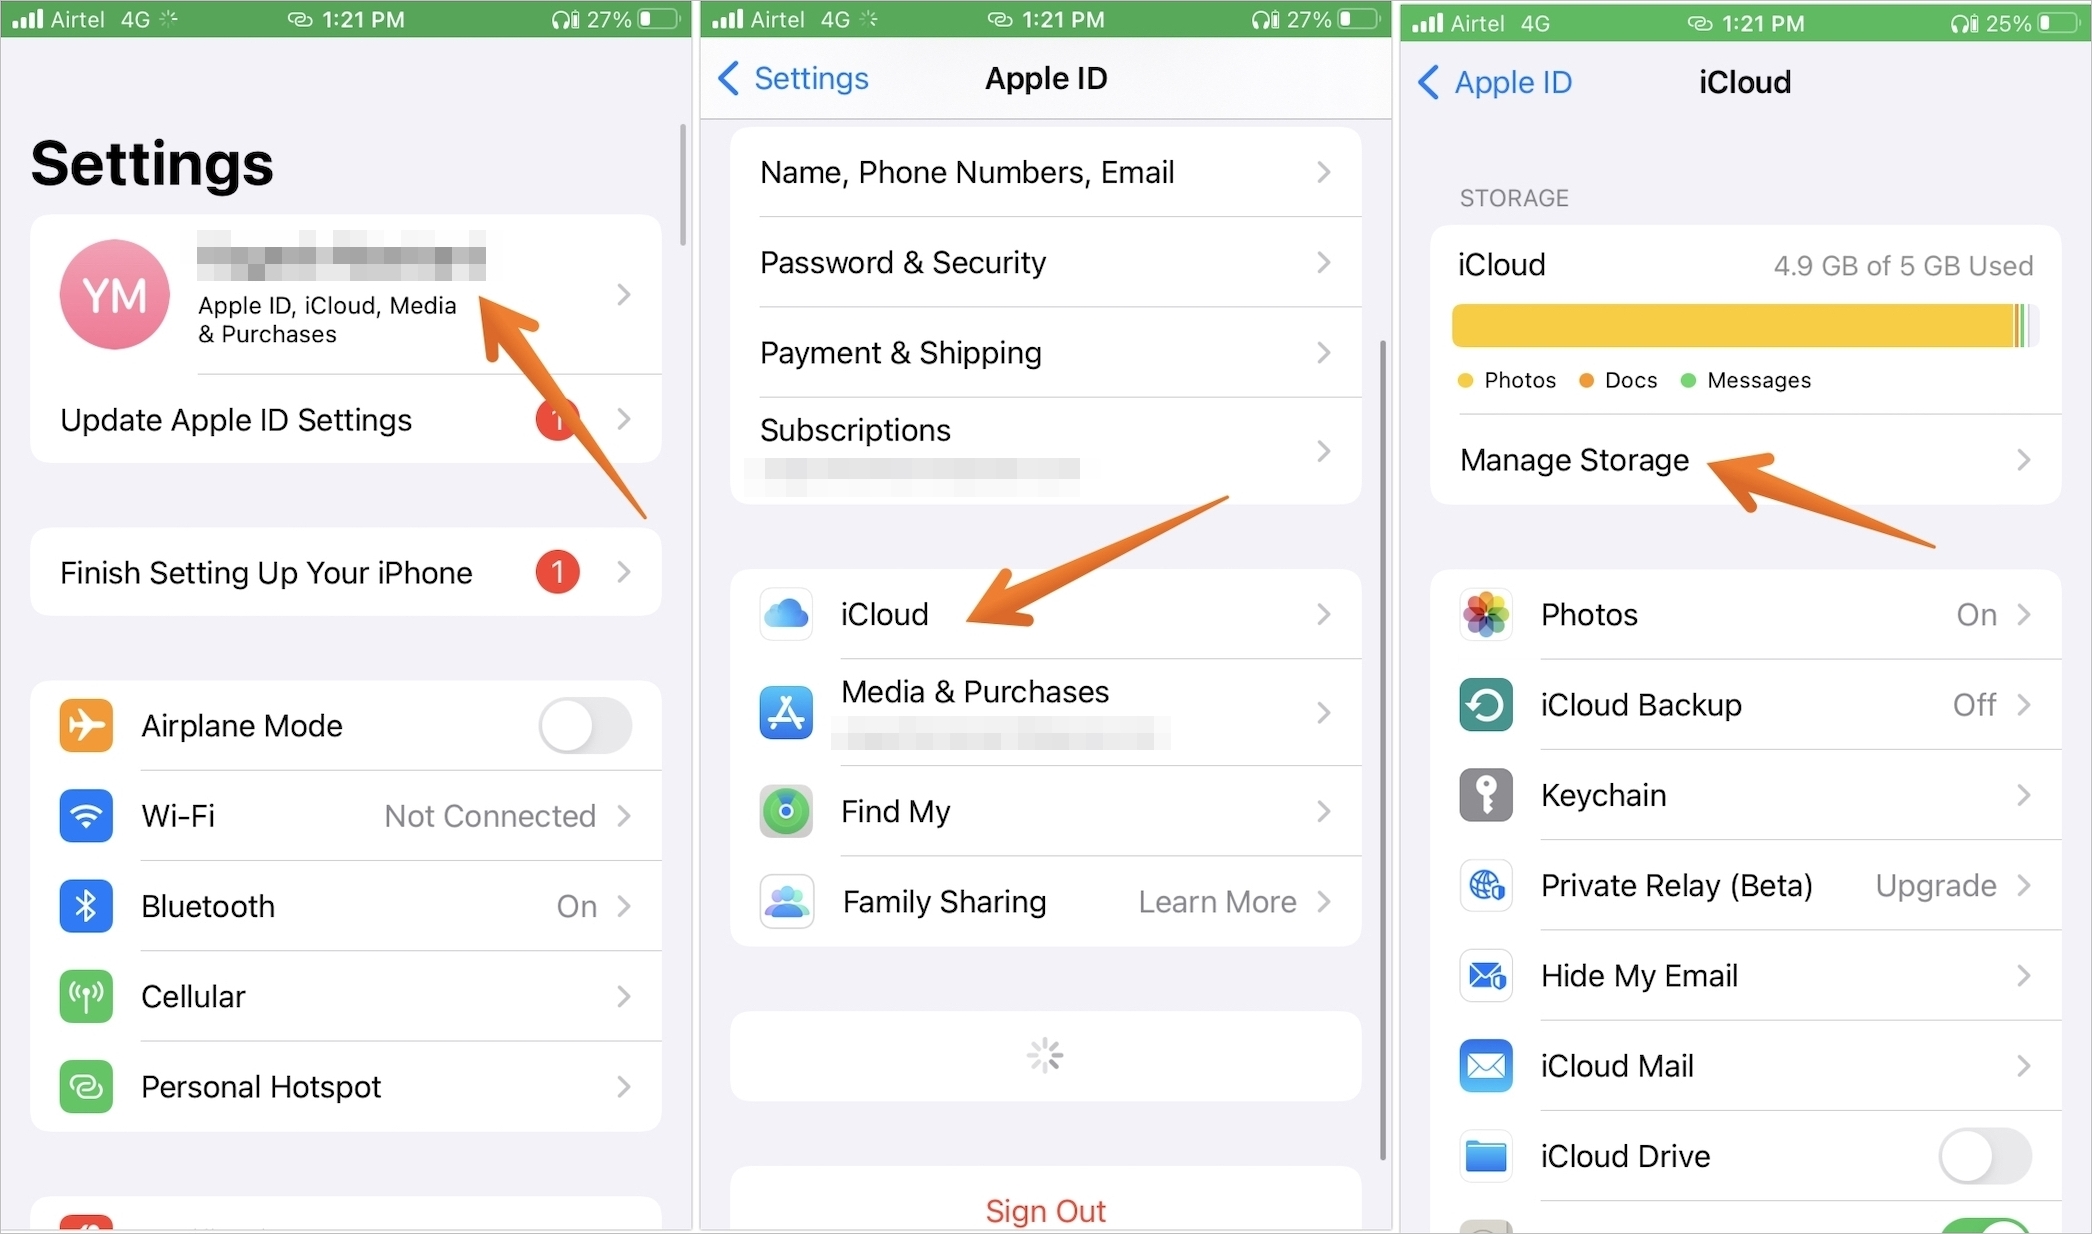
Step 3. After that, press the "Photos" option.
Step 4. Tap on "Photos" once again.
Step 5. Disable the "iCloud Photos" option.
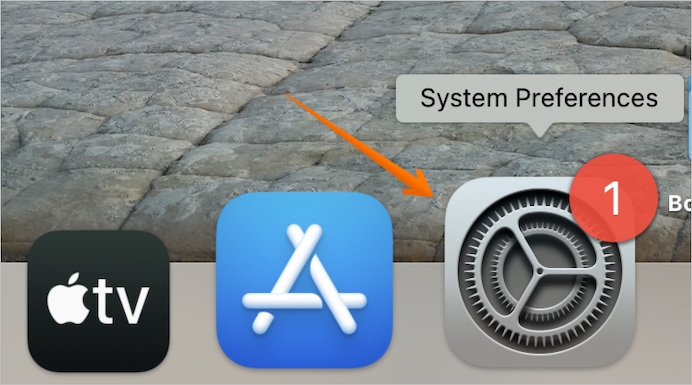
If you are wondering how to disable iCloud Photos on Mac, take a look.
Step 1. To open System Preferences, click on the System Preferences icon from the dock area.
Step 2. To access the Apple ID settings, click on the "Apple ID" option at the top of the system preferences pane.
Step 3. To access iCloud data, click on iCloud from the left pane, and then click on the "Manage" button on the right side.
Step 4. To turn off photos from the left side, click on the "Photos" tab and then toggle off the switch from the right-hand side settings.
Tip 2. Can I Delete Photos from iCloud But Not iPhone
To delete photos from iCloud but not the mobile device, you can disable iCloud Photos, which will allow you to delete photos from iCloud without removing them from your iPhone.
Method 3. Delete Pictures from iCloud via Photo Stream
Photo Stream is a convenient feature that backs up photos from Apple devices to iCloud when connected to Wi-Fi, providing a saved backup, but also potentially consuming unnecessary space.
To free up space and delete duplicate photos from the "Photo Stream", you can turn it off. This will allow you to manage your photos and delete any duplicates or unwanted photos.
Step 1. Go to "Photos" and click on "Albums".
Step 2. To access the Photo Stream option, press the "Photo Stream" option, and then press the "Select" button.
Step 3. To delete one or multiple images, click on the desired images and then select the "Trash" icon.
Step 4. Now, click on the "Delete Photos" option.
There is an alternative way too.
Step 1. Go to "Settings" and click on "Photos & Camera".
Step 2. Please scroll down to "My Photo Stream". Then click on it.
Step 3. You will get a pop-up message to ensure that turning it off will delete the photos.
Step 4. Click on "Delete".
Recover Deleted iCloud Photos with Software
Deleting photos from your iPhone may free up storage space, but what happens when you accidentally delete or lose precious images? Fortunately, reliable data recovery software can help retrieve lost photos, providing a solution in cases where images are deleted or lost unexpectedly.
You can choose Qiling MobiSaver, a professional data recovery software compatible with Mac and Windows, to retrieve lost data regardless of the reason. This software makes it easy and hassle-free to restore photos on iPhone, iPod, and iPad.
There are three modes of recovery available. These are:
- Recover from iOS Device
- Recover from iTunes Backup
- Recover from Backup
This software can recover various types of data, including photos, videos, audios, messages, call history, contacts, notes, attachments, Safari bookmarks, and more.
The software is easy to use and can recover data within a few minutes.
Are you wondering how to use Qiling MobiSaver to retrieve the deleted photos from iCloud? In that case, take a look at the steps listed below.
Step 1. Choose "Recover from iCloud"
Connect your iPhone to your PC, launch Qiling MobiSaver, select "Recover from iCloud", and click "Start" to initiate the recovery process.
Step 2. Turn Off "Find My iPhone"
Turn off "Find My iPhone" on your iPhone/iPad/iPod to continue.
Step 3. Type Code in the Confirmation Box
To confirm your identity, type "123456" in the verification box and click the "Continue" button.
Note: This step will erase all data and reset all settings. Make sure you have backed up important information.
Step 4. Reset iPhone
To reset your iPhone, move through the setup process until you reach the reset screen. From there, select "Restore from iCloud Backup" and enter the Apple ID and password associated with the backup you want to restore. Click "Next" on your PC to proceed.
Step 5. Select the Files
To recover data, select the type of data you want to recover. If all files need to be restored, you can directly click the "Select All" button below.
Step 6. Analyze the iPhone
The software will analyze your phone, which may take a few minutes. Please do not disconnect or use your device during this time.
Step 7. Scan Lost Data and Recover
Qiling MobiSaver will automatically scan your iCloud backup file to find the lost data, a process that may take a few minutes. Once complete, select the desired data and click the "Recover" button to restore it.
Summary
Deleting pictures from iCloud is a straightforward and stress-free process. You can choose from three different methods, and the whole process takes only a few minutes. By freeing up space, you can use it for other purposes, making it a convenient and efficient way to manage your iCloud storage.
However, before deleting them, ensure a backup is in place. If a backup is not necessary, reconsider before making a decision. If you want to recover the photos, consider using recovery data software, such as Qiling MobiSaver, for assistance.
Delete Photos from iCloud FAQs
Now that you know the ways to delete photos from iCloud, it's a good idea to be more informed before taking any action. To do this, we recommend reading the following questions and answers to make yourself more knowledgeable.
1. Do photos stay on iCloud if deleted from iPhone?
Photos on an iPhone may remain on iCloud even after being deleted from the device, but this can be avoided by disabling the iCloud Photo Library, which would prevent deleted photos from being automatically removed from iCloud.
2. Why can't I delete photos from my iCloud?
The reason for not being able to delete images from my iCloud is the activation of the disable and delete option. If that is activated, then the photos will autodelete in 30 days. For immediate deletion, you need to go to iCloud photo library and click on the undo delete option.
3. Why are deleted photos still on iCloud?
The reason for deleted photos still being on iCloud may be due to the disabling of the iCloud photo library.
Related Articles
- How to Recover Lost Apple Music Files in iOS Devices?
- [Solved] iPhone Messages Disappeared But Still Taking up Space
- How to Recover Deleted/Lost Voice Memos with/without Backup
- [Solved] 7 Ways to Fix Contacts Missing from iPhone
- Best Get Data Back Full Version Crack Alternative Free Download in 2022
Download best alternative software to replace Get Data Back full version crack and let the NTFS, FAT, FAT32, exFAT, EXT recovery software to get data back from all drives, USB memory stick and memory card. - Hard Drive Recovery| Recover Files from a Hard Disk
If you've lost data on your hard drive, don't worry - there are easy methods to recover it. Our guide provides step-by-step instructions on how to perform hard drive data recovery on Windows 11/10/8/7 and Mac, allowing you to restore your hard drive data quickly and easily.