2022 Fix: ExFAT USB Not Showing Up on Mac Without Losing Data
Using the ExFAT file system on a USB drive isn't uncommon, but when a Mac stops recognizing the drive, it can be a concern, especially if essential data is stored on it. This issue can lead to potential data loss, making it a pressing problem to resolve.
Tensions arise when irreplaceable data loss is a possibility, making it unfathomable to lose critical data. This article discusses ExFAT USB, why Macs don't recognize it, and potential solutions.
*** 79% of Mac users are interested in ExFAT vs. Mac OS Extended
What Is Exactly ExFAT USB?
ExFAT, which stands for Extended File Allocation Table, is a file system designed for devices like SD cards and USB flash drives. Introduced by Microsoft in 2006, it is a more efficient and scalable alternative to traditional file systems.
ExFAT is the successor of FAT32, optimized for flash drives like USB drives, with features making it the perfect file system for them.
ExFAT is a lightweight file system that is compatible with various operating systems and devices, requiring minimal hardware resources. It supports large partition sizes, up to 128 pebibytes, and file sizes, making it a versatile option.
The ExFAT file system is compatible with both Mac and Windows, making it easy to transfer data between different operating systems and devices, which is why formatting a USB with ExFAT is a good idea.
Why My ExFAT USB Is Not Detected on Mac?
Various reasons explain why the ExFAT USB is not detected on Mac, including file system corruption, incorrect file system format, outdated Mac OS, incompatible USB drive, and issues with the USB drive's hardware or firmware.
- Corruption issues:If your ExFAT USB drive won't mount on your Mac, it might be due to corruption, which prevents it from being recognized. To resolve this, you may need to rebuild the directory or run a repair on the USB drive. This should help resolve the issue and allow you to access your files again.
- Missing driver software: Another reason for the issue could be the absence of necessary driver software for reading the ExFAT USB, which may prevent the system from recognizing and accessing the USB drive.
- Faulty cable: If the USB cable is the issue, try using a different one to see if that resolves the problem.
- Plugging issues: Make sure the USB drive is properly plugged in to ensure a stable power supply, which is necessary for the drive to be recognized and mounted.
- Operating system concern:In some cases, the operating system and the USB drive may not be compatible, causing the system to fail to recognize the drive.
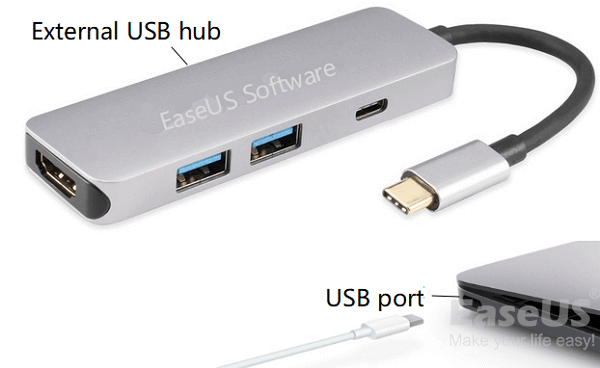
Solved: USB Flash Drive Not Showing Up on Mac
The reasons behind a USB device not showing up are varied, including a malfunctioning USB port, USB drive corruption, virus infection, or a faulty macOS. To effectively resolve the issue, you need to troubleshoot and identify the root cause of the problem, which may involve checking the USB port, scanning for viruses, or running disk utility to repair the USB drive.
5 Methods to get your ExFAT USB recognized by Mac
If you're still having trouble, make sure to check the power supply and ensure the USB is properly plugged into the system. If that doesn't resolve the issue, consider exploring other solutions.
Fortunately, there are several solutions to the problem of an ExFAT USB not being recognized by a Mac. Various methods can be used to resolve this issue, which are listed below.
- Method 1. Turn Mac Off and On Again
- Method 2. Check Finder Preferences
- Method 3. Update Your Mac's OS and Firmware
- Method 4. Use First Aid to Repair the USB Corruption Error
- Method 5. Change System Configuration
Method 1. Turn Mac Off and On Again
The issue can be resolved by simply turning off and on the system, which is a quick and easy process that requires no technical expertise.
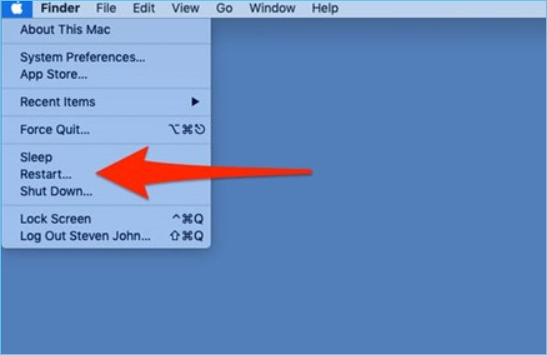
Step 1. To restart your Mac, click on the Apple icon located in the top right corner of the screen and select the "Restart" option from the drop-down menu.
Step 2. To resolve the issue, uncheck the "Reopen windows" option while logging in again, and then select the "Restart" option again.
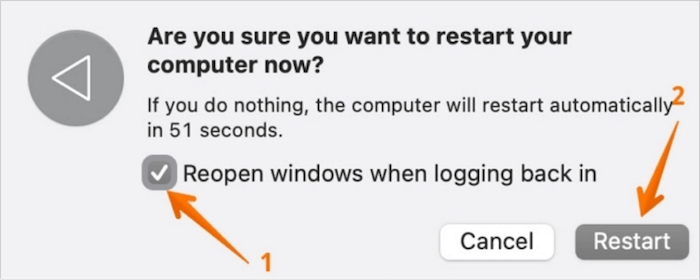
After the Mac restarts, wait for the system to start. Then, try using the USB flash drive again. If that doesn't work, proceed to the other methods.
Method 2. Check Finder Preferences
To check if a particular drive can be mounted on your Mac using a Finder, follow these steps. Open the Finder and navigate to the "Go" menu, then select "Connect to Server." Enter the drive's UNC path or SMB address in the "Server Address" field, and then click the "Connect" button.
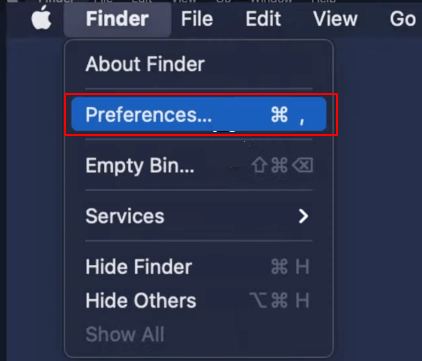
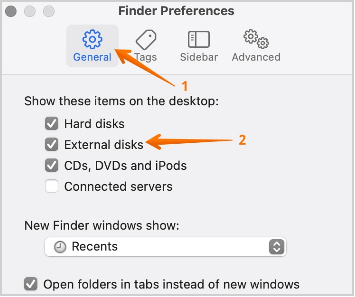
Step 1. To access the Finder preferences, go to the top of the screen and select the "Finder" menu, then choose "Preferences" from the drop-down list.
Step 2. Click on the "General" tab. Tick the options "External disks".
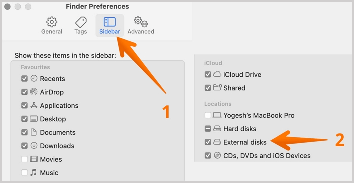
Step 3. Select the "Sidebar" tab and tick the "External disks" option.
Step 4. To view the content on your Mac, simply close the window, plug the USB into the Mac, and you should see the content on the Mac screen.
Method 3. Update Your Mac's OS and Firmware
One of the simplest ways to open USB drives on a Mac is to check for software updates, as this often resolves compatibility issues and allows for seamless access to USB drives.
Take a look:
Step 1. To update your Mac, click the "Apple" icon on the screen and select System Preferences. From there, go to Software Update.
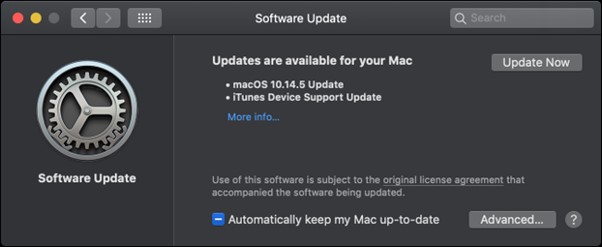
If you find any update, click on it immediately.
Note: To keep your Mac up to date, you can enable the "Automatically keep my Mac up to date" option. This will automatically install system updates and firmware updates, which can improve the performance of your Mac. This way, you don't have to constantly check for updates, and your Mac will stay secure and running smoothly.
Method 4. Use First Aid to Repair the USB Corruption Error
Mac has an exceptional repair feature called First Aid, which is a storage device repair tool accessible from the Disk Utility option. It allows you to follow a series of steps to repair and maintain your storage devices.
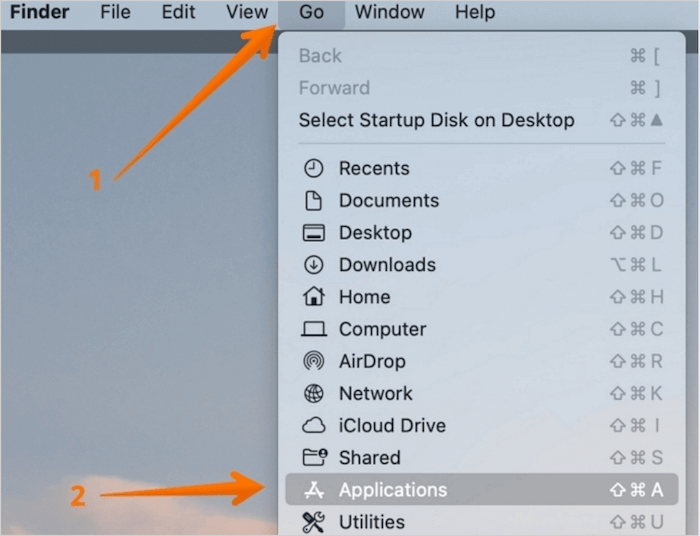
Step 1. To access the Finder menu on your desktop, click anywhere on the desktop until the menu bar appears at the top, displaying the "Finder" menu.
Step 2. Select the "Applications" option from the drop-down menu by clicking on it.
Step 3. Click on the "Utilities" folder option and open "Disk Utility".
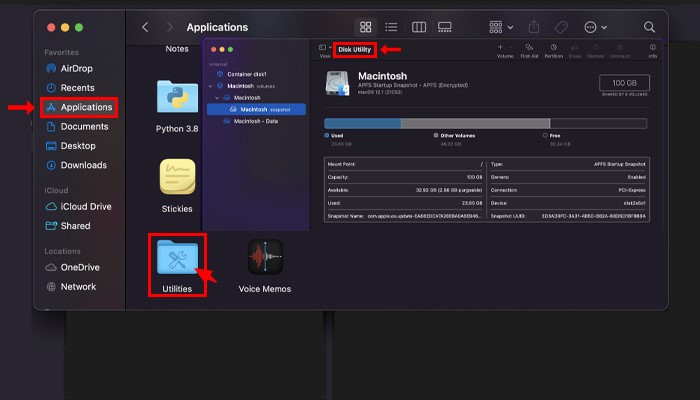
Step 4. On the list of storage devices, select your USB flash drive. From the toolbar, choose the "First Aid" option.
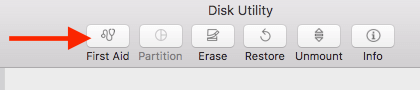
Step 5. To repair a corrupted USB flash drive, choose the "Run" option and First Aid will assess the drive, checking for errors. If errors are found, First Aid will attempt to repair them. This process may help restore functionality to the drive.
Method 5. Change System Configuration
To resolve the USB drive issues, resetting the system configuration is an excellent idea. You need to reset or change the USB driver and the system's USB configuration settings. This will help resolve the problem and get your USB drive working properly again.
Resetting the SMC or System Management Controller
Step 1. Unplug the power supply cord from the wall outlet.
Step 2. If your device is not turning on, try pressing and holding the power button for five seconds, and then reconnect the power supply. This may help resolve the issue.
Step 3. Turn on the system.
Resetting the PRAM/NVRAMThe Parameter RAM and the Non-volatile RAM on a Mac contain information related to the USB ports you use, such as device connections and configurations.
Step 1. To reset a Mac, shut down the system and then press the "Command", "Option", "P", and "R" keys together while restarting the Mac. This will initiate a System Management Controller (SMC) reset, which can resolve various issues, including startup problems, overheating, and battery calibration.
Step 2. Hold the stun gun down until there is a flash and sound, then wait for the chime to signal that the stun gun has been activated.
Now, wait as the system boots.
The Ultimate Trick: Format Your ExFAT USB
If you've tried the previous methods and are still experiencing the issue, formatting the ExFAT USB drive might be the only solution. However, this should be done with caution, and it's crucial to back up any important data before proceeding.
Mac users can back up data using Time Machine or third-party apps like Qiling Backup for Mac.
Formatting an ExFAT USB can sometimes lead to data loss, causing anxiety and panic. In such cases, using data recovery software like Deep Data Recovery for Mac can be an ideal solution to recover lost data.
The Deep Data Recovery for Mac is an excellent data recovery software that helps retrieve lost data due to various reasons, allowing you to recover photos, music files, videos, emails, documents, and more.
If you're concerned about the size of a deleted file, you can rest easy with Deep Data Recovery for Mac. This software is designed to help you recover lost data regardless of the cause or size of the file, making it a perfect choice for mac users.
To use Deep Data Recovery for Mac, follow these steps:
Step 1. Connect your external hard drive to your Mac, then launch Deep Data Recovery for Mac, select the desired file types and click "Next" to initiate the recovery process.

Step 2. To scan an external disk for lost files, select the disk and click the "Scan" button in the software. This will allow the software to search the disk for any lost files.

Step 3. After a quick scan and deep scan, all files will be presented in the left panel in the scan results.

Step 4. Select the files you want to recover and click the "Recover" button. Do not save the recoverable files to the external hard drive to prevent data overwriting.
Related Articles
- Mac Video Repair | How to Repair Corrupt MOV, MP4 Files
- [macOS Guideline] How to Enter Mac Internet Recovery Mode
- How to Recover Unsaved/Lost/Deleted Pages Documents on Mac
- Time Machine Restore Button Greyed Out, How to Fix?
- [Solved] IDM File Has Been Moved
Internet Download Manager says The file has been moved when you download a large file. How to solve this? Read this article to know the solutions, and restore the moved files from IDM with ease. - What to Do When Computer Says Invalid System Disk Replace the Disk Windows 10/8/7
This guide provides solutions to fix the “invalid system disk” error on Windows 10, which can be caused by a faulty hard drive. Before attempting to fix the issue, it's recommended to use Qiling data recovery software to restore data from the hard drive to prevent data loss.