FIX 'Attempting data recovery' on iPhone X/8/7/6 After iOS 12 Update
Summary
If your iPhone or iPad is stuck in an "attempting data recovery" loop after an iOS 12 update, don't worry! This page has got you covered.
You connected your iPhone to your PC, updated to iOS 13, and now it's stuck on a white screen with a data recovery message. After that, it says the update failed and prompts you to press the home button to restore. What would you like to do next?
-- A Question from the Apple Community
When your iPhone attempts data recovery, it means the device is trying to recover data from a backup or from a previous iOS version. This issue can occur due to various reasons, such as iOS update failure, data corruption, or device restore. To resolve this issue, you can try restarting your iPhone, checking for software updates, or restoring your device from a backup. These solutions can help you fix the issue and recover your data.
| Workable Solutions | Step-by-step Troubleshooting |
|---|---|
| 1. Perform a Force Restart | Quickly press and then release the volume up button > Quickly press and then...Full steps |
| 2. Putting iPhone in Recovery Mode | Launch the latest version of iTunes on your computer > Connect your iPhone to the computer...Full steps |
| 3. Recover data after fixing the issue | Choose a recovery mode among "Recover from iOS device," "Recover from iTunes,"...Full steps |
Why Is My iPhone Attempting Data Recovery?
On iPhone, "attempting data recovery" is a common issue that occurs when updating to a new iOS version via iTunes, particularly on iOS versions 10.0.1 to 12. This is due to a known bug that causes the update process to fail, resulting in a "attempting data recovery" message.
Many users experience issues where their iPhone restarts unexpectedly, causing messages to disappear and potentially losing essential data. This can occur after an update, resulting in photos vanishing from the camera roll, leading to frustration and data loss.
How to fix "Attempting data recovery" Issue on iPhone 11/11 Pro/11 Pro Max/X/8/7/6
To address the issue of an iPhone that fails to restore from iTunes, two solutions can be tried: forcing a restart or putting the iPhone in Recovery Mode. If these methods fail, a third solution can be used to retrieve data without complications.
Solution 1. Fix "Attempting Data Recovery" Issue by Preforming a Force Restart
Performing a force restart can fix various small iPhone issues, such as freezing, crashing, or frequent unresponsiveness, by resolving system and app-related problems, with the process slightly varying depending on the iPhone model.
For iPhone 11/11 Pro/11 Pro Max/XS/XS Max/XR/X/8/8 Plus:
Step 1. Quickly press and then release the volume up button.
Step 2. Quickly press and then release the volume down button.
Step 3. Press and hold the Power button (on the other side) until you see the Apple logo.
Step 4. Please enter your passcode at startup, even if you usually use a fingerprint for ID.
For iPhone 7/7 Plus:
Step 1. Press the power/lock key on the right side of the phone.
Step 2. Press and hold the volume down key on the left at the same time.
Step 3. Wait for the Apple logo to appear, then the phone will go through its startup sequence. You may see the Slide to Power Off slider, but keep holding the side buttons until the phone skips this step.
Step 4. At startup, enter your passcode, even if you normally use a fingerprint for identification.
For iPhone 6s/SE or earlier:
Step 1. Press and hold the Home button (on the front of the iPhone or iPad) and the Power button at the same time.
Step 2. Keep both buttons held until the Apple logo appears.
Step 3. The device will automatically go through a series of checks to ensure everything is working properly. This may take a few minutes, but it's a crucial step to get your device up and running smoothly.
Step 4. At startup, enter your passcode, even if you normally use a fingerprint for identification.
Solution 2. Fix "Attempting Data Recovery" Issue by Putting iPhone in Recovery Mode
If the previous solution doesn't work, try putting your iPhone in Recovery Mode, which will erase your iPhone data, and then restore it using iTunes.
Step 1. To sync your iPhone with your computer, launch the latest version of iTunes on your computer and then connect your iPhone to the computer.
Step 2. The steps to force restart an iPhone are as follows: Press and hold the Sleep/Wake button and the Volume Down button simultaneously for at least 10 seconds, until the Apple logo appears. This will restart the iPhone, even if it's unresponsive or frozen.
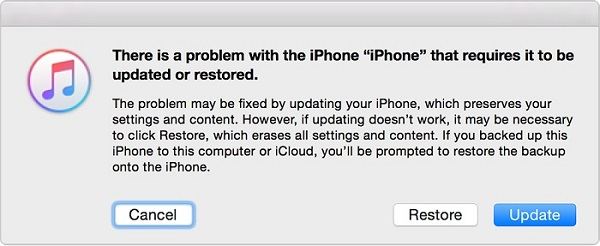
Step 3. After clicking on the Windows Update button, you will see a window that asks you to cancel the process, restore your device, or update your device. Choose the "Update" option.
Step 4. Wait for your iPhone to be updated. If the process completes, you can then set up your iPhone.
Solution 3. How to Recover Data after "Attempting data recovery" Failed?
Don't panic if your iPhone or iPad's data recovery attempt failed to restore all your data. Before new data overwrites the old and causes more serious loss, download Qiling MobiSaver on your Windows PC or Mac immediately. This software can scan your device and recover as much data as possible, offering three recovery modes to help you get back your lost data on various iPhone models, including XS, XS Max, XR, X, 8 Plus, 8, 7 Plus, 7, 6S Plus, 6S, 6 Plus, 6, 5S, 5c, 5, 4S, and 4.
Recover from iOS Device This mode allows for the recovery of various file types, including contacts, text messages, WhatsApp messages, iMessages, call history, notes, and voice memos, without the need for a backup.
Recover from iTunes This software selectively recovers data that have been backed up to iTunes, treating it as an iPhone backup extractor.
Recover from iCloud This mode allows for selective retrieval of data that have been backed up to iCloud.
To recover iPhone data with Qiling MobiSaver, follow these simple steps: first, download and install Qiling MobiSaver on your computer, then connect your iPhone to the computer using a USB cable; next, select the data type you want to recover, such as contacts, messages, or photos; after that, Qiling MobiSaver will scan your iPhone and display the recoverable data; finally, select the data you want to recover and click on "Recover" to save it to your computer.
Step 1. Connect iPhone to Your PC
Launch Qiling MobiSaver, click "Recover from iOS device" on the left and click "Start".
Step 2. Scan for Lost iPhone Data
Qiling MobiSaver will automatically scan your iPhone/iPad/iPod, finding both existing and potentially lost data, and you just need to wait for the scan to finish.
Step 3. Click the "Recover" Button
You can select the lost data you want to recover, such as photos, videos, contacts, SMS, notes, voice mails, and other files, and save them to a new location.
The Bottom Line
To fix the "Attempting data recovery" issue, try performing a force restart or putting your device in Recovery Mode. If these solutions fail, use Qiling MobiSaver to recover lost files.
Related Articles
- How to Recover Lost Apple Music Files in iOS Devices?
- [Solved] 7 Ways to Fix Contacts Missing from iPhone
- [SOLVED] Why Won't My iOS 15 Install? Fix the Error
- Find Recycle Bin on iPhone 13/12/11 and Restore All Lost Files [Resolved]
- 2022 Alternative to Recuva Free Download Full Version with Crack
Qiling data recovery software is a free download alternative to Recuva, offering a full version with crack. This software allows users to restore lost, deleted, or formatted files, including pictures, documents, music, audio, and videos, in just three steps. - [Official & Latest] Deep Data Recovery Key 2.6 and Qiling License Code
Stop using Qiling data recovery crack, keygen, or serial number to activate Deep Data Recovery. Instead, download the official license code and serial key available here to activate the software legally and safely recover your data. With the Qiling data recovery key, you can recover your data in the safest way possible.