Recover Lost Photos After macOS Ventura Update [Monterey & Big Sur Available]
macOS Ventura is a free update that adds new features, a redesigned Dock, dark mode, a new Finder, and performance improvements to your Mac.
The latest Mac operating system, macOS Ventura, has its advantages and shortcomings, one of which is the issue of photos disappearing unexpectedly. If you're experiencing this problem, don't panic, as you can recover lost pictures after the update in several ways.
Upgrading to macOS 13 can sometimes result in missing photos, but there are effective solutions to recover them. You can start by checking the Trash on your iMac or MacBook, as deleted photos may still be recoverable there. Alternatively, you can use Mac data recovery software to scan your device and retrieve lost photos. If you have been using Time Machine, you can also restore your photos from a previous backup, ensuring that your cherished memories are safely recovered.
Restore Lost Photos After macOS Ventura Update from Trash
If you've updated to macOS Ventura and lost some of your photos in the process, don't panic. You can try running a disk utility scan to see if the photos are still on your computer, or use a third-party recovery software to scan for deleted files. You can also check your iCloud Photo Library to see if the photos are synced there.
If you accidentally deleted photos, check your Trash folder. To access it, go to your phone's gallery app, tap the three dots or the menu button, and select "Trash" or "Recycle Bin." If the photos are in the Trash, you can restore them by tapping the "Restore" or "Undo" button. If the photos are not in the Trash, you may want to try recovering them using a third-party app or contacting the app's customer support for help.
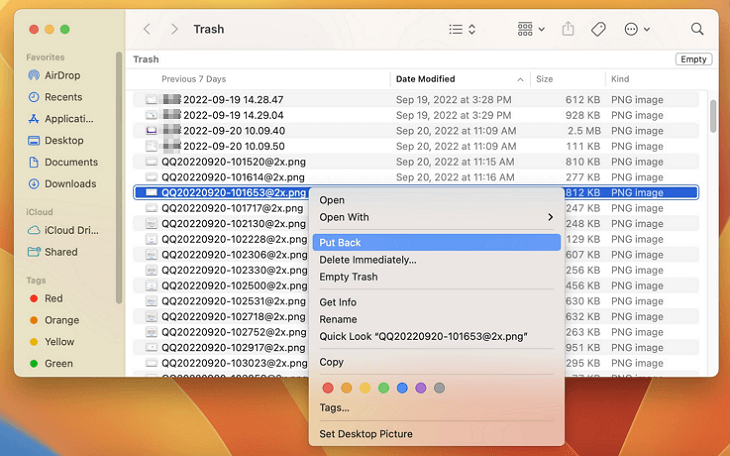
Step 1. Open Finder and click on the "Go" menu at the top of the screen. A dropdown list will appear with various options, including "Computer" and "Network".
Step 2. To access the Trash folder, select "Go to Folder" and type in "~/.Trash".
Step 3. If you see missing photos here, select them and click "Put Back" to restore your photos.
Recover Lost Photos After Upgrading to macOS Ventura with Data Recovery Tool
If photos aren't in the Trash folder, try using a data recovery tool like Deep Data Recovery for Mac, which can help recover deleted files, including photos.
Deep Data Recovery for Mac scans the drive and shows any recoverable files, allowing you to select and recover desired photos by clicking "Recover" to save them to your Mac.
Highlights of Deep Data Recovery for Mac:
- Support is provided for recovering data from various storage devices, including SD cards on Mac, as well as other devices such as SSDs, USB drives, and external hard drives.
- Recover lost files of all types, including photos, videos, documents, emails, and more, with a reliable solution that can help you retrieve them with ease.
- The software is compatible with all macOS versions, including the latest Ventura, as well as older versions like Monterey, Big Sur, Catalina, Mojave, and more.
- The overall requirements of 3DS
To recover lost photos after a macOS Ventura update, download and install Qiling Mac data recovery software and follow these steps: follow the steps below.
Step 1. Scan for lost photos
Select the location where your valuable photos were lost and click the "Search for lost files" button.
Step 2. Select wanted photos
Deep Data Recovery for Mac will immediately start a scan on your selected disk volume. The scanning results will be presented in the left pane, allowing you to filter the lost photos by Path and Type.
Step 3. Recover lost photos
Select the target photos and click the "Recover" button to get them back at once.

How to Recover Deleted Files on macOS Ventura
You can recover deleted files on macOS Ventura (macOS 13) by following the methods outlined in our post, which provide different ways to retrieve accidentally deleted pictures, videos, or documents.

Retrieve Lost Pictures After macOS Ventura/Monterey/Big Sur with Time Machine
If you enabled Time Machine before upgrading to macOS, your photos will be automatically backed up and you can restore them quickly if needed.
Here’s how to restore missing pictures on a Mac with Time Machine:
Step 1. 1. Open Time Machine. You can find it in the Applications folder or by searching for it in Spotlight.
Step 2. The volume that contains your lost photos is usually your primary hard drive.
Step 3. Find the date of the macOS update in the timeline on the left side of the window.
Step 4. Click on the date when the photos were lost, then click "Restore" to start the recovery process. Time Machine will recover the photos and restore them to their original location.
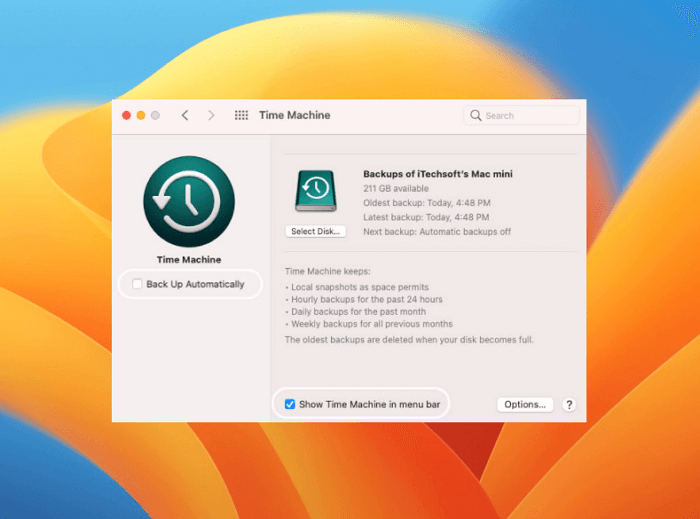
Step 5. Once the process is complete, you should find your lost photos back in their original locations on your device.
Wrap Up
Losing photos after a macOS Ventura or OS update can be frustrating, but there are a few things you can try to recover them. First, check your Trash folder to see if the files are still there. If not, you can use a data recovery program like Deep Data Recovery for Mac to try and retrieve them. Alternatively, if you had Time Machine backup turned on in advance, you can use that to recover your lost photos.
If your photos are missing from your iPhone, try restarting your device, checking your iCloud backup, and using the Photos app to recover them. If that doesn't work, try checking your other Apple devices for the photos, and if all else fails, contact Apple support for help. With a little effort, you should be able to get your lost photos back.
Recover Lost Photos After macOS Ventura Update FAQs
If you're experiencing issues with lost photo recovery after upgrading to macOS Ventura, Monterey, or Big Sur, you can find more helpful questions and answers on the topic.
How can I get my pictures back after an update?
To recover missing pictures after an update, consider using a professional Mac file recovery program. This can help you restore lost photos and files with ease, making it a helpful solution for getting your pictures backup.
Step 1. Download and launch Deep Data Recovery for Mac.
Step 2. Scan your hard disk for lost photos.
Step 3. Preview and restore the images you need.
Why did all my photos disappear on my Mac after the update?
Upgrading your Mac can sometimes result in a frustrating situation where all your photos seem to have vanished. One possible reason for this is that the update may have altered the location of your photos directory, causing it to become inaccessible.
If you're having trouble finding your photos after an update, you can try searching for them in the Finder or check the Photos app's Preferences to see where the photo library is located.
How do I recover Photos on my Mac photo library?
Here are the steps to recover photos from the Mac Photos library in one paragraph:
Step 1. Run Time Machine and open all your available backups.
Step 2. Find the latest backup of your photo library.
Step 3. Click Restore to recover your Photos library.
Related Articles
- How to Recover Previous Version of Files/Document on Mac [5 Ways]
- How to Control Alt Delete on Your Mac
- [5 Solutions for macOS] Recover Deleted Files After Updating to Catalina
- Upgrade to Mac OS X El Capitan 10.11.6, No Data Loss [2022 Tutorial]
- How to Recover Deleted Files Without Backup in Windows 10/11
If you've deleted files without a backup on Windows, there are still ways to recover them. Four efficient methods can help you restore deleted files without a backup, and you can use them for free. Alternatively, you can use Qiling data recovery software to accomplish the task. - Recover Deleted Folders on Windows 10/11 [Quick]
To recover deleted folders on Windows, check your Recycle Bin first. You'll need Windows File History and Windows Backup and Restore if you cannot find the folders in the Recycle Bin. You can also restore the folder to a previous version or download Deep Data Recovery to regain lost folders.