What Is the Latest Version of iTunes 2022
Summary
iTunes is a basic application for managing files on iPhone, iPad, and iPod. You may want to upgrade it to the latest version, but first, you need to identify your current version and then follow the steps to update it to the latest version, which will be explained in this article.
Apple's iTunes is a free program for Windows and Mac PCs that's essential for managing files on iPads, iPhones, and iPods. To get the most out of it, you'll need the latest version of iTunes installed. This powerful app allows you to back up data from your devices to your PC and offers much more functionality.
iTunes allows you to stream Apple Music songs, convert audio formats, upload music to iCloud, burn digital music to CDs/DVDs, rip songs from CDs/DVDs, update your iOS device, and share songs over your home network.
In 2019, Apple announced that it would be transforming the iTunes brand, which would be split into three separate apps: TV, Music, and Podcasts, and would no longer be available on macOS.
Apple regularly updates iTunes for Windows 10, so you don't have to worry about the change, and the latest version will work smoothly on your PC.
The latest iTunes version is 12.10.11, and the newest version of iTunes available on the Windows store is 12123.5.6009.0. As you know, it's the latest version; let's see how to update iTunes to the latest version and more!
Steps to Figure What Version of iTunes You Have
Knowing the basic version of iTunes can help you stay informed about the latest software updates, which also update your iTunes app with new features and fix technical glitches or bugs. To check your iTunes version, follow these steps:
Step 1. Open iTunes.
Step 2. To find the iTunes version, go to the "Help" menu and select the iTunes option. A window will appear with scrolling text that displays the iTunes version. Press the space bar to freeze the text and view the version.

Step 1. Launch iTunes.
Step 2. Go to the top left corner of your screen and click on the iTunes option from the menu bar.
Step 3. Choose "About iTunes".
Step 4. A window will pop up with scrolling text that you need to stop by pressing the space bar, initially displaying the iTunes version on your Mac.
How to Update iTunes to the Latest Version
To update iTunes to its latest version on Mac and Windows, follow these steps. On Mac, click on the Apple menu and select "System Preferences," then click on "Software Update" to check for updates. If an update is available, click on the "Update Now" button to download and install the latest version.
Update iTunes on Windows PC
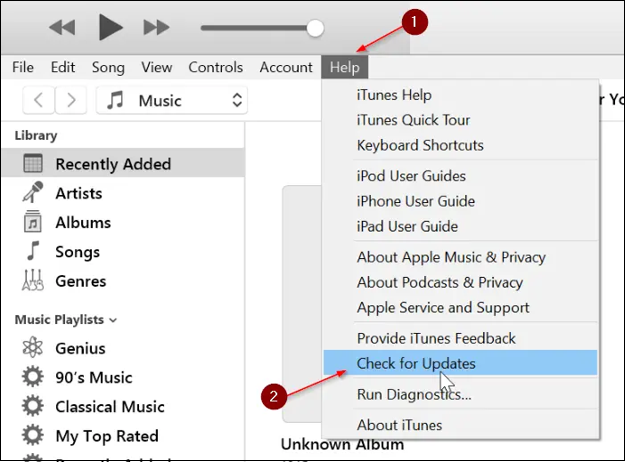
To update iTunes to its latest version on your Windows PC, follow these steps: Open iTunes, click on the "Help" menu, and select "Check for Updates". If an update is available, click on the "Update" button to download and install the latest version.
Step 1. Launch iTunes.
Step 2. To check for the latest iTunes updates, select "Help" from the menu bar at the top of the iTunes window, then choose "Check for updates" from the drop-down menu that appears.
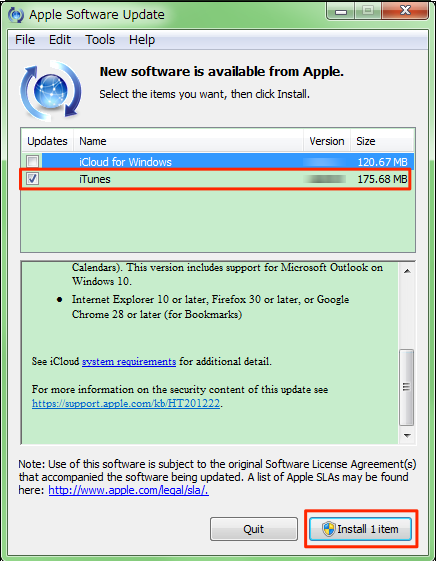
Step 3. After an Apple Software Update window appears, you'll need to check the availability of the latest iTunes version.
Update iTunes on Mac Computer
If you're using a macOS, you can update iTunes on your Mac by following these steps: go to the App Store, click on the "Updates" tab, and look for iTunes in the list of available updates. Click the "Update" button next to iTunes to start the update process.
Step 1. To check for iTunes updates, go to System Preferences and click on Software Update.
Step 2.If there are any recent iTunes updates showing, click the "Update Now" button to install them. Otherwise, select "More Info" to view the details of each update and choose which ones to install.
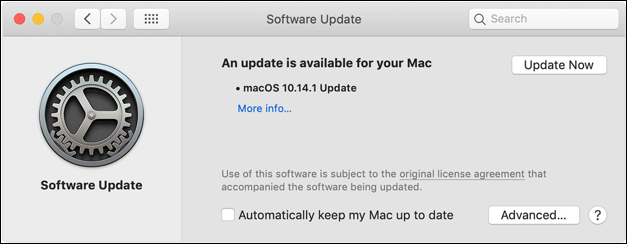
Step 3.Once the software update is complete, your macOS and all installed apps are updated.
How to Recover Lost Data from iTunes
iPhones users can rely on iTunes for a premium data backup solution. It automatically backs up any type of data from an iPad, iPhone, or iPod Touch once connected to a PC. If you've lost data due to an accidental upgrade in iTunes, don't worry - you can retrieve those lost data using some methods.
Steps to Recover Data from iTunes
To retrieve data from an iTunes backup, follow these steps:
Step 1. To start, connect your iOS device to your PC using a correct cable connection. Once connected, open iTunes, and it should quickly detect the linked iOS device.
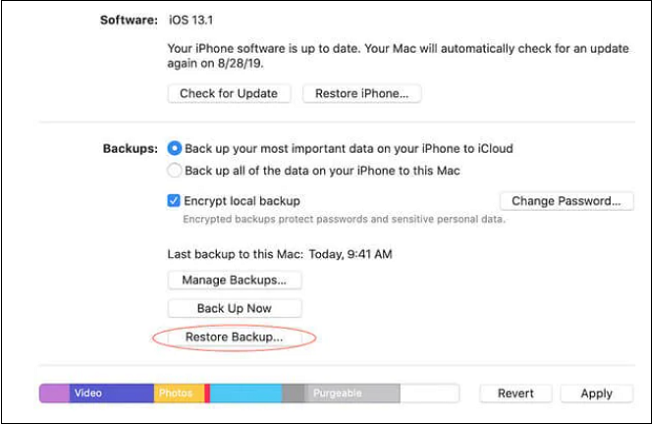
Step 2. To access the Summary page of an iOS device, navigate to the top-left corner of the iTunes window and select "Devices". This will open a new panel, and from the left panel, choose "Summary" to view the Summary page of the iOS device.

Step 3.To restore a backup, hit the "Restore Backup" button on your PC, then search for the backup file on your PC. If the backup is encrypted, you may be prompted to enter a passcode.
To finalize the retrieval process, let the device restart and re-sync with iTunes.
How to Recover Data Without iTunes Backup
If you've lost data during an iTunes upgrade and can't recover it with an iTunes backup, don't despair - Qiling MobiSaver is here to help! This professional iPhone data recovery software is available for both Mac and Windows and can recover any data directly from your iOS device, even without an iTunes backup.
Highlights:
- It provides full-With the addition of retrieve LINE attachments, WhatsApp, Kik chat, and other attachments, the service now offers more comprehensive support for various messaging platforms, allowing users to retrieve and save attachments from a wider range of sources.
- This tool allows you to access and recover various types of data from iCloud and iTunes backups on iOS devices, including messages, contacts, videos, photos, and other content.
Features:
- Supports several data types and devices:Qiling MobiSaver can recover various types of iPhone data, such as Safari bookmarks, voice memos, contacts, and WhatsApp chat history.
- Different device compatibility:This software is compatible with a wide range of devices, including iPhones (11, 12, 13, mini, Pro, Pro Max), iPads (9, 8, 7, 6), iPad mini (5, 6), iPod touch (4, 5, 6), Windows (11, 10, 8, 7), and macOS (10.14, 10.13, 10.12, 10.11).
Here, we will give you the full steps to recover data without iTunes backup, you can follow the instructions to finish it.
Step 1. Connect iPhone to Your PC
Launch Qiling MobiSaver, click "Recover from iOS device" on the left and click "Start".
Step 2.Scan for Lost iPhone Data
Qiling MobiSaver will automatically scan your iPhone/iPad/iPod, finding both present and potentially lost data for you. Just wait for the scan to complete.
Step 3.Click the "Recover" Button
You can select the lost data you want to recover, such as photos, videos, contacts, SMS, notes, voice mails, and other files, and save them to a new location.
Summary
This article aims to provide the necessary information about the latest version of iTunes. By reading it, you can put an end to your curiosity about what the latest version of iTunes is and get the details you need to know. The article has been carefully crafted to include every important detail about the latest version of iTunes.
If you're unable to recover lost data from iTunes using the steps mentioned, Qiling MobiSaver can help you retrieve the data you want. You can download Qiling today to take advantage of its professional backup services.
Related Articles
- [Solved] iPhone Keeps Freezing After Update iOS 12/11.3/11
- How to Recover Deleted Videos from iPhone
- How to Recover Deleted Texts on iPhone
- How to Recover Music Files Deleted by iTunes
- Fix Error Code 0x800F0954 on Windows 10
Users of Windows 10 have reported encountering error code 0x800F0954 while handling Windows updates or installing the .NET framework, but there are four easy fixes to help eliminate this error. - 6 Fixes for Excel File Keeps Closing Automatically | Excel File Recovery Tips
If your Microsoft Excel file keeps closing automatically while editing, it is probably because Excel has a crash problem. Here, you can get 5 fixes to get rid of the issue.