How to Recover Photos from Disabled iPhone
Summary
If your iPhone is disabled and you don't have a backup, don't worry - you can still recover your photos. You can try the methods outlined in this post to get your photos back from your disabled iPhone, regardless of the model (XS/XS Max/XR/X/8 Plus/8/7 Plus/7/6(s) Plus/6(s)/5(s)).
Apple officials may disable your iPhone or iPad when you enter an incorrect passcode too many times, or if you haven't updated your Apple ID settings for a long time. This renders your iPhone inaccessible, unless you erase everything on it to unlock it without a passcode.
If you're trying to recover files, including photos, from a disabled iPhone, whether or not you have a backup, we have some specific tips and techniques to help you do so.
| Workable Solutions | Step-by-step Troubleshooting |
|---|---|
| 1. Fix Disabled iPhone | Long press your Home button to active Siri > Ask for Siri: "What's the time now?"> Siri will...Full steps |
| 2. Recover Photos without Backup | Run Qiling MobiSaver and choose "Recover from iTunes Backup" > Preview and copy pictures from iTunes Backup...Full steps |
| 3. Warm Tips | o know the way to resolve iPhone disabled error is fairly not enough. It's also...Full steps |
Part 1. Fix Disabled iPhone Without Backup
To recover photos from a disabled iPhone, you can unlock it using iTunes, iCloud, Recovery Mode, or Siri, with Siri being the safest option that won't erase any data, but only working on devices running iOS 8.0 to iOS 13.
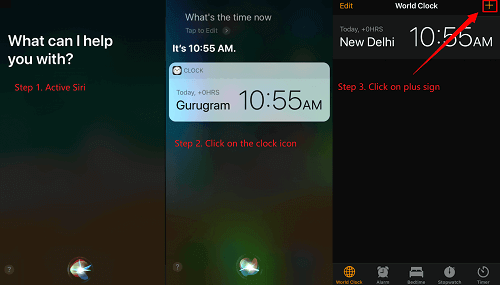
Step 1. To activate Siri on an iPhone, you can either long press the Home button (for iPhone 7 and earlier) or say "Hey, Siri" (for iPhone 8 and later) or press the Side button for 2-3 seconds (for iPhone X and later).
Step 2. You can ask Siri to display the current time by saying "What's the time now?" and she will show you the local time.
Step 3. Once the clock icon appeared, click it.
Step 4. Then, you will see a menu of the World Clock with some small icons as the following picture shows > Click on the plus sign on the upper right corner.
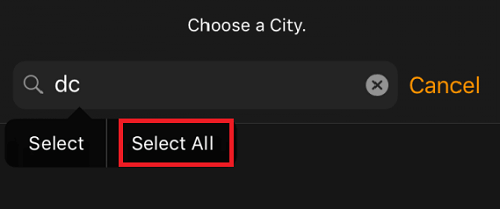
Step 5. A search box will appear, type any characters, select all, and then search for them.
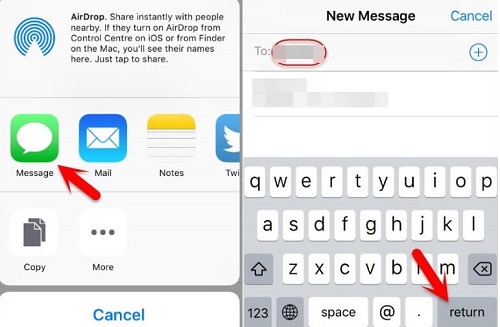
Step 6. Tap on "Share" to continue.
Step 7. To send a text message, open the Messages app, tap any character in the "To" field, and tap "return" on your keyboard.
Step 8. Wait for a while and press the Home button, and then your iPhone will be unlocked. After unlocking, you can regain access to your photos.
Note: It's not 100% successful to use Siri to unlock an iPhone since different iPhone models have varying levels of Siri integration, and some may not support this feature.
Part 2. How to Recover Photos from Disabled iPhone Without Backup
After unlocking your device, you can easily recover photos without backup using Qiling MobiSaver. If your images are stored in the Photo Library, you can ignore these steps. Otherwise, follow the steps to recover your photos.
If your iPhone photos are lost due to various reasons, you can use the powerful iPhone data recovery software Qiling MobiSaver to retrieve them. This software allows you to recover pictures from a disabled iPhone through iTunes or iCloud backup, and instead of restoring all contents, you can selectively restore specific file types like photos, music, or contacts as needed.
To recover pictures from a disabled iPhone, you can use Qiling MobiSaver to extract photos from an iTunes backup. This process involves connecting your iPhone to a computer, opening iTunes, and selecting the "Restore iPhone" option from the backup.
To transfer pictures from a disabled iPhone, you can use Qiling MobiSaver to extract photos from an iTunes backup. This process allows you to recover and transfer your desired photos to a new device or computer, even if your iPhone is no longer functional.
Step 1. Connect iPhone to Your PC
Launch Qiling MobiSaver, choose "Recover from iOS Device" on the left, and click "Start" to begin the recovery process.
Step 2. Scan for Lost iPhone Photos
Qiling MobiSaver will automatically scan your iPhone and find both existing and lost photos for you.
Step 3. Preview and Restore Photos
To recover photos, select the "Photos" option on the left-hand side, view and choose the desired photos, and then select either "Recover to PC" or "Recover to Device" to initiate the recovery process.
Part 3. Warm Tips to avoidiPhone being locked, losing data
To resolve iPhone disabled error, it's not enough to just know the way to fix it. You should also learn how to avoid your iPhone from being locked and losing data. To help you out, here are some useful tips:
- Back up iPhone data to iTunes or iCloud regularly
- Back up your iPhone passcode on other devices
- To set up Touch ID and add your fingerprint as an alternative way to unlock your iPhone, go to Settings, then Face ID & Touch ID, and select Touch ID. Tap Set Up Touch ID and follow the on-screen instructions.
- If you've lost data from your iPhone, consider using a data recovery software like Qiling MobiSaver to help retrieve it.
The Bottom Line
This page offers helpful solutions to restore photos from a disabled iPhone, unlock a disabled iPhone, and prevent similar issues from occurring again. If you're facing a similar situation, the suggestions on this page may be able to assist you. Just give them a try!
Related Articles
- [Solved] iPhone Keeps Freezing After Update iOS 12/11.3/11
- iPhone Keeps Asking for Apple ID Password (10 Ways)
- 10 Best iPhone Data Recovery Services and Software
- 3 Ways to Retrieve Deleted Messages on iPhone 8
- Your File History Drive Was Disconnected for Too Long, How to Reconnect File History Drive
Windows 10 users may encounter the error “Reconnect your drive. Your File History drive was disconnected for too long.” This error can occur for various reasons, but don't worry, the solutions in this article can help fix the problem and restore lost files. - Files Automatically Encrypted, How to Remove Encryption from Files
If your files are automatically getting encrypted on your computer, this post provides detailed instructions on how to remove encryption in Windows 10, 8, or 7. You can also learn how to decrypt a file and change an encrypted file to a normal file, such as unencrypting PDF and Excel files.