Clone a Disk with AOMEI Backupper: Free Edition
AOMEI Backupper is a Windows backup suite that also includes clone tools. Its Clone menu offers a disk clone for a full copy and a system clone for moving only Windows and its boot partitions to a new drive.
The workflow is short, but the free edition adds restrictions, and the difference between the two clone types decides whether the new disk will actually start. This guide covers both paths, the edition limits, and the checks to run before you retire the old drive.
PAGE CONTENT
- Clone Options Inside AOMEI Backupper
- Perform a Disk Clone in AOMEI
- Free Edition Limits and Boot Problems
- Clone with Qiling Disk Master
- Verify and Boot from the Cloned Disk
- Frequently Asked Questions
- Back Up Before You Clone
Clone Options Inside AOMEI Backupper
- Clone sits beside backup. The suite treats cloning as a separate task type, so it does not create an image file and does not appear in the backup schedule.
- Disk Clone copies everything. It duplicates all partitions on a physical disk, including data volumes, recovery partitions, and the boot entries.
- System Clone is selective. It copies Windows, the EFI or System Reserved partition, and the recovery partition, leaving other volumes on the old disk untouched.
- Partition Clone is narrow. It copies a single volume, which is useful for data disks but not for a bootable Windows upgrade.
- WinPE media is available. The suite can build bootable media so the clone can run without starting Windows, which helps when the system disk is failing.
Choosing the right task matters more than any setting inside it. A system clone is faster and produces a clean target for a laptop with one Windows volume, while a disk clone preserves extra partitions that a system clone would drop. Both paths copy the boot chain when used correctly.
Perform a Disk Clone in AOMEI
- Image the source. Create a full backup on another drive first, because the clone overwrites the target and cannot be undone.
- Connect the target disk. Attach the new SSD over SATA, M.2, or USB, then initialize it in Disk Management so the wizard lists it as usable.
- Open the Clone menu. Select Disk Clone, choose the source disk, and pick the destination by model and capacity rather than by drive letter.
- Enable sector alignment. Keep the SSD alignment option enabled so the new drive performs properly instead of inheriting a misaligned layout.
- Apply and wait. Confirm the erase warning, start the task, and leave the machine idle until the progress bar completes.
Alignment is the quiet difference between a fast clone and a slow SSD. The option is easy to miss because it is offered as an edit step rather than part of the main wizard. Leave it on for any solid-state target and let the tool handle the offset automatically.
Free Edition Limits and Boot Problems
- Edition gating. The free build limits some clone and recovery options, and certain features prompt for an upgrade before they run.
- System clone scope. A system clone assumes a standard Windows layout; unusual OEM recovery partitions may be left out of the copy.
- Disk style mismatch. An MBR source stays MBR, so a UEFI-only board may refuse to boot the cloned disk without a conversion.
- BitLocker lockout. Encrypted volumes are skipped or fail unless BitLocker is suspended or the clone runs from boot media.
- Target not detected. An uninitialized disk, a loose M.2 slot, or a USB bridge that drops the link will hide the destination from the wizard.
None of these are unusual, and all of them are visible before the copy starts if you check the preview screen. Look for the boot partitions, confirm the target style matches the firmware mode, and decrypt any protected volume. If the preview shows a missing partition, cancel and fix the layout instead of repairing it afterward.
Clone with Qiling Disk Master
Qiling Disk Master is a dedicated cloning tool rather than a backup suite, so the clone options are on the main screen. It copies the boot partitions, keeps SSD alignment, resizes on a larger target, and works with any drive brand.
Watch the video tutorial below to clone the drive step by step with Qiling Disk Master.
Step 1. Open Qiling Disk Master, choose Clone, and then select Disk Clone.

Step 2. Select the source disk and click Next.

Step 3. Select the destination SSD and confirm that its data will be replaced.

Step 4. Choose the clone mode and adjust the partition size if the target is larger.

Step 5. Click Proceed, wait for the copy to finish, then shut the machine down before you remove any cable.

Verify and Boot from the Cloned Disk
- Compare partition maps. Use Disk Management to confirm that the new disk holds the same partitions, sizes, and boot flags as the source.
- Extend unused space. If the target is larger and the main partition did not grow, extend it into the unallocated area first.
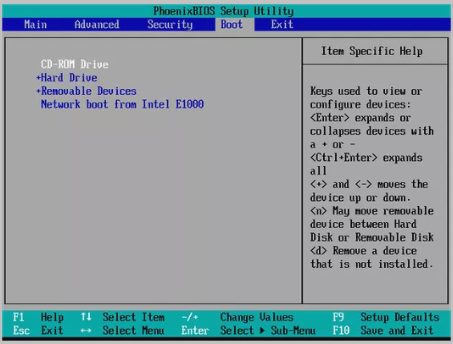
- Set the boot order. Enter the firmware settings, place the new disk first, and keep the old disk disconnected during the first start.
- Confirm the drive letter. Windows should still report C as the system volume; a different letter can break installed software.
- Watch the first updates. Let Windows install pending updates and restart twice before you consider the clone permanent.
A first boot that reaches the desktop is a good sign but not the final test. Run a full restart, open Disk Management, and check that the SSD reports its real capacity. Only then should you reuse or wipe the original drive.
Frequently Asked Questions
Does the free edition of AOMEI Backupper allow cloning?
It allows basic cloning, but some options and recovery features are limited or prompt for an upgrade. Check the edition before you plan a system migration.
Should I use Disk Clone or System Clone?
Use System Clone when only Windows and the boot partitions need to move. Use Disk Clone when the old disk also holds data or recovery partitions you want to keep.
Why is the new SSD not booting after the clone?
The boot partition may be missing, the disk style may not match the firmware mode, or the boot order still points at the old drive. Check all three.
Can I clone to a smaller SSD?
Only if the used data fits. Shrink partitions before cloning and leave room for the boot and recovery partitions.
Does the clone keep SSD alignment?
Yes, when the alignment option is left enabled. Disabling it can produce a misaligned layout and noticeably slower writes on the new drive.
Back Up Before You Clone
A backup suite makes it tempting to skip a fresh image, but the clone is the operation that changes hardware. Take a verified system image on a separate disk so a failed job leaves you with a working recovery path.
Watch the video tutorial below to back up Windows and restore it if the clone fails.
Step 1. Open Qiling Disk Master and select System Backup to include the boot partitions.

Step 2. Save the image to a drive other than the target disk and start the backup.

Step 3. Click Proceed to start the system backup and wait patiently until it finishes. You can also tick Shut down the computer when the operation is completed to power off automatically.

Step 4. If the clone fails, restore the image and check the source disk before you retry.

Conclusion
AOMEI Backupper can handle a disk or system clone in a few clicks, and its WinPE media adds a recovery path for a failing system disk. The trade-off is that cloning is a secondary feature in a backup suite, with edition limits and partition choices that decide whether the new drive boots.
For related guides, see AOMEI Cloner Review, Best Free Disk Cloning Software 2026, Clone SSD to Larger SSD, and Cloned Drive Will Not Boot: Fix.
Related Articles
- AOMEI Cloner Review
Review the dedicated AOMEI cloning tool, its target support, speed, and how it differs from the clone menu in Backupper. - Best Free Disk Cloning Software 2026
Compare current free cloners on speed, brand support, boot handling, and recovery tools before you commit to one. - Clone HDD to SSD on Windows 10
Move a Windows 10 installation from a hard disk to an SSD with the right source, target, and boot checks. - Clone SSD to Larger SSD
Copy an existing SSD to a bigger drive and extend the main partition so the extra capacity becomes usable. - Cloned Drive Will Not Boot: Fix
Repair boot records, drive letters, and BIOS settings when a finished clone will not start on the new disk.
Products
Articles & Tutorials
- Data Recovery
- Data Backup
- File Recovery
- File Backup
- System Backup and Restore
- Disk and Partition Clone
- Technical articles
- Mobile articles
- Disk Master Help
- Windows Data Recovery Tutorials
- Windows Secure Delete Tutorials
- Windows Partition Management Tutorials
- Windows File Backup and Restore Tutorials
- Windows System Backup and Restore Tutorials
- Windows Disk Backup and Restore Tutorials
- Windows Clone Tutorials