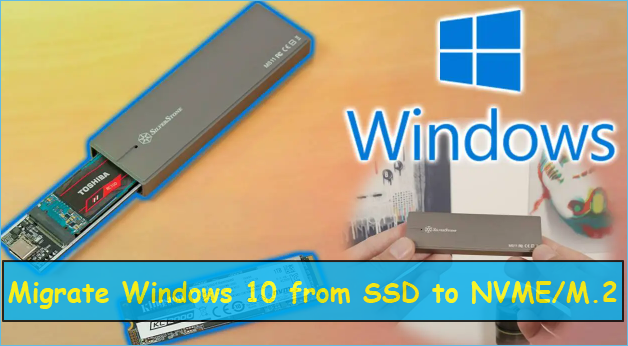
Migrate Windows 10 from SSD to NVME and M.2 Without Reinstalling
Click here to find quick answers:
- 1. What Is NVME and M.2 Respectively (Detailed explanation)
- To ensure a seamless migration of Windows 10 from an SSD to an NVMe/M.2 drive, follow these 5 tips:
- Migrating Windows 10 from an SSD to an NVMe/M.2 drive is a straightforward process that can be easily done by anyone, even a starter. Qiling Disk Copy is a tool that can help with this process, making it a hassle-free experience.
Upgrading to an NVME or M.2 drive can significantly improve system performance by transferring Windows 10 to the new device, even if larger drives have already been upgraded.
Migrating your Windows 10 system to an NVME/M.2 drive can be a bit complicated, but with the right guidance, it's a relatively simple process. By following reliable guides and tutorials, you can successfully migrate your system in just a few steps, making it a worthwhile upgrade for improved performance.
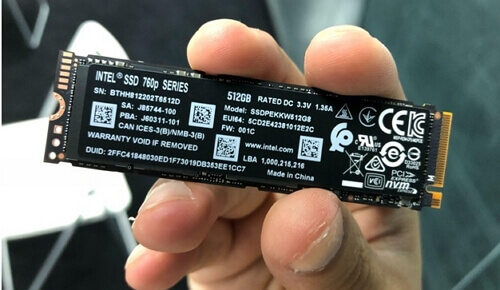
What Is NVME and M.2 Respectively
NVMe (Non-Volatile Memory Express) is a storage interface that allows for faster data transfer between a host device and a storage device, such as an SSD. M.2 is a physical interface standard for SSDs, which provides a smaller and more efficient way to connect the SSD to the motherboard. Together, NVMe and M.2 enable faster storage solutions that are ideal for applications that require high-speed data transfer.
Definition of NVME
NVME, or Non-NVMe, the modern standard for connecting solid-state drives (SSDs), offers improved data transfer rates and support for multi-core CPUs, surpassing its predecessor AHCI. While modern server SATA SSDs have read and write speeds of 550 and 520 MB per second, respectively, NVMe SSDs boast incredible read and write speeds of 6200 and 2900 MB per second, respectively. This significant difference makes NVMe a top choice for those seeking high-performance storage solutions.

Definition of M.2
M.2, also known as NGFF, is a new specification for internally mounted computer expansion cards and associated connectors, replacing mSATA. M.2 SSDs with a B-key interface and NVME protocol are at least 3 times faster than traditional SATA SSDs, and nearly 7 times faster with an M-key interface and NVME protocol.
Upgrading to an NVME or M.2 drive from traditional SSDs on Windows 10 can bring significant benefits, including improved performance, faster loading times, and enhanced overall system speed. This upgrade can also lead to a more responsive and efficient computing experience, making it a worthwhile investment for those looking to breathe new life into their Windows 10 setup.
- Faster read and write speeds
- Lower power consumption
- Reduced heat generation
- Improved system responsiveness
- Enhanced reliability for gaming systems and other high-performance PCs.
Fully Prepared Before Migrating Windows 10 From SSD to NVME/M.2
Here are the steps to help you make full preparation before transferring Windows 10 to an NVME/M.2 drive: You should backup your important files to an external drive or cloud storage to prevent data loss. You should also ensure that your NVME/M.2 drive is compatible with your motherboard and has the correct drivers installed. Additionally, you should disable Secure Boot and Fast Boot in your BIOS settings to prevent any potential issues during the transfer process.
#1. Backup Your Data
Before moving your operating system, back up all important files and user profiles to a separate device, such as an external hard drive or cloud storage service, to prevent data loss in case anything goes wrong.
#2. Check Device Compatibility
Before transferring Windows 10 to an NVME or M.2 SSD, ensure your computer and its BIOS settings are compatible with the drive, and update your PC's BIOS or UEFI firmware to the latest version that supports NVME or M.2 drives, to avoid any potential issues or damage.
#3. Verify the Capacity of Your Target Drive
To ensure a smooth transition, verify that the target drive has sufficient capacity to hold all the data from your current SSD. If the target drive is too small or lacks sufficient disk space, the cloning process may fail, potentially resulting in a damaged system.
#4. Set Windows 10 to AHCI Mode
To migrate to Windows 10, you may need to switch from IDE mode to AHCI mode on your current SSD, depending on the brand. If you're unsure whether you have AHCI enabled, you can easily check by looking for a setting in your BIOS or UEFI settings.
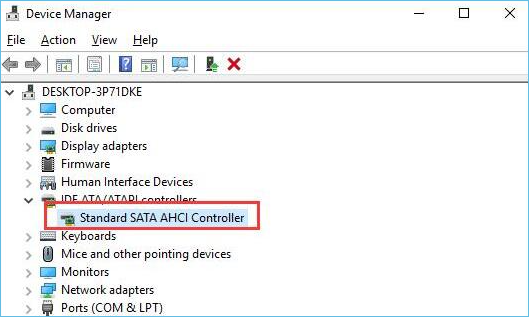
Step 1. To access Device Manager, click the Start button and type "device manager" into the search field, then click on the "Device Manager" result to open it.
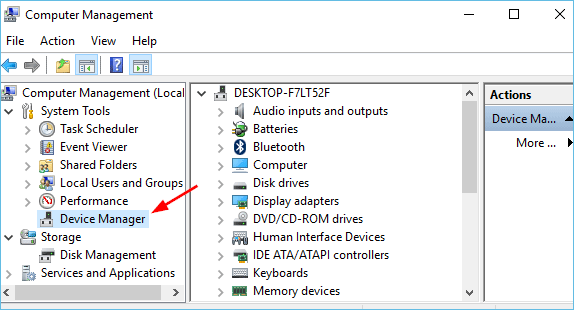
Step 2. Click on "Storage controllers" to expand the category.
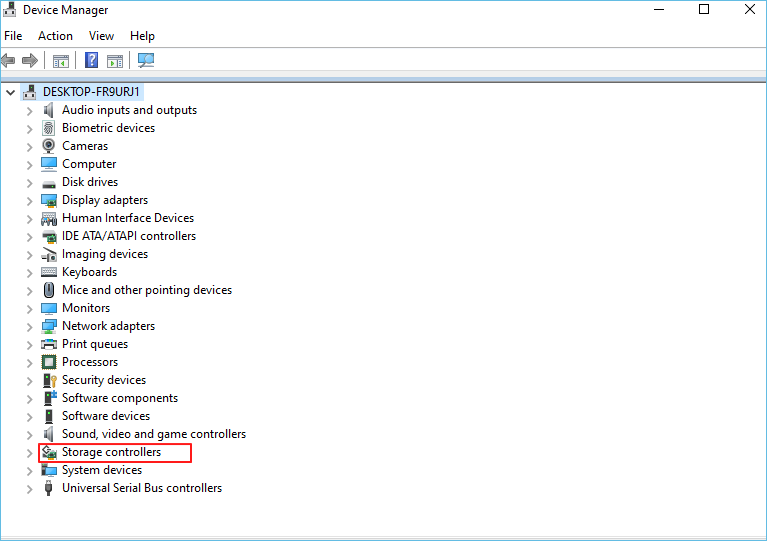
Step 3. If you see "Intel SATA AHCI Controller" or "AMD SATA AHCI Controller," then your Windows 10 installation is already using AHCI mode.
5. Choose the Right Migration Tool
When migrating your system from an SSD to an NVME/M.2 drive, it's essential to choose the right disk cloning tool to avoid data damage. There are many options available, but not all are created equal, so it's crucial to research and select the best tool for the job.
These are the five essential steps you need to take before migrating Windows 10 from SSD to NVME/M.2. Following these tips will help ensure that the process goes as smoothly and successfully as possible.
Migrate Windows 10 from SSD to NVME/M.2 with Qiling Disk Copy
If you're concerned about data safety and reliability during the migration process, Qiling Disk Copy is a reliable and easy-to-use tool worth considering. This efficient software makes it simple to move Windows 10 from an SSD to an NVME or M.2 SSD without losing any data, and also allows for easy cloning of SD cards, SSDs, and other devices in just a few clicks. Additionally, it includes advanced options for more experienced users to control every aspect of the migration.
Qiling Disk Copy
Offers sector-level cloning, which helps to clone a hard drive with bad sectors by bypassing the problematic areas and only copying the good sectors, allowing for a successful clone even when the original drive has issues.
Supports cloning from MBR to GPT and vice versa
Supports adjusting disk layout.
Compatible with Windows 11/10/8/8.1/7
You can follow the steps below to use Qiling Disk Copy to switch Windows 10 from an SSD to an NVME or M.2 drive.
Prior Notice:
- The "Sector by sector copy" feature requires the destination disk to be at least as large as the source disk, allowing the cloning of a larger hard disk to a smaller one by leaving this feature unchecked.
- All data on the destination disk will be completely erased, so be sure to back up any important files first.
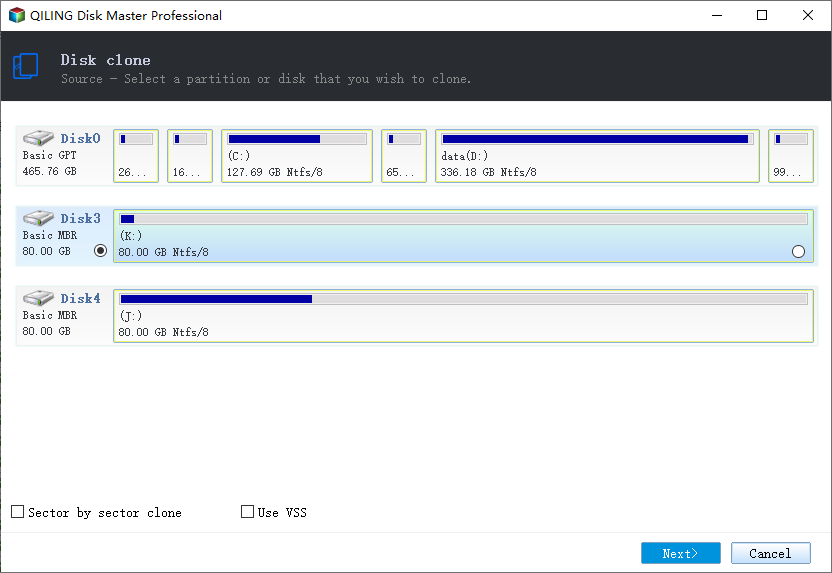
Step 1. To begin cloning an entire disk, select the disk you want to copy as the source disk under Disk layout and click "Next".
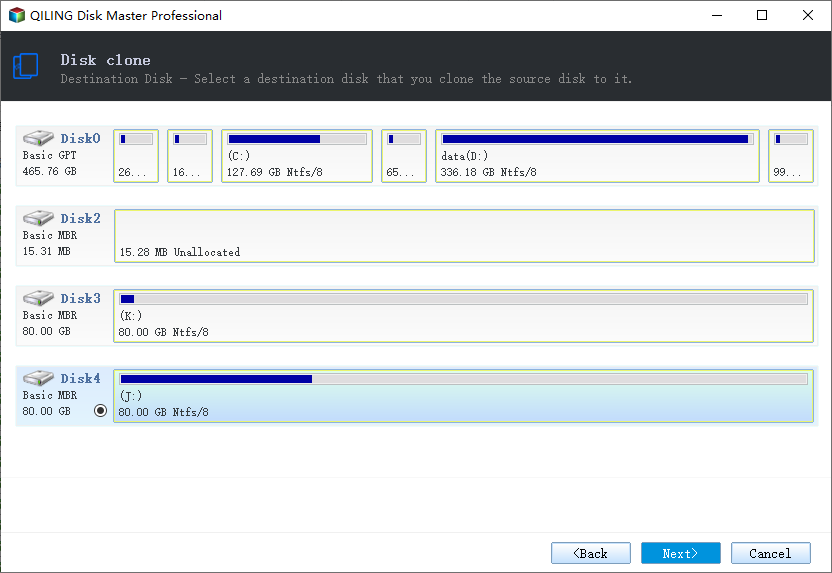
Step 2. Choose the other disk as the destination disk.
Step 3. Check the disk layout of the two disks. You can manage the disk layout of the destination disk by selecting "Autofit the disk", "Copy as the source" or "Edit disk layout" in order to ensure the two disks have a compatible layout for the migration process.
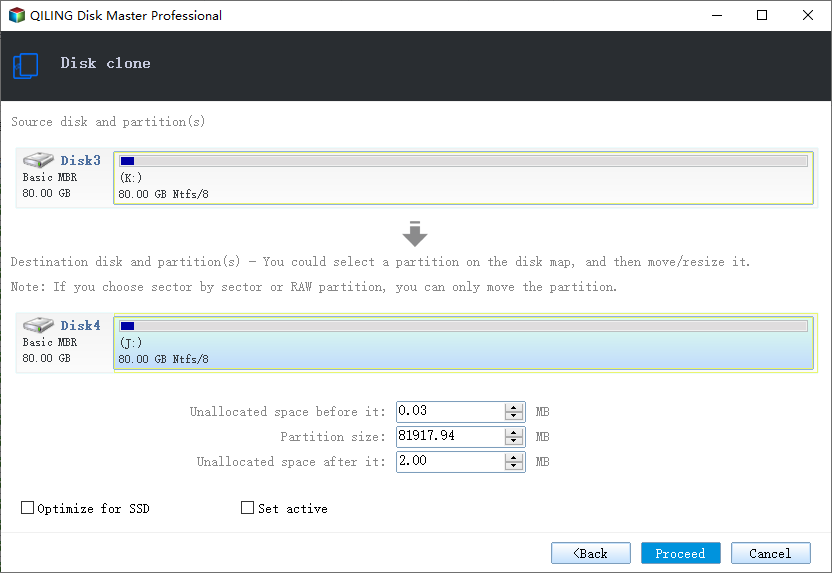
- The "Autofit the disk" feature makes some changes to the destination disk layout by default to ensure optimal performance.
- The "Copy as the source" option does not modify the destination disk, and the layout remains identical to the source disk.
- "Edit disk layout" allows you to manually resize and move the partition layout on the destination disk.
Enabling the "Check the option if the target is SSD" option can help optimize your SSD's performance by allowing the operating system to take advantage of its specific characteristics and capabilities, potentially leading to improved read and write speeds and overall system responsiveness.
Step 4. Click "Proceed" to officially execute the task.
A message now appears, warning you that data will be lost. Please confirm this message by clicking "OK" and then click "Next".
Conclusion
To successfully migrate Windows 10 from an SSD to an NVME or M.2 drive, follow the tips in the "Preparation" section and use Qiling Disk Copy to switch without data loss or issues, resulting in increased speeds and performance.
Related Articles
- (2022) Top 2 Silicon Power Cloning Software
- Clone Linux HDD to SSD Without Re-installing | Reliable Methods 2022
- Do You Have to Reinstall Windows After Installing a New M2 SSD? [Check the Answer]
- [Solved] How to Move OS to Another Drive Without Reinstalling Windows and Applications
- Why My PC Suddenly Slow and How to Fix it?
Learn how to Why My PC Suddenly Slow and How to Fix it?. This guide explains the causes, steps, and practical tips for pc suddenly slow, why is my pc suddenly so slow windows 10, gamimg pc suddenly slow on Windows with Qiling Disk Master. - Best Tool for Transferring C Drive to SSD in Windows 10/8/7
It is a wise choice to transfer C drive to SSD from HDD since SSD comes with better speed and performance. Here we will teach how to move C drive to a new SSD drive and make it bootable as well.