Recovery Partition Too Large on Windows 11: Shrink It Safely
Quick Navigation:
- Why the Recovery Partition Grew
- Confirm Which Recovery Partition Is Live
- Back Up Before You Move or Delete Anything
- Resize or Remove the Old Partition with Qiling Disk Master
- Frequently Asked Questions
A recovery partition that once took 500 MB now claims two or three gigabytes, and the volume in front of it can no longer grow. On many Windows 11 machines the cause is visible in the partition list: two partitions labelled Recovery, one of them empty and out of date. Nothing has failed. The recovery environment outgrew its old home, Windows built a larger replacement elsewhere on the disk, and the previous one stayed behind as reserved space that no standard dialog will hand back to you.
Why the Recovery Partition Grew
The recovery partition holds the Windows Recovery Environment, a small maintenance system used by Reset this PC, Startup Repair, and System Restore. Its size follows the image it stores, and that image has grown with each release: from roughly 300 MB on early Windows 10 to a gigabyte or more on current Windows 11 builds. Service updates to the recovery environment add further weight, since a staging copy has to fit next to the working one.
When an update does not fit, Windows does not quietly fail. It creates a new recovery partition of the required size, preferably in free space after the system partition, moves the image there, and points the boot configuration at the new one. The old partition is left as it was. That is how a disk ends up with a 500 MB Recovery entry that holds nothing current and a 1 GB or 2 GB entry that is actually in use.
A clone to a larger disk, a manual shrink of C:, or a third-party tool that placed partitions differently can produce the same doubling, because the free space needed for the new partition was not adjacent to the old one. The result is space carved out twice for one function, which is exactly the space you are trying to recover.
Confirm Which Recovery Partition Is Live
Before deleting anything, identify the partition Windows uses today. Open an elevated command prompt and run reagentc /info. Reagentc is a Microsoft tool built into Windows; in this guide it is used only to read the status and the location of the recovery image, and it is not part of Qiling Disk Master. The output names a partition in a form such as partition=4, and that number matches the partition order on the disk.
Read the first lines as well. Windows RE status Enabled with a location means the recovery environment is active on that partition. Disabled, or a location pointing at a folder rather than a partition, means no partition currently carries a live image, and every Recovery entry on the disk is a candidate for removal once a backup exists.
Disk Management shows the same order visually but offers almost nothing else. A recovery partition has no drive letter, and its context menu contains only Help and Delete Volume, with no Shrink Volume entry at all. That absence is by design: the file system inside is protected, and the volume is marked as a recovery type so that standard tools will not resize it. Disk Management and diskpart are Microsoft built-in tools that can view this layout, and neither is a component of Qiling software.
Back Up Before You Move or Delete Anything
Every operation in the next section changes the partition table of the system disk, so the first step is a backup that does not live on that disk. Create a full disk image to an external drive, or at minimum image the system partition together with the recovery partition that reagentc reports. A bootable rescue medium is worth the extra ten minutes, because a mistake on the partition table can leave a machine that no longer starts.
Write down the current layout before you begin: partition number, starting offset, size, and label, read from the same list reagentc refers to. That note is how you will tell a successful change from a shifted layout afterwards, and it also prevents the classic mistake of deleting the partition next to the intended one.
Decide on the goal first. To give space back to C:, the unallocated room must end up directly behind C:. If the stale recovery partition sits at the end of the disk, deleting it and extending C: into the new space is enough. If a live recovery partition sits between C: and that free space, the live partition has to be moved rather than deleted, and that is a slower and riskier job that the backup makes reversible.
Resize or Remove the Old Partition with Qiling Disk Master
Qiling Disk Master works on the partition table directly and can move a recovery partition, which the built-in console will not do. Start from the machine itself, with the external backup disconnected until the layout has been checked, and keep the note from part three next to the screen while the numbers are compared.
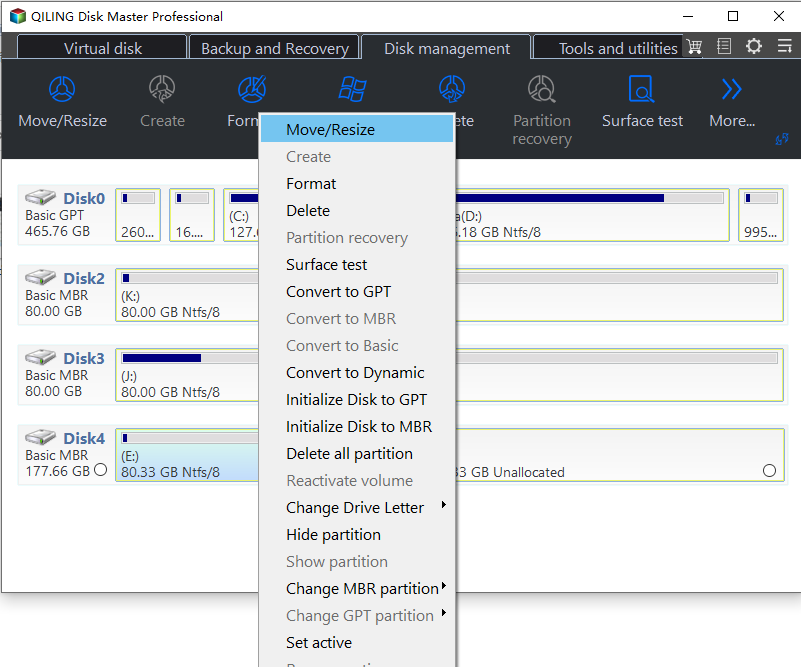
Step 1. Right-click the partition you plan to change and choose Resize/Move. Pick C: when you want the space, or the recovery partition when it has to move. The dialog opens on a bar that shows the partition and the free space on both sides of it, and no change is written while the bar is being edited.
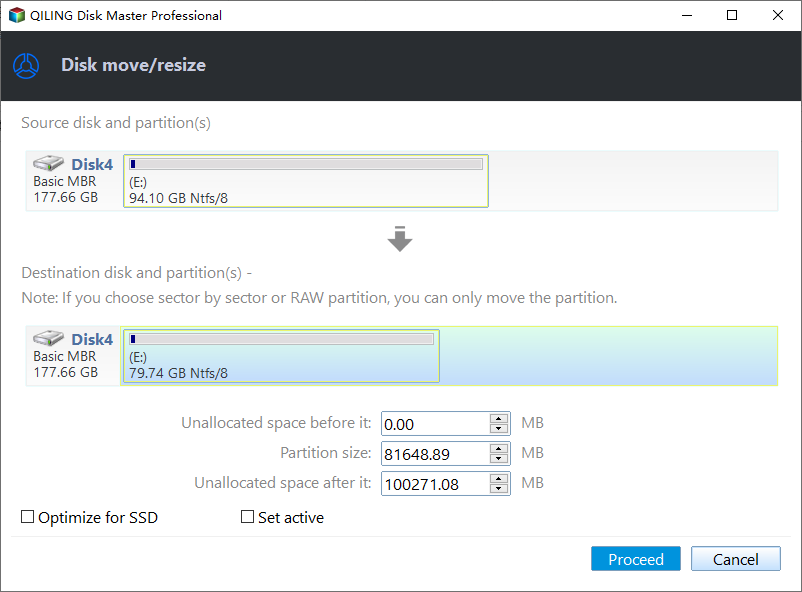
Step 2. Drag the border to shrink the partition that holds the extra room. When the recovery partition is the oversized one, pull its right edge toward its start so the free space is released, and use the size readout to set the exact figure. Extending C: works the same way once unallocated space sits directly behind it: pull the right edge of C: into that space. Nothing is written while the bar is being edited.
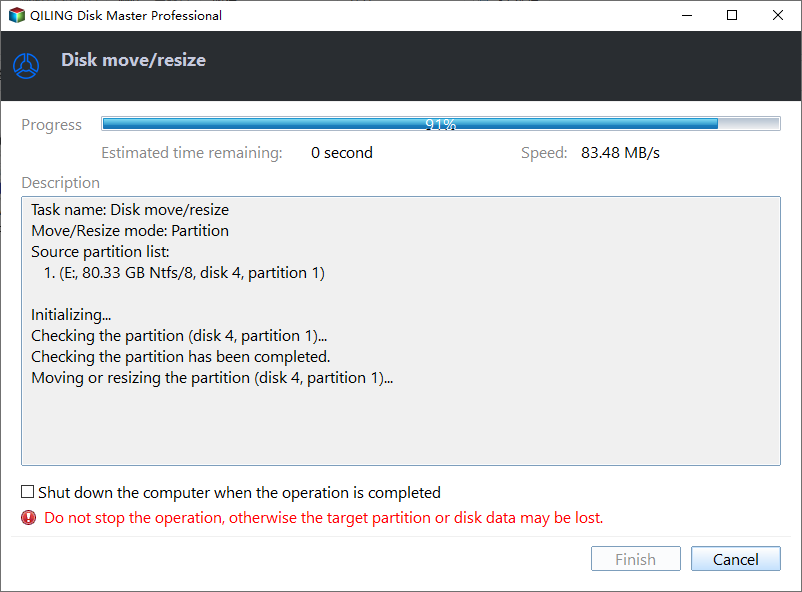
Step 3. Review the preview and click Proceed. The preview page lists each pending operation with old and new values, in the order they will run. Confirm the list, click Proceed, and wait for the task to finish; a partition in use is processed at the next restart, as the program states before it begins.
To remove a stale recovery partition, right-click it and choose Delete Partition. That action shows a warning about data loss and nothing else: confirming the box executes the deletion at once, with no preview page and no Proceed step, so verify the partition number before you confirm. Never delete the partition that reagentc /info reports.
Finally, run reagentc /info again and confirm that the status is still Enabled and the location unchanged. Reopen Disk Management to check that C: shows the new size, and keep the external image for a week before it is reused.
Frequently Asked Questions
Can Disk Management shrink a recovery partition?
Normally no. The volume has no drive letter and carries a recovery type that blocks resizing, so the context menu offers only Delete Volume. Moving or resizing it needs a partition tool that writes the table directly.
How large should a recovery partition be on Windows 11?
Between 500 MB and 1 GB covers most builds, and current updates create partitions of about 1 GB. The image itself is a few hundred megabytes; the extra room is staging space for the next update.
Will deleting an old recovery partition break Reset this PC?
Only if it is the partition in use. Check reagentc /info first and delete the entry that is not named there. With the live partition untouched, the recovery environment keeps working exactly as before.
Related Articles
- System Reserved Partition Too Small for Windows Update
- We Couldn't Update the System Reserved Partition Windows 10
- What is System Reserved Partition and How to Delete It
- How to Delete EFI Partition in Windows 11
- Create or Recover EFI Partition in Windows 11
Products
Articles & Tutorials
- Data Recovery
- Data Backup
- File Recovery
- File Backup
- System Backup and Restore
- Disk and Partition Clone
- Technical articles
- Mobile articles
- Disk Master Help
- Windows Data Recovery Tutorials
- Windows Secure Delete Tutorials
- Windows Partition Management Tutorials
- Windows File Backup and Restore Tutorials
- Windows System Backup and Restore Tutorials
- Windows Disk Backup and Restore Tutorials
- Windows Clone Tutorials