SSD Wear Level Is High: What to Do Next
Quick Navigation:
- Read the Numbers Correctly
- Reduce Unnecessary Writes
- Plan the Replacement
- Clone Before the Drive Fails
- Frequently Asked Questions
SSD health tools report wear in a way that is easy to misread. A wear level of 80 percent usually means 80 percent of the rated endurance remains, not that the drive is 80 percent dead. The number still matters: it tells you how much writing budget is left and whether a replacement should be scheduled rather than deferred.
Read the Numbers Correctly
Three values describe endurance: total bytes written, the rated endurance for the model, and the remaining life percentage. Vendors express the last one differently, and some tools invert it.
Compare total bytes written against the rating for the model rather than reading the percentage alone. A drive rated for 600 TBW that has written 500 TB is close to its limit regardless of what the percentage shows.
Also read reallocated sectors, pending sectors, and the uncorrectable count. Those describe current health, while wear describes future capacity.
Reduce Unnecessary Writes
Move the page file off a heavily worn drive if another disk is available, and reduce the frequency of large temporary file operations.
Disable indexing or search on volumes that do not need it, and avoid keeping large virtual machine images that are rewritten constantly.
These measures slow the wear rate. They do not restore life that is already consumed.
Plan the Replacement
Choose a replacement with at least the same capacity and a higher endurance rating if the workload is write heavy.
Clone the drive while it is still readable. A drive at the end of its endurance can fail during the clone, so do not wait for a warning that never comes.
Keep a second copy of the clone. A single copy made from a dying drive is not a backup.
Clone Before the Drive Fails
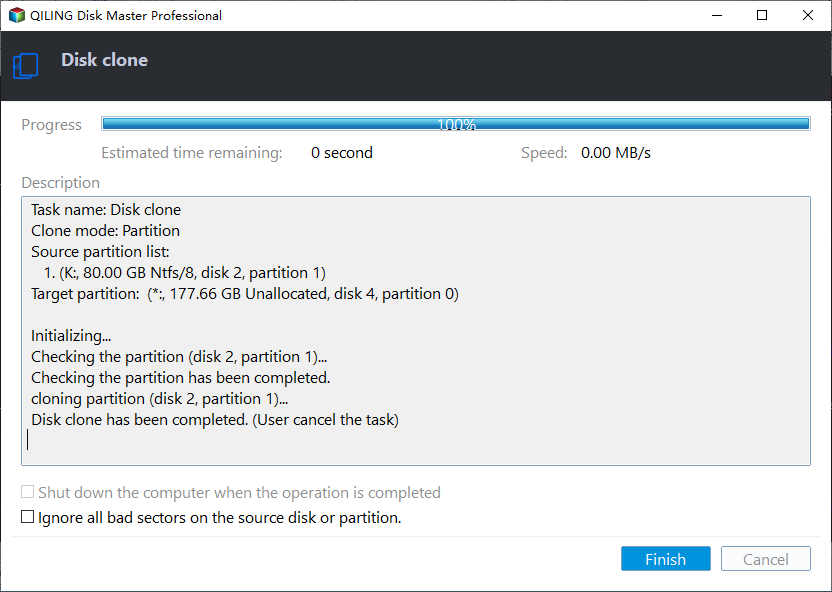
Qiling Disk Master can clone the system to a new SSD without reinstalling Windows, which is the practical way to replace a worn drive.
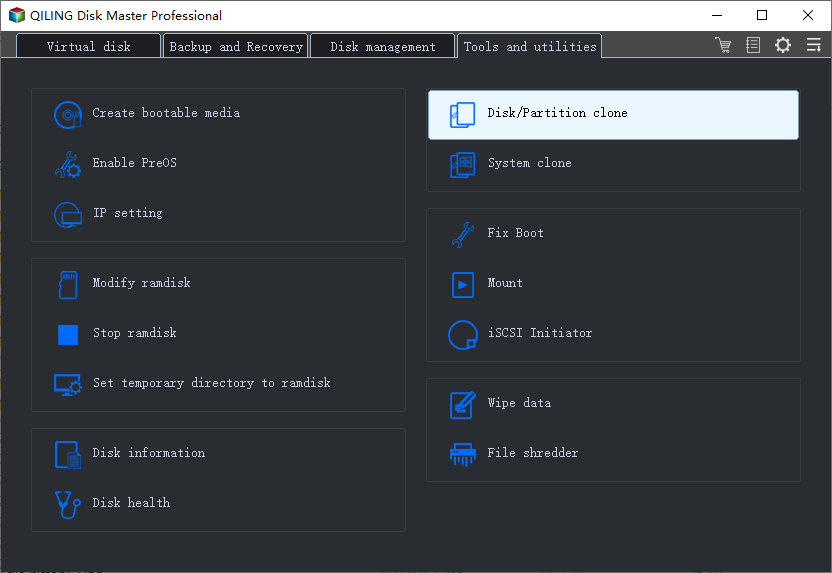
Step 1. Choose Disk Clone
Open Clone on the left and choose Disk Clone. Partition Clone is enough when only one volume needs to move.
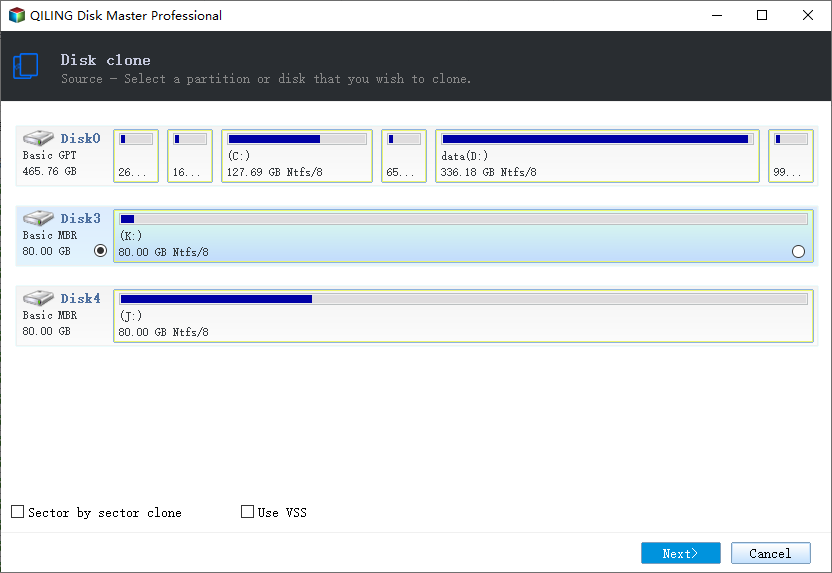
Step 2. Select the Worn Drive
Pick the drive by model and capacity. Note the health values before you start, so you can compare them afterwards.
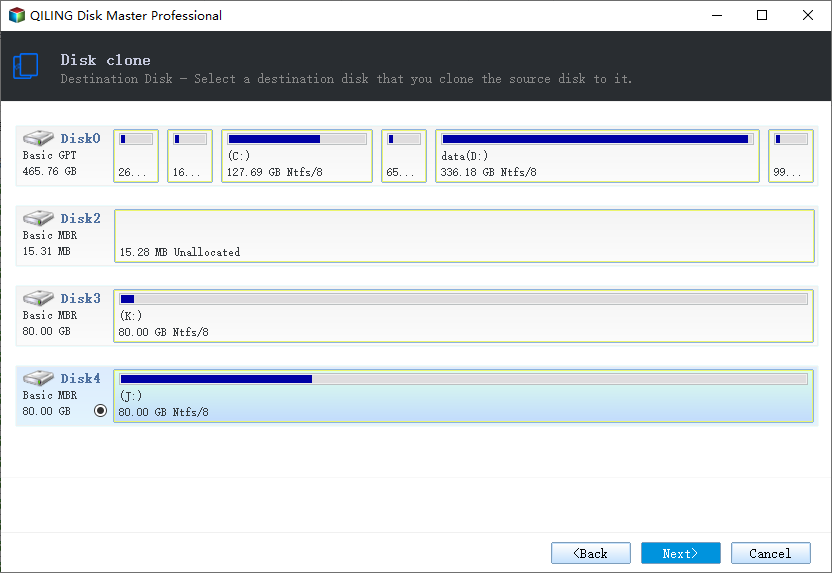
Step 3. Select the New SSD
Choose the replacement. Any data on it will be replaced, so copy it out first if the drive has been used.
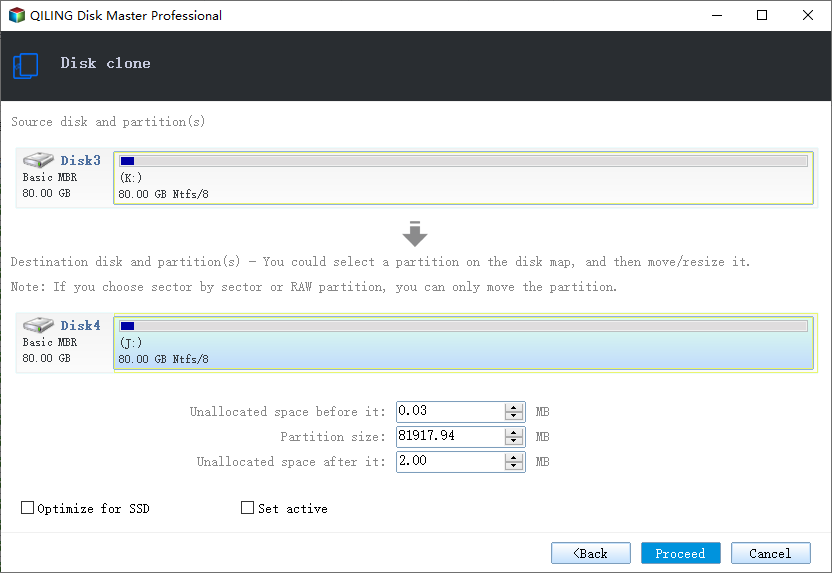
Step 4. Preview and Proceed
Review the layout and start the job. If the worn drive reports read errors during the clone, stop and recover the data before you continue.
Step 5. Boot and Keep the Old Drive
Boot from the new drive and confirm that Windows starts. Keep the old drive untouched until you are satisfied, then erase it.
Frequently Asked Questions
Does a high wear level mean the drive will fail soon?
Not necessarily. It means the rated write budget is nearly used. Failure can still be months away, but planning a replacement is sensible.
Can I reset the wear counter?
No, and doing so would not extend the life of the drive. The counter reflects actual writes to the NAND.
Does the drive slow down as it wears?
Write performance can degrade once the spare area is exhausted, because the controller has less room to manage garbage collection.
Should I keep using it as a data disk?
A worn drive is acceptable for read-heavy data once the system has moved. Keep a backup regardless.
For the health values behind these figures, see how to check an NVMe SSD for health.
Related Articles
- How to Check an NVMe SSD for Health
- How to Check Disk Health
- Clone an HDD to an NVMe SSD
- External SSD Throttles During a Large Copy
- SSD Shows 0 MB: Controller Failure
Products
Articles & Tutorials
- Data Recovery
- Data Backup
- File Recovery
- File Backup
- System Backup and Restore
- Disk and Partition Clone
- Technical articles
- Mobile articles
- Disk Master Help
- Windows Data Recovery Tutorials
- Windows Secure Delete Tutorials
- Windows Partition Management Tutorials
- Windows File Backup and Restore Tutorials
- Windows System Backup and Restore Tutorials
- Windows Disk Backup and Restore Tutorials
- Windows Clone Tutorials