How to Fix "This Device is currently in Use" when Ejecting Drive in Windows 10/7
Quick Navigation:
- 3 Useful Solutions for How to Fix "This Device is currently in Use"
- Method #1: Find the Program Using the Device and End the Task
- Method #2: Eject the Device in Disk Management
- Method #3: Eject the Device in Device Manager
- Tips: How to Recover Data if External Hard Drive does not work properly after Forced Ejection
- Solution #4. Format External Hard Drive
- How to Recover Files or Data Lost/Deleted/Missing from External Drive
Safely removing an external hard drive from a computer should not be an issue. All you have to do is right-click on the device icon on the system tray and you will see the message "Safe to Remove Hardware". However, you may encounter an error message that says "Windows 7 this device is currently in use". The reason you receive the message may because a program on the device is still running on your PC. Sometimes, you may not have any running program and still get the message.
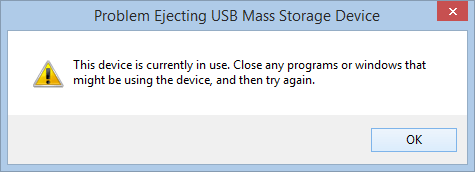
Irrespective of whether you have a program running or not, you should not forcefully eject an external drive if you receive the message, "this device is currently in use Windows 10". If you do, the external drive may not be recognized again when next you want to use it. It may also not be accessed and the file system displayed as RAW. Additionally, you may be unable to open the external hard drive when you put it back on the PC. A lot can go wrong if you forcefully eject an external hard drive when you receive an error message. So, how do you fix this device is currently in use error?
3 Useful Solutions for How to Fix "This Device is currently in Use"
If you experience the issue with the "this device is currently in use external hard drive Windows 10" error message, you can resolve the issue with some simple methods.
Method #1: Find the Program Using the Device and End the Task
As stated above, the reason you have the issue of "the device is currently in use how to eject" could be because there is a program currently running on your PC that is preventing the external hard drive from ejecting safely. Therefore, you need to find the program and close it. Here are the steps.
- Open the Task Manager and locate the program that is currently running on the external hard drive. To open the Task Manager, press down "Ctrl + Alt + Del".
- Under the "Process" tab in the Task Manager window, find the running applications that are located on the drive.
- Right-click on the application and select "End Task".
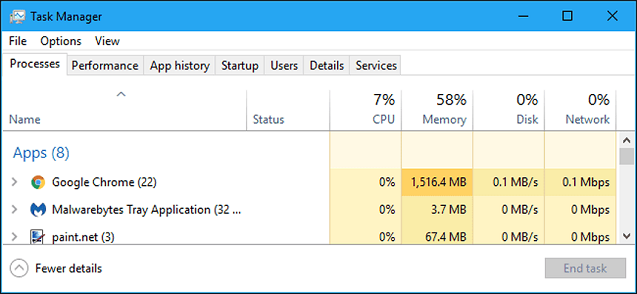
This should stop the program and you can go ahead to safely remove the external hard drive in Windows 7/10.
Method #2: Eject the Device in Disk Management
If you can't find any application that is running on the external hard drive from the Task Manager, you can eject the device directly from the Disk Management. Check out the steps below.
- Step 1: Right-click on "My Computer" or "This PC" in Windows 7 and 10 respectively and click on "Manage".
- Step 2: Click "Disk Management" under the "Storage" menu.
- Step 3: Find the external hard drive from the list and right-click on it and click on "Eject".
This will enable you to safely remove the device. Note that the next time you want to use the external hard drive; you will receive the "Offline" notification. You have to return to Disk Management to switch to "Online".
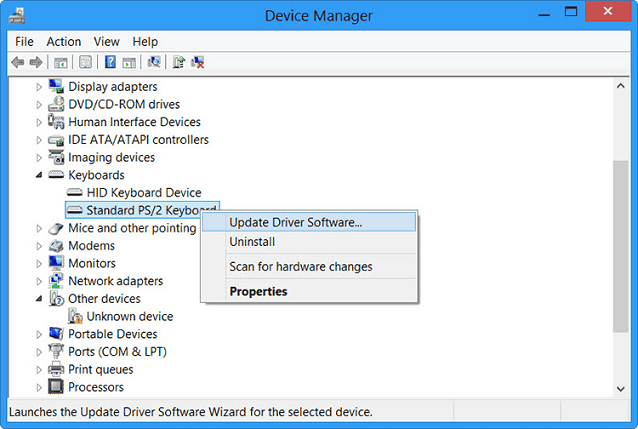
Method #3: Eject the Device in Device Manager
The third option to resolve the issue of "Windows 7 this device is currently in use" is to eject the external hard drive directly from Device Manager. To do this, follow the steps below:
- Step 1: Click the "Start" button at the bottom left of the window and then "Control Panel". From here, Click on "Hardware and Sound" and then click on "Device Manager".
- Step 2: Click on "Disk Drives" from the Device Manager and all the storage devices connected to the system will be on display.
- Step 3: Right-click on the device that is having the "this device is currently in use external hard drive Windows 10" issue and select "Uninstall".
- Step 4: Click on the "OK" button to confirm the action.
- Step 5: Allow the process to complete and remove the external hard drive.
Tips: How to Recover Data if External Hard Drive does not work properly after Forced Ejection
If you failed to use CHKDSK to repair your computer system, you can try another built-in feature: SFC, namely System File Checker, to scan your system and repair the missing or corrupted system files.
Solution #4. Format External Hard Drive
When you forcefully eject an external hard drive from your PC, there is a tendency for it not to work properly again. It may be damaged and you won't be able to access the data on the device manually. If this happens, you don't have to worry. You can recover data from the drive when you use Windows or Mac data recovery software.
Deep Data Recovery is the most recommended software that you can use to recover lost data from the external hard drive. It has a streamlined and intuitive user interface. It takes three simple steps to completely recover deleted files with the software. The tool features two scanning modes, which are Quick Scan and Deep Scan. With the Quick Scan, you can complete the scanning process within minutes. However, if you discover that some files are still missing, you can use the Deep Scan for a thorough and extensive scan and recovery process.
Your Safe & Effective File Recovery Software
- Recovers deleted or lost data from external hard drives, USB flash, Pen Drive, Flash Drive, formatted hard drive.
- Recovers lost data from an operating system crash.
- Restores data from the damaged RAW partition or lost partition.
- Retrieves files from emptied recycle bin, and much more.
How to Recover Files or Data Lost/Deleted/Missing from External Drive
Step 1: Download and install the Deep Data Recovery software. After this, connect the external hard drive to the computer and launch the software.
Step 2: All the supported files will be selected by default in the main window. If you want, you can deselect all the file types and select the specific ones that you want. When you are done, click "Next".

Step 3: Select the location of the external drive to scan and click the "Scan" icon to start the recovery process.

Step 4: When the scanning is completed, select the files you want and click "Recover" to save them all on your PC. That's all it takes to recover lost/missing/deleted files from an external hard drive.

To avoid forcefully ejecting an external hard drive in Windows 7/10, you can use the three methods highlighted above when you see the "this device is currently in use Windows 10" message. However, if you already ejected the device forcefully and the drive gets damaged, you can recover your data by using the Deep Data Recovery tool.
Related Articles
- How to Fix an Undetected External Hard Drive
- [Solved] USB/External Hard Drive Folder Access Denied in Windows 10/7
- How to Recover Data from Damaged External Hard Drive
- How to Transfer Photos from iPhone to Flash Drive on Windows
To help you transfer photos from iPhone to flash drive on Windows, there is a collection of proven ways to get photos from an iPhone to a USB connected to a PC. Check them in detail and apply one of them to transfer photos from iPhone to flash drive within minutes. - How to Transfer Photos from iPhone to PC Using iTunes | Full Guide
You can easily transfer photos from iPhone to PC, but not by using iTunes. Read on to know why you can't transfer photos from iPhone to PC using iTunes and how to transfer photos from iPhone to PC easily. - Top 5 iOS Device Backup Software
If you are looking for the best iPhone or iPad backup software, this guide will introduce a couple of programs for you to make a copy of your iPhone/iPad contacts, messages, photos, videos, and other popular files to Mac, PC, or another iOS device.