How to Download Photos from iPhone to Computer in 6 Ways
After reading this article, you will learn how to download photos from iPhone to computer, be it a Mac, PC or laptop, in proven and effective ways. Whether you want to download photos from iPhone to PC without iTunes or iCloud, you will find the solution to it.
The camera has always been one of the numerous advantages of an iPhone. With more and more of us getting used to taking photos and videos using the handy mobile device, we find ourself in a need to download photos from iPhone to PC or Mac at one time or another, due to reasons like making a backup of the precious images, freeing up iPhone space, editing photos from the computer, and more.
No matter what reasons you have, as long as you want to know "How do I download photos from my iPhone to my computer?", this guide is for you.
Part 1. How to Download Photos from iPhone to PC
When you attempt to transfer photos from your iPhone to your PC running Windows 10, Windows 8, or Windows 7, what do you think of first? iTunes, right? Actually, Apple iTunes doesn't provide you with a direct solution to import photos from iPhone to computer. Then how to download photos from iPhone to computer without iTunes? The ways are many.
Method 1. Transfer Photos from iPhone to PC with Qiling MobiMover
With professional iOS data transfer software like Qiling MobiMover, you can download pictures from iPhone to computer without installing iTunes. Qiling MobiMover will help you transfer photos you took with the iPhone camera, the screenshots, the pictures you saved from social networks, and images from other sources. In a word, it allows you to get all photos from your iPhone to computer at once.
To download photos from iPhone to computer without iTunes:
Step 1. Connect your iPhone to PC running Windows 7 or later. Run Qiling MobiMover, choose "Phone to PC" and click the "Next" button to go on.
Step 2. Check the category/categories you want to transfer from your iPhone to the computer. As you can see, you can copy other supported files together with photos from your iPhone to PC all at once. Besides, you can customize the storage path for the exported photos. Otherwise, MobiMover will save them on your desktop.
Step 3. Now, click the "Transfer" button to start transferring photos from your iPhone to PC without iTunes. Exporting files from iPhone to PC with MobiMover is the right way for backup to avoid unexpected data loss.
As you can see from the images above, Qiling MobiMover will also allow you to transfer other files types like videos, audio files, contacts, books, messages, and more. Besides, it also supports the data transfer from computer to an iOS device or between two iOS devices. Don't hesitate to copy all your photos and videos from your iPhone to computer with it.
Method 2. Import Photos from iPhone to PC with File Explorer
Do you have a question like "How do I transfer photos from iPhone to laptop using USB?" If you do, the answer for you is to use File Explorer (called Windows Explorer in earlier versions) in Windows 10. Windows File Explorer enables you to copy photos in the DCIM folder to your computer using a USB cable. Thus, if you want to transfer photos from iPhone to PC in Windows 10 or earlier versions, using File Explorer is a good choice. The only drawback of this way is that the DCIM folder only contains the photos you take with your iPhone camera. Therefore, you won't be able to copy photos from other sources on your iPhone to PC.
To copy photos from iPhone to PC using USB:
Step 1. Unlock your iPhone and connect it to your Windows PC using a USB cable. (Make sure the USB cable is a good one.)
Step 2. Then a prompt will appear on your iPhone asking you whether to allow the device to access your photos and videos. Click "Allow" to continue.
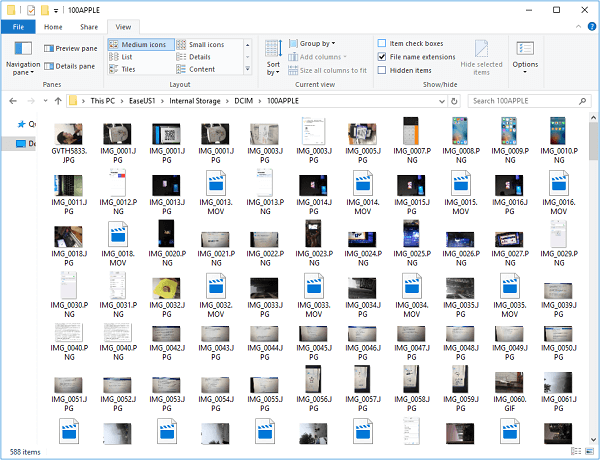
Step 3. Go to "This PC" > "Apple iPhone" > "Internal Storage" > "DCIM" > "100APPLE" and you will see all the photos in your iPhone Camera Roll.
Step 4. Copy the photos on your iPhone and paste them to a folder on your PC. When it has done, you have successfully downloaded photos from iPhone to your computer.
Method 3. Copy Photos from iPhone to PC Using Photos
Windows Photos is a built-in photo management tool on PC running Windows 8 and later. With it, you can import photos from iPhone to PC using a USB cable without iTunes. Compared with File Explorer, the Photos app will transfer all photos and videos from your iPhone to PC, not limited to the items in the Camera Roll.
To download photos from iPhone to PC via Photos:
Step 1. Connect your iPhone to your PC in Windows 10 or Windows 8.
Step 2. Click "Allow" on your iPhone to trust the computer.
Step 3. Open the "Photos" app and click the "Import" button.
Step 4. Click "From a USB device" from the drop-down menu and the app will look for a device to import photos from automatically. Afterward, it will show you how many items it has found.
Step 5. You can import selected items or import all the items it found according to your needs.
Step 6. Click "Continue" to start downloading photos on your iPhone to the PC or laptop.

You may encounter issues like "Photos not working" in Windows 10 PC. If you do, learn how to fix it or try the alternative ways available here.
Method 4. Sync Photos from iPhone to PC Using iCloud Photos
With iCloud on, you can sync your iPhone photos across your devices like iPhone, iPad, Mac, and even PC wirelessly over a Wi-Fi connection. To upload photos from iPhone to computer, you need to make sure you are using the same Apple ID on the devices. Besides, iCloud will copy all photos from your iPhone to PC, which means it's impossible for you to selectively transfer photos from iPhone to PC using iCloud Photos.
To move photos from iPhone to PC using iCloud:
Step 1. Turn on iCloud Photos on iPhone: Go to "Settings" > [your name] > "iCloud" > "Photos" and switch on "iCloud Photos".
Step 2. Turn on iCloud Photos on the computer.
- Download and install iCloud for Windows.
- Sign in with the Apple ID you use on the iOS device.
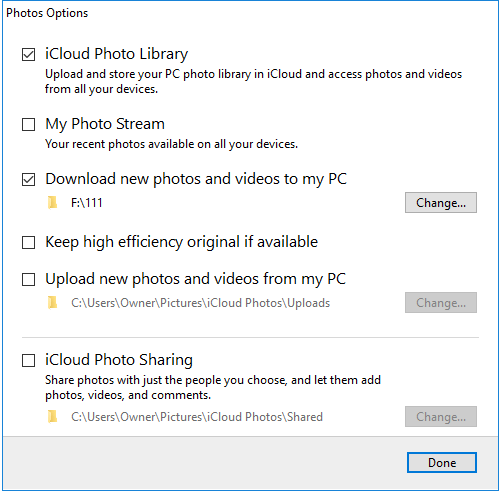
- Click the "Options" button next to Photos and check the "iCloud Photo Library" option.
- Click "Done" > "Apply".
Step 3. After the syncing process, check your iPhone photos by going to "This PC" > "iCloud Photos" > "Downloads" on your PC.
Other cloud services, for example, Dropbox and Google Photos, can also help you transfer photos from your iPhone to other devices.
Part 2. How to Download Photos from iPhone to Mac
Some of the methods above can also be applied to move photos from iPhone to Mac, including using Qiling MobiMover and iCloud. It's just slightly different to turn on iCloud on Mac:
Step 1. Go to the Apple menu and click "System Preferences".
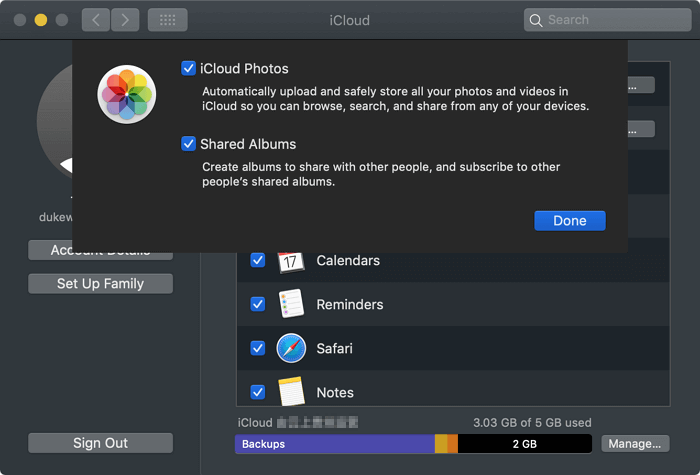
Step 2. Click "iCloud" and sign in with the Apple ID you use on your iPhone.
Step 3. Check the "Photos" option and turn on "iCloud Photos".
Step 4. Then all your iPhone photos will emerge on the Photos app.
Except for the two ways mentioned, there are two more workable solutions for you to transfer photos and videos from iPhone to Mac.
Method 1. Import Photos from iPhone to Mac Using the Photos App
Yes, there is an app called Photos on Mac, too. And it is also used to manage photos. With it, you can easily transfer photos from iPhone to Mac using a USB cable.
Step 1. Unlock your iPhone and plug your iPhone into the Mac. (You may need to go through a verifying process.)
Step 2. Run Photos for Mac, go to the "Devices" section and select your iOS device.
Step 3. Click "Import All New Photos" or select the photos you want to transfer to the Mac and then click "Import XXX Selected". Note: You can use "Command + A" to choose all the photos and videos or use the "Shift" key or "Fn" key for bulk selection. (You can customize the picture folder that is used to store the imported pictures.)

Can't import photos from iPhone Mac using this way? Learn how to fix it from the related article.
Method 2. Transfer Photos from iPhone to Computer Using AirDrop
If you are using a Mac, the exclusive way for you to download photos from iPhone to computer is using AirDrop. AirDrop is the file-sharing utility on iOS devices and Mac computer. With AirDrop enabled, you can share photos, videos, contacts, locations, websites, and more between two of the mentioned devices.
Step 1. Make sure you have turned on both Wi-Fi and Bluetooth on the iPhone and enable AirDrop from Control Center on your iPhone.
Step 2. Turn on AirDrop on the Mac by going to "Finder" > "AirDrop". Then set the option "Allow me to be discovered by:" to "Contacts Only" or "Everyone".
Step 3. To transfer photos from iPhone to computer, go to the Photos app on your iPhone and select the items you want to transfer.
Step 4. Click the "Share" button and choose "AirDrop" > [your Mac's name].
Step 5. On the Mac, click "Accept" to import photos from iPhone to Mac.

If AirDrop is not working properly, you need to fix it first.
The Bottom Line
Now you know how to transfer photos from iPhone to Mac or PC in all the possible ways. How will you download pictures from your iPhone onto the computer? Carry out the way best suited to your needs to import photos from iPhone to PC, Mac, or laptop with ease.
Related Articles
- How to Import Videos from iPhone to Mac in 5 Ways
- How Do I copy an Entire Conversation on iPhone
- How to Transfer Videos from iPhone to MacBook Air/Pro
- How to Save Text Messages to Computer