How to Transfer Files from iPhone to PC in Windows 11
When it comes to transferring files from an iPhone to a Windows 11 PC, the simplest situation could be transferring photos, which can be done only using a USB cable. For other types of files, like music, ringtones, books, contacts, or documents, it is relatively difficult but still isn't a tough task to finish. No matter which type of file you are looking to transfer, you will find the corresponding solution from the details below.
How to Transfer Photos and Videos from iPhone to PC in Windows 11
If what you want to copy are photos and videos, there is no way that is easier than using a USB cable. By connecting your iPhone to the Windows computer with a USB cable, Windows can get access to your iPhone's DCIM folder which contains the photos and videos on the iOS device. Afterward, you can either use File Explorer or the Photos app to transfer your iPhone photos to Windows 11.
To import photos from an iPhone to a PC in Windows 10:
Step 1. Connect the iPhone and the PC with a USB cable.
Step 2. Unlock your iPhone and click "Allow" in the prompt asking for your permission.
Step 3. Copy photos from the iOS device to Windows:
File Explorer: Go to "File Explorer" > "This PC" > "Apple iPhone" > "Internal Storage" > "DCIM" and copy these folders that contain your iPhone photos and videos to the computer.

Photos: Launch Photos and click "Import" > "From a connected device." Wait for Photos to load the photos and videos on your iPhone, select the items, and then import them to your iPhone to the computer.
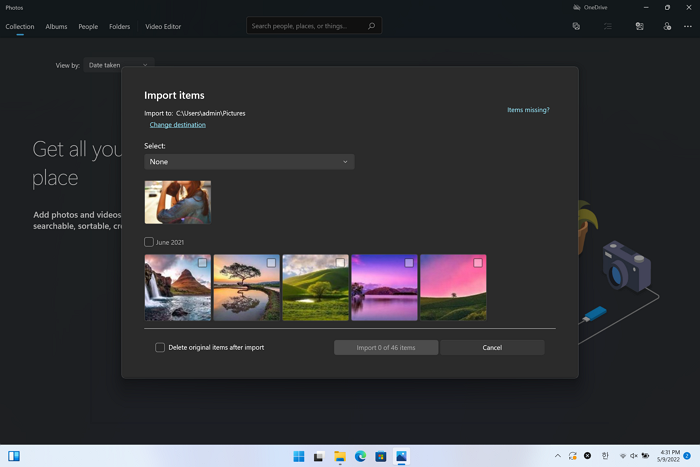
Step 4. Go to the selected folder to check your iPhone photos and videos.
How to Transfer Files from iPhone to Windows 11 with iPhone Transfer Software
Supports: Photos, videos, music, ringtones, contacts, messages, books, and more
Other than photos, there are times when you may need to transfer other files, like music, ringtones, books, messages, or contacts, between an iPhone and a PC. It's no doubt that neither File Explorer nor Photos would help in such situations. Indeed, you can transfer photos from an iPhone to a PC in Windows 10 without any software installation. But when it comes to other file types, it's necessary to use an iPhone transfer software tool like Qiling MobiMover.
It is a powerful toolkit that includes an iPhone data transfer tool, an iPhone backup tool, a WhatsApp manager, and a HEIC to JPG converter. These features make it easy for you to:
- Transfer files from an iPhone to a PC/Mac or vice versa
- Transfer files from one iPhone to another
- Back up and restore an iDevice
- Transfer, back up and restore WhatsApp messages
- Convert HEIC to JPG in bulk
If you prefer to manage your iPhone, iPad, or iPod in more flexible ways, don't hesitate to try Qiling MobiMover. Let me take transferring files from an iPhone to a PC as an example:
Step 1. Connect your iPhone to your PC with a USB cable. Then launch Qiling MobiMover and go to "Phone to PC" > "Next".
Step 2. Check the types of files you want to transfer and click "Transfer". You can specify a location to keep the transferred items in advance. Otherwise, they will be placed on Desktop by default.
Step 3. Wait for the transfer process to finish. When it has done, go to the selected folder to check the items.
How to Transfer Files from iPhone to PC in Windows 11 via iCloud Drive
Theoretically, no matter which type of files you want to share from your iPhone to a PC, you can use iCloud Drive to help. It supports any file that is smaller than 50GB. Therefore, whether you want to transfer large videos, documents, or other files, iCloud Drive will be here to help.
Just like using any other cloud-based services, you need to make sure:
- You have enough cloud storage to store the files.
- You use the same Apple ID account on both your iPhone and the PC.
- You have stable network connections on both devices.
Get prepared and then follow the steps below to transfer files from an iPhone to a Windows 11 PC using iCloud Drive.
Step 1. Go to the Settings app on your iPhone to enable iCloud Drive.
Step 2. On your iPhone, select the files you want to transfer and tap the "Share" icon.
Step 3. Tap "Save to Files" > "iCloud Drive" and then select or create a folder to save these files.
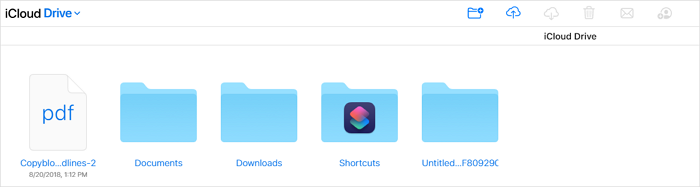
Step 4. Go to iCloud.com and sign in with the Apple ID used on your iPhone.
Step 5. Click "iCloud Drive" and select the folder that contains your iPhone files.
Step 6. Select and download these files from iCloud Drive to your PC.
By doing so, you can transfer files from your iPhone to a PC in Windows 11 wirelessly.
The Bottom Line
There are other ways that are also helpful to share files from an iPhone to a PC. For example, you can send your iPhone files via email or use Dropbox to sync files over Wi-Fi. But the ways detailed above are used most frequently. Specify the file type you need to transfer and apply a suitable way to get your iPhone files to Windows 11 without hassle.
Related Articles
- How to Back Up iPhone to PC or Mac
- How to Restore iPhone from Computer Backup, iTunes, and iCloud
- How to Download Twitch Videos (or Clips)
- How to Transfer Music from iPad to iPhone/iPhone to iPad