How to Turn off iCloud Music on a PC or Mac?
| Workable Solutions | Step-by-step Troubleshooting |
|---|---|
| What is the iCloud Music Library | iCloud Music is a built-in feature in iOS and...Full steps |
| Disable iCloud Music Library | Go to "Settings" > Click on"Music"...Full steps |
| Sync iPhone Music to the Computer | Connect your iPhone to the computer...Full steps |
What is the iCloud Music Library?
iCloud Music Library is a built-in feature in iOS and macOS that allows users to access and synchronize their songs, albums, and playlists across Apple devices under the same Apple account. It performs like the iCloud Photo Library. If you enable it on your device, then all of your purchased and non-purchased music across your iPhone, iPad, iPod touch, and Mac. Though it brings great convenience to its users to manage their songs, it also comes with some disadvantages, as we listed below.
- iCloud music is not correctly syncing, which misses or mismatches album artwork.
- iCloud music always shows the wrong metadata.
- Live tracks matched to their studio versions.
From the above, you can see that there are many limitations of using the iCloud Music Library. Thus, you may want to turn it off. If that is the case, just follow the instructions below to disable the iCloud music library on your iPhone/iPad and PC/Mac.
Important Notice: Before you disable iCloud music library, we suggest you make a copy of your music with the method in Part 2 since you will lose all of your saved songs from the Apple Music catalog and a cloud-based copy of your Mac's iTunes library after turning off iCloud Music Library. But if you don't care about the music, just go ahead to disable the iCloud Music Library on your device.
How to Turn off iCloud Music on iPhone/iPad and PC/Mac
In this section, we will introduce the steps to disabled iCloud Music on iPhone, iPad, PC, and Mac. Now, you can follow us to do it.
On your iPhone and iPad
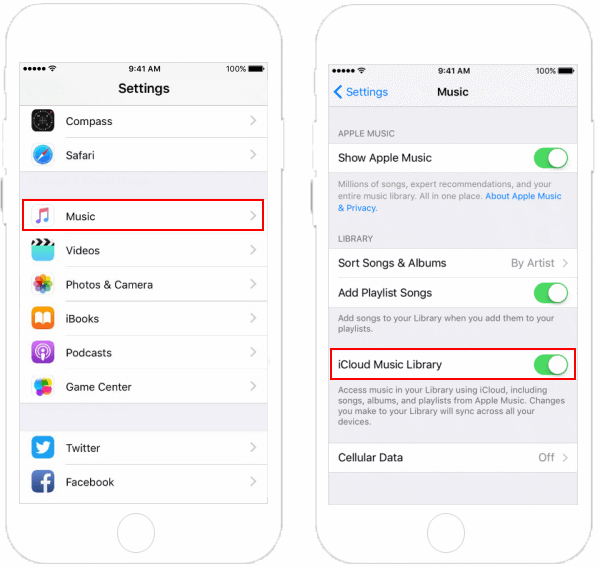
Step 1. Head to the Settings on your iPhone or iPad > "Music" > "iCloud Music Library."
Step 2. Uncheck the option "iCloud Music Library."
On your Mac and PC
Step 1. Open iTunes on your Mac > Click iTunes in the Menu bar > Click the "Preference."
Step 2. Click the checkbox next to iCloud Music Library > Uncheck it.
As we mentioned at the beginning, you may lose music after disabling iCloud Music. If you have made a backup of your music, just ignore this part. But what to do if you haven't made any backup? If this is your case, don't worry, you still have the chance to get the lost music back without backup.
How to Sync Music with the Best iCloud Alternative Software
If you have demand for syncing valuable music from your iPhone or iPad to somewhere safe on your computer, Qiling MobiMover is the right choice. It's iPhone data transfer software that offers comprehensive and straightforward solutions to back up iPhone to computer, including music here, photos, videos, audios, contacts, messages, and more. Moreover, MobiMover provides you the all-in-one data transfer and management options to add ringtones to the iPhone 8, delete all contacts from iPhone, remove all the music on the iPhone, etc..
Follow guides below to sync your music from iPhone to the computer with MobiMover in an easier way than ever.
Step 1. Connect your iPhone to the computer and run Qiling MobiMover. "Allow" it to access your iPhone data and "Trust" this computer. Then, click "Audio" and "Music" to proceed.
Step 2. Click "Music" to choose desired music files and click "Settings" at the right top corner to navigate a safe location on your PC for saving the files.
Step 3. Click "Transfer to PC" to start the transferring.
In Conclusion
We hope this guide is helpful to you. Whether you want to turn off the iCloud Music Library on your iPhone/iPad or the computer, we have the way to help you do it. But before you do that, remember to back up your music to the computer with Qiling MobiMover. Otherwise, you will lose all of your music in a flash. To avoid data loss caused by maloperation, we suggest you back up your iPhone data often.
Related Articles
- 3 Easy Methods to Convert iPhone Video to MP4
- How to Transfer Apps from iPhone to iPhone in 5 Ways
- How to Download Twitch Videos (or Clips)
- How Do I copy an Entire Conversation on iPhone