How to Sync Music from iTunes to iPhone
Quick Navigation:
- Overview of Steps to Transfer Music from iTunes to iPhone
- Before You Start
- How to Sync Music from iTunes to iPhone Automatically
- How to Transfer Music from iTunes to iPhone Manually
- How to Add Music from Mac to iPhone via Finder
- How to Transfer Music from Computer to iPhone Without iTunes
- The Bottom Line
In this guide, you will learn how to add music from iTunes to iPhone in detail using two different methods. If you don't want data loss, follow the bonus tip to transfer music from computer to iPhone without iTunes.
To add music from iTunes to your iPhone, you can simply connect your device to your computer, open iTunes, select the music you want to transfer, and click "Sync" or drag the files to your iPhone icon in the iTunes sidebar. This process allows you to transfer music from your computer to your iPhone without any additional software or service costs.
Overview of Steps to Transfer Music from iTunes to iPhone
- Connect your iPhone to the computer
- Choose the automatic or manual way to transfer music
- Select the music you want to transfer
- Start syncing music from iTunes to your iPhone
Before You Start
When adding music to an iPhone using iTunes, there's a potential issue: existing music, movies, TV shows, and books not in iTunes will be deleted and replaced by synced items, resulting in data loss.
If you want to put music from iTunes to your iPhone, you can follow one of two methods or add music to your iPhone without syncing. Alternatively, if you prefer to transfer music from your computer to your iPhone without syncing, you can learn how to add music to your iPhone without using iTunes.
To sync music from iTunes to iPhone, you need to ensure that your iPhone is connected to your computer, and iTunes is installed and running on that computer. You should also make sure that the iPhone is recognized by iTunes, and that the music you want to sync is selected in the iTunes library.
- To get started, download and install the latest version of iTunes on your computer.
- To transfer music from iTunes to your iPhone, add music files to the iTunes library first. To do this, go to the iTunes window and select "File" > "Add File to Library" to add the desired music files.
Syncing music from iTunes to iPhone can be done in two ways. Firstly, you can connect your iPhone to your computer, open iTunes, and select the music you want to sync. Then, click on the "Sync Music" button to transfer the selected music to your iPhone.
How to Sync Music from iTunes to iPhone Automatically
To have iTunes automatically add songs to your iPhone when it's connected, enable the "Sync Music" option in iTunes. This allows your iPhone to sync with your iTunes library and copy music from your computer to your iPhone.
To automatically transfer music from iTunes to iPhone:
Step 1. Connect your iPhone to the computer with a USB cable, and iTunes will automatically run.
Step 2. Unlock your iPhone and trust the computer. If asked, enter your iPhone password as required.
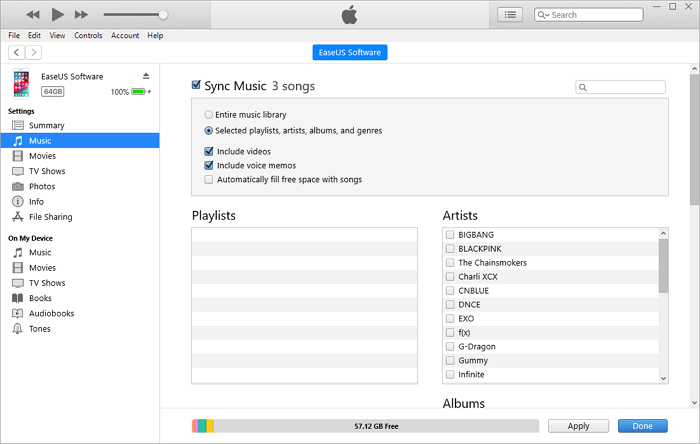
Step 3. Click the device icon and choose "Music".
Step 4. To sync music, select the "Sync Music" option and then choose "Remove and Sync" from the new iTunes window.
Step 5. To sync your iPhone with iTunes, you can choose to sync your entire music library or select specific playlists, artists, albums, and genres. If selecting specific items, you can choose which ones to transfer.
Step 6. After selecting the music, click "Apply" and then "Sync" to transfer the music from iTunes to your iPhone.
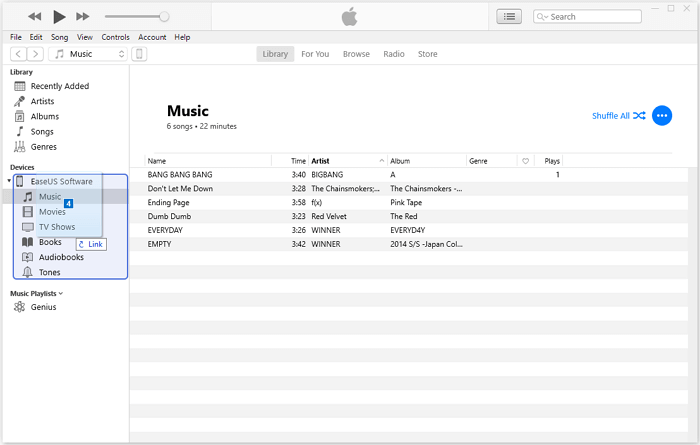
Step 7. Once the syncing is complete, you can verify the synced songs on your iPhone by navigating to the "Music" tab, then selecting "Library" and finally "Songs".
How to Transfer Music from iTunes to iPhone Manually
If you prefer to take more control over the data transfer, you can manually copy songs from iTunes to your iPhone. This gives you more control over the process, allowing you to select specific songs or albums to transfer, and also to remove any unwanted songs or duplicates.
To manually move music from iTunes to iPhone:
Step 1. To start the process of backing up your iPhone, first ensure that your iPhone is connected to your computer using a USB cable. Next, make sure that iTunes is running on your computer.
Step 2. Unlock your iOS device and trust the computer.
Step 3. In the iTunes window, click your iPhone icon and choose "Summary" from the left panel.
Step 4. To save changes, go to the "Options" section, select "Manually manage music and videos", and click "Apply".
Step 5. To sync music to a device, go to "Devices" and select "Music". Then, open the folder containing the desired songs, select the items to sync, and drag them to the left panel or center of the window, or directly from the iTunes library to the device.
How to Add Music from Mac to iPhone via Finder
In macOS Catalina, iTunes has been replaced by Finder, which handles syncing and backing up data on Macs. To transfer music to an iPhone from a Mac running Catalina, use Finder instead of iTunes.
To put music to iPhone via Finder:
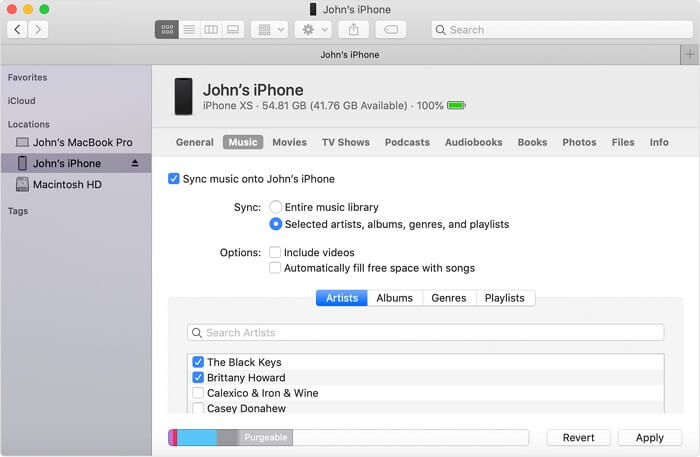
Step 1. To connect your iPhone to your Mac, open a Finder window on your Mac and click on the "Locations" tab on the left side of the window. Select your iPhone from the list of available devices, then click on the "Trust" button to establish a connection.
Step 2. To sync music on your iPhone, choose your iPhone from the list of devices and select the type of content you want to sync, which in this case is "Music".
Step 3. To sync music from your computer to your iPhone, check the box next to "Sync music on to [your iPhone name]" and select the music files you want to transfer.
Step 4. Once you click "Apply", your iPhone will start syncing music from your computer to your iPhone. This process may take a few minutes, depending on the number of songs you are syncing.
To avoid syncing data and losing existing media files on your iPhone, you can use the "Add to Library" feature in iTunes or Finder instead of syncing. This will allow you to add music to your iPhone without overwriting the existing files. Simply select the music files you want to add and choose "Add to Library" from the context menu.
How to Transfer Music from Computer to iPhone Without iTunes
If you want to add music to your iPhone without syncing, using a professional iOS data transfer software like Qiling MobiMover is a good option. This software allows you to transfer music to your iPhone more flexibly, without the need for syncing. It works well to transfer music to your iPhone.
- Transfer files between iPhone and Mac or PC
- Copy files from an iOS device to a computer
- Transfer data from one iPhone/iPad to another
- Transfer, back up and restore WhatsApp messages
The app supports a wide range of file types, including music, photos, videos, contacts, ringtones, audiobooks, messages, and more, making it a versatile tool for managing various types of digital content.
To transfer music from computer to iPhone without iTunes:
Step 1. Connect your iPhone to your computer and run Qiling MobiMover. Then, go to "PC to Phone" and select the files you want to transfer.
Step 2. Select the music files you want to transfer to iPhone and click "Open" to proceed with the transfer process.
Step 3. Select the music files you want to transfer, check the box next to "Audios", and click "Transfer" to move music from your PC to your iPhone. Once the transfer is complete, open the Music app on your iPhone to verify that the songs have been successfully transferred.
To download music directly to your iPhone, you can use the Music app, which allows you to browse and download music from various sources, including the iTunes Store, Apple Music, and other music services. You can also use the Safari browser to download music from websites that offer free music downloads. Additionally, you can use third-party apps, such as Downloader or iMusic, to download music to your iPhone.
The Bottom Line
The methods shown above can also be used to transfer other types of files, such as photos and videos, from a computer to an iPhone, iPad, or iPod touch. This allows for a more informed decision to be made.
If you want to transfer music from a computer to your iPhone, you have two options. You can use iTunes for free, which will sync your music and potentially other data, or you can use an iOS data transfer tool that allows you to transfer music without syncing other data. This second option is a good choice if you want to avoid syncing data.
Related Articles
- How to Access Notes on iCloud on PC
- How to Transfer Photos from iPhone to Computer in 5 Ways
- Easy Way to Transfer Notes from Computer to iPhone 8
- Are You Able to Read iPhone Backup Files?