How to Access Notes on iCloud on PC
To view and edit your iCloud Notes from your PC, visit iCloud.com. This process is straightforward, but to ensure a smooth experience, you need to have set up iCloud Notes on your iPhone or iPad first.
If you haven't set it up, you can read Part 1 to turn on iCloud Notes first. Then go to Part 2 to learn how to access your iCloud Notes from PC. Alternatively, if you're interested in accessing and viewing your iPhone Notes on PC without using iCloud, you can go to Part 3 and Part 4 instead.
| Page Content | Quick Navigation |
|---|---|
| Part 1. Set Up iCloud Notes | Go to Settings > Tap [your name]..Full content |
| Part 2. Access iCloud Notes in iCloud | Go to visit iCloud.com > Enter Apple ID...Full content |
| Part 3. Access iCloud Notes on PC | Connect your iPhone to the computer...Full content |
| Part 4. View Apple Notes on PC via Gmail | On your iPhone or iPad, open the Settings...Full content |
Part 1. How to Set up iCloud Notes on an iOS device
iCloud services allow users to sync their iOS content across multiple devices, providing great convenience. To take advantage of this feature, users simply need to turn it on and ensure their devices are connected to Wi-Fi.
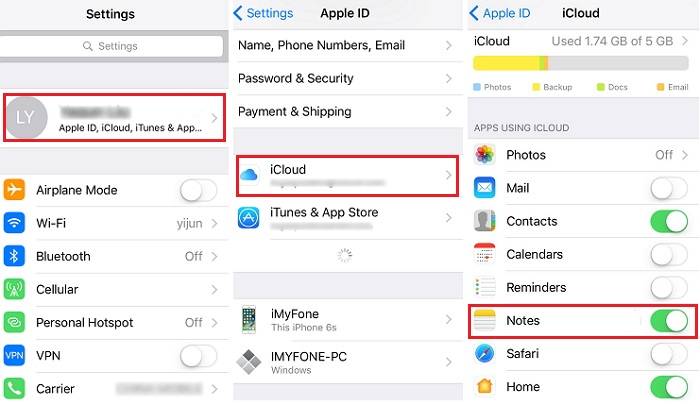
Step 1. Open the Settings app on your iPhone or iPad.
Step 2. Tap on your name at the top of the screen, then select "iCloud." (In iOS 10.2 and earlier, choose "iCloud" directly.)
Step 3. Switch on the "Notes" option.
If you're experiencing issues with backing up your iPhone or iPad to iCloud, such as "iPhone can't back up to iCloud," it's a good idea to troubleshoot the problem before proceeding.
Part 2. How to Access Notes via iCloud
If you have turned on iCloud Notes on your iPhone, you can access them from your PC by going to icloud.com on your browser, signing in with your Apple ID, and then clicking on the "Notes" option to view and manage your notes.
Step 1. Go to visit iCloud.com on your PC.
Step 2. Enter your Apple ID and sign in to iCloud.
Step 3. Tap on "Notes" to view and manage your iCloud Notes.

To access iCloud Notes on your computer regularly, you can create a progressive web app for this purpose. This allows you to have a dedicated app-like experience on your computer, making it easy to access your notes without having to open a browser each time. The process is straightforward and can be completed by following the steps outlined above.
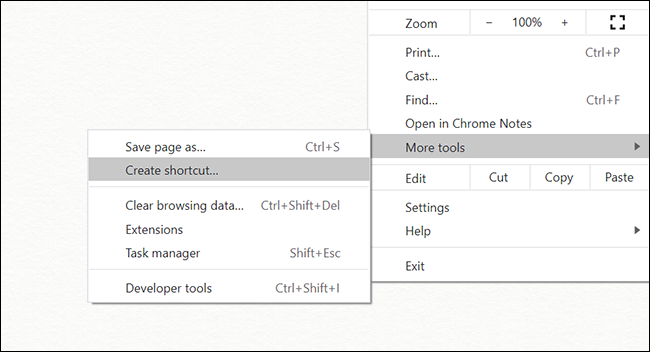
Step 1. Open Chrome on your computer.
Step 2. Visit iCloud.com. Then, sign in to your iCloud account.
Step 3. Tap "Notes" from the options.
Step 4. To create a shortcut, tap the three dots in the top-right corner, then select "More Tools" and finally "Create Shortcut."
Step 5. Tick the "Open as Window" box and click "Create."
Step 6. Then, you'll see the shortcuts on your desktop.
Part 3. How to Access iPhone Notes on PC Without iCloud
You can access your iPhone Notes not only through iCloud, but also using a data transfer tool like Qiling MobiMover. With MobiMover installed, you can access your notes, messages, contacts, and more data anywhere, even without an internet connection. Unlike iCloud's 5GB free storage, MobiMover allows you to transfer as many files as your computer's storage space allows.
You can click the button below to download and install Qiling MobiMover on your computer safely.
Step 1. Connect your iPhone/iPad to your computer, launch Qiling MobiMover, unlock your device and click "Trust", then choose "Phone to PC" > "Next" in the app.
Step 2. Select the category or categories you want to transfer from your iPhone/iPad to computer, click the default path and set a custom storage path for the notes, then click "Transfer" to initiate the transfer process.
Step 3. After the transfer process is complete, you can easily view and manage your notes on your computer.
Part 4. How to View Apple Notes on PC via Gmail
To view Apple Notes on a computer, you can also use Gmail, although this method has limitations. You can only view notes and not edit them, and it only works for notes created in the future, not for existing ones. This method also doesn't allow importing current notes to Gmail. If you're aware of these restrictions, you can follow the steps to view notes using Gmail.
Step 1. On your iPhone or iPad, open the Settings app.
Step 2. To enable notes on a device running iOS 14 or later, go to "Passwords & Accounts" and turn on "Notes." Alternatively, if your device is on iOS 14 or later, you can go to "Contacts" > "Accounts" > "Gmail" and enable the "Notes" option.
Step 3. Now, whenever you create a new note, it will be automatically synced to your Gmail account, making it easily accessible whenever you want.
Conclusion
You can easily access iCloud notes using the methods we introduced, and even without an iCloud connection, you can still view your notes via Qiling MobiMover. Our guide is designed to be helpful, and if it assists you, please don't forget to share it with others who may need it.
Related Articles
- How to Transfer Photos from Laptop to iPhone Without iTunes
- How to Transfer Data from Android to iPhone Using Computer
- How to Transfer Photos from iPhone to Laptop in 5 Proven Ways
- How to Export Contacts from iPhone to Excel or CSV