How to Transfer Photos from Laptop to iPhone Without iTunes
You can transfer photos from your laptop to your iPhone without using iTunes on a Windows computer. You can use the Photos app on your iPhone to transfer photos from your laptop. Simply connect your iPhone to your laptop using a USB cable, select the photos you want to transfer on your laptop, and then select the option to transfer them to your iPhone. You can also use third-party apps like Google Photos or Microsoft OneDrive to transfer photos between your devices. Alternatively, you can use AirDrop to transfer photos wirelessly between devices. Just make sure both devices are connected to the same Wi-Fi network.
Transferring photos from a laptop to an iPhone can be a common issue for fresh iPhone users. Fortunately, there are three ways to achieve this, with or without iTunes. You can use Qiling MobiMover, a professional iOS data transfer software, to transfer photos from laptop to iPhone. Alternatively, you can use iCloud or iTunes to accomplish this task. In this blog, we will guide you through the process of transferring photos from laptop to iPhone using these three methods.
Part 1. How to Transfer Photos from Laptop to iPhone Without iTunes
Qiling MobiMover is a powerful iPhone data transfer program that allows you to sync data between iOS devices and Windows/Mac, or between two iOS devices. It enables you to add files from Mac/Windows to iPhone without data loss, back up entire iOS content to Mac/Windows computer, copy data from one iOS device to another directly, or manage iPhone/iPad data in full ways. Additionally, its Video Downloader feature allows users to save online videos using URLs, making it easy to download Twitch clips, for example, by simply copying and pasting the clip's link to Qiling MobiMover.
Download Qiling MobiMover on your laptop and follow the steps to transfer photos from laptop to iPhone without using iTunes.
- Notice
-
1. MobiMover supports transferring various types of data from Android to PC, including contacts, messages, music, photos, videos, audios, ringtones, music playlists, notes, and books.
2. You don't need to use iTunes, but you still need to have it installed on your computer to read iOS data, which is required for any third-party software.
Step 1. To transfer photos from your laptop to your iPhone, connect your iPhone to your laptop and run Qiling MobiMover. Then, select "PC to Phone" and click "Select Files" to proceed.
Step 2. After selecting the photos you want to transfer, click "Open" to continue.
Step 3. Check the box next to "Pictures" and click the "Transfer" button. Once the transfer is complete, open the Photos app on your iPhone to verify the newly imported photos.
Part 2. How to Transfer Photos from Laptop to iPhone Using iCloud
Enabling iCloud Photos on your iPhone allows you to access your photos across all your devices, including iOS devices, Mac, or a Windows PC. Alternatively, you can upload photos from your laptop to iCloud and then download them to your iPhone from iCloud. Below are detailed guides on how to transfer photos from laptop to iPhone using this method.
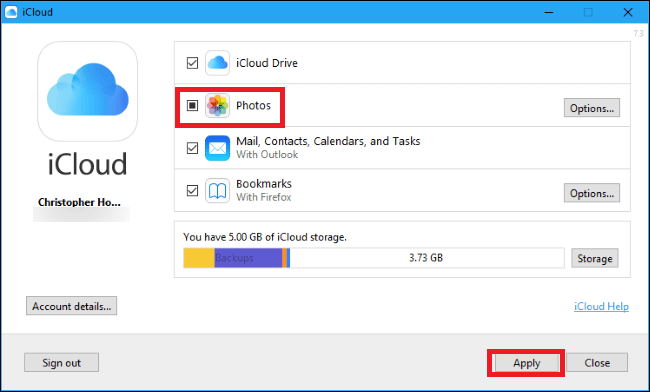
Step 1. To enable iCloud Photo on your iPhone, go to Settings > Photos. On your laptop, download and install iCloud for Windows.
Step 2. Go to iCloud on your laptop and sign into the same Apple ID on your iPhone.
Step 3. To access iCloud Photos, go to Photos in iCloud and click on "Options...". Then, tick the checkbox for "iCloud Photos" and click "Done" and "Apply" to save the change.
Step 4. After updating the settings, you can upload photos from your laptop to iCloud. To do this, click the iCloud icon in the taskbar, then click "Upload Photos" and browse your laptop's photos. Select the ones you want to sync to your iPhone and click "Open" to start the upload process.
After using the iCloud Photo Library feature, you can access your laptop's photos on your iPhone by going to iCloud.com with Safari. This allows you to view your photos from your laptop on your iPhone. Additionally, you can download the photos to your iPhone by navigating to "Settings" > "[Apple ID]" > "iCloud" > "Photos" and selecting the "Download and Keep Originals" option.
Part 3. How to Transfer Photos from Laptop to iPhone with iTunes
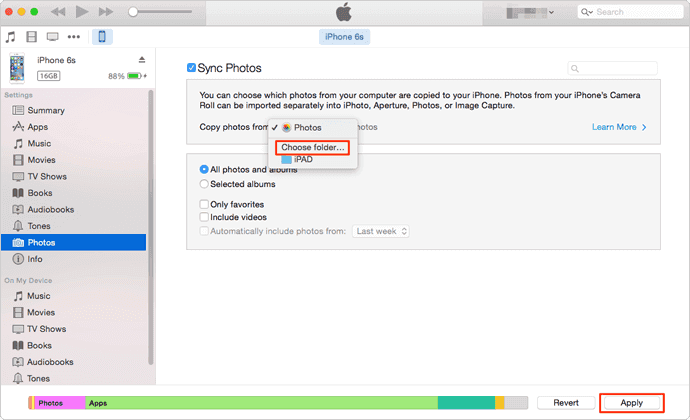
Step 1: Connect the iPhone to your laptop via a USB cable and start iTunes.
Step 2: To sync photos from your iPhone to iTunes, click on the iPhone icon at the top left corner of iTunes, and select "Photos" from the drop-down menu.
Step 3: To sync photos from a specific folder, click on the "Sync photos from" option and select the folder containing the photos you want to sync.
Step 4: To sync photos from your laptop to your iPhone, click the "Apply" button to initiate the process. This may take some time, so be patient and wait for the sync to complete.
- Notice
- When trying to transfer photos from a laptop to an iPhone using iTunes, it may not work if iCloud is enabled on the iPhone. However, turning off iCloud on the iPhone would remove all iCloud photos, which might not be desirable. To avoid this, it's recommended to back up the iCloud photos before disabling iCloud.Part 1 To transfer data from your old device to your new one, you can use MobiMover, a reliable and efficient transfer tool. With MobiMover, you can transfer files, photos, music, and other data from your old device to your new one without any loss or damage. The process is simple and straightforward, allowing you to easily move your important data to your new device, ensuring that you don't lose any of your cherished memories or important files.
The final words
Although we've highlighted the differences between iTunes and MobiMover, it's worth emphasizing that iTunes syncing can lead to media file loss on your iPhone. To keep your data safe and transfer it in a simpler and quicker way, Qiling MobiMover is a better choice. Download and install it to experience the difference for yourself.
Related Articles
- How to Download Facebook Videos in Every Possible Way
- How to Fix PDF Blank Pages Problem [PDF Repair]
There may be several causes for PDF blank pages problems. We will learn the root reasons for this problem on this page and identify the most effective 5 fixes. We also covered one of the top PDF repair solutions to help you cure any PDF-related issues swiftly. - How to Recover Deleted Game Files/Steam Data/Game Saves on PC
Recovering deleted game files on a PC can be achieved through several efficient approaches. To effectively recover deleted game files, refer to the detailed instructions in the article, which outline 5 methods for recovering lost game data after deletion. - How to Delete a Corrupted File Windows 10? Simple Methods Here!
If you're having trouble deleting a corrupted file on Windows 10, don't worry - there are still ways to get rid of it. You can try deleting the file using an administrator account, or booting into Safe Mode to see if that makes a difference. Alternatively, you can use the Command Prompt (CMD) to delete the file, among other methods.