How to Connect iPad to PC/Mac/Laptop
Quick Navigation:
- Part 1. How to Connect iPad to Computer Using USB
- Option 1. Connect iPad to PC/Mac Using USB Directly
- Option 2. Connect iPad to PC/Mac via Qiling MobiMover
- Option 3. Connect iPad to PC/Mac via iTunes
- Option 4. Connect iPad to Mac via Finder (macOS Catalina and later)
- Part 2. How to Connect iPad to Computer Wirelessly
- Option 1. Connect iPad to iTunes via Wi-Fi
- Option 2. Connect iPad to Mac Using Bluetooth
- Option 3. Connect iPad to Mac via AirDrop
- Option 4. Connect iPad to Mac Using Handoff
- The Bottom Line
When you want to transfer files between your iPad and computer, you need to first connect the iPad to the computer, either using a USB cable or wirelessly, and then follow the detailed methods to choose the best option for your specific situation.
Part 1. How to Connect iPad to Computer Using USB
Transferring files between an iPad and a computer can be done in various ways, starting with the most common method of using a USB connection. This connection can be made directly, or through third-party software like Qiling MobiMover, or by using iTunes, which is a popular option. For Mac users, Finder is also an alternative method to transfer files between the iPad and computer.
Option 1. Connect iPad to PC/Mac Using USB Directly
If you don't want to use any other third-party software, you can transfer files between your iPad and computer using only USB. There are two methods to choose from.
Connect iPad to Computer via USB
Step 1. To properly charge your device, ensure you're using the correct cable for the USB port it has. If your device uses a USB-C port, use a USB-C charge cable.
Step 2. Attach the USB connector to a USB port on your PC, laptop, or Mac.
Step 3. Attach the other end of the cable to the port on your iPad.
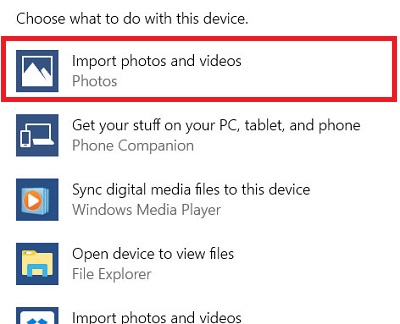
Step 4. To unlock your iPad, enter your passcode and tap "Trust" or "Allow" to confirm the connection with your device.
Step 5. On your PC, a popup will appear, choose "Import photos and videos" or "Open device to view files" from the options.
Connect iPad to Computer via Dock
Step 1. Connect the dock to your computer using a 30-pin USB cable.
Step 2. Depending on your iPad generation, do one of the following:
For iPad mini and 4th-If you have a newer generation iPad (and later), you can charge it using a Lightning to 30-Pin Adapter, which you insert into the dock cradle and connect your tablet to.
For 3rd generation iPad or earlier, insert the iPad into the dock cradle.
Option 2. Connect iPad to PC/Mac via Qiling MobiMover
If you want to transfer files between your iPad and computer, the method introduced above only supports importing photos and videos. For transferring other types of files like music, books, and contacts, you'll need a free iPhone transfer software like Qiling MobiMover, which is safe and easy to use.
To connect your iPad to a PC, laptop, or Mac and transfer files, you can use a USB cable, Wi-Fi, or cloud services. You can use a USB cable to directly connect your iPad to a computer, or use a USB-C to USB adapter if your iPad doesn't have a USB-C port.
Step 1. Connect your iPad to your PC using a USB cable, then tap "Trust This Computer" on your device's screen. Next, open Qiling MobiMover and select "Phone to PC" from the main screen, followed by clicking "Next" to initiate the data transfer process from your iPad to your computer.
Step 2. MobiMover automatically loads and reads all compatible files on your iPad. You can select specific file types, such as contacts, messages, pictures, audio, or video, to transfer. The transferred content is initially saved to your desktop, so you may need to change the default location before initiating the transfer.
Step 3. MobiMover will immediately start transferring data from iPad to PC without using iTunes. It's essential to keep the USB connection uninterrupted during this process. Once the transfer is complete, you can open and review the transferred content. Note that certain files, such as contacts and messages, will be saved as .html files, requiring a web browser to access them.
Qiling MobiMover not only helps transfer data from iPad to computer, but also allows you to backup iPad data to the computer, backup WhatsApp messages, and download videos from YouTube to iPad for free.
Option 3. Connect iPad to PC/Mac via iTunes
iTunes is a reliable software for syncing files from a computer to an iPad. It's available on PCs or Macs running macOS Mojave and earlier. After connecting your iPad to the computer via USB, you can use iTunes to sync your files.
Step 1. Install iTunes on your computer and launch it.
Step 2. Tap the device icon on the navigation bar.
Step 3. To view device information, select the device you want to see details for on the left menu, and then choose an item from the menu to perform a specific operation, such as monitoring or managing the device.
Option 4. Connect iPad to Mac via Finder (macOS Catalina and later)
Starting from macOS Catalina, Finder has a new feature that syncs iDevice files to Mac, addressing the limitations of iTunes.
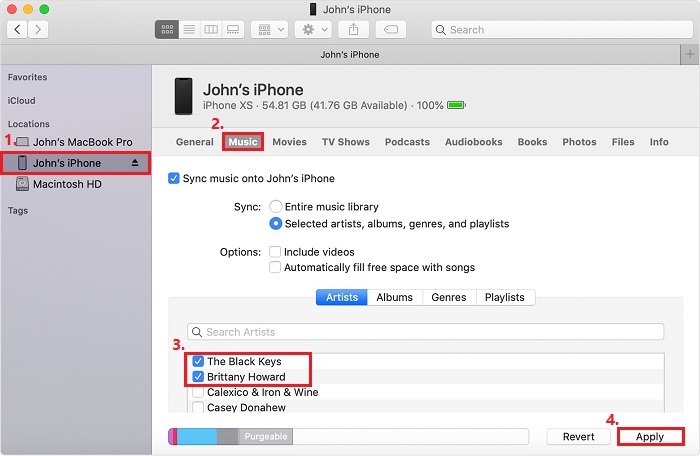
Step 1. To connect your iPad to your Mac using a USB cable, open a Finder on your Mac.
Step 2. The iPad appears in the left sidebar of the Finder window. Click it.
Step 3. If required, trust your iPad.
Step 4. Select the type of data you'd like to sync and check the box next to Sync. This will sync the selected data with your device.
Step 5. Select the items you want to sync by checking the corresponding checkboxes next to each item.
Step 6. Click "Apply."
Part 2. How to Connect iPad to Computer Wirelessly
Besides using a USB to connect your iPad to a computer, you can also choose from some wireless options.
Option 1. Connect iPad to iTunes via Wi-Fi
To connect your iPad to iTunes, you can use a USB connection or connect it via Wi-Fi. When using a USB connection, simply plug your iPad into your computer and turn on "Sync with this [device] via Wi-Fi" in iTunes. This allows you to sync your iPad with iTunes via Wi-Fi, eliminating the need for a USB connection in the future.
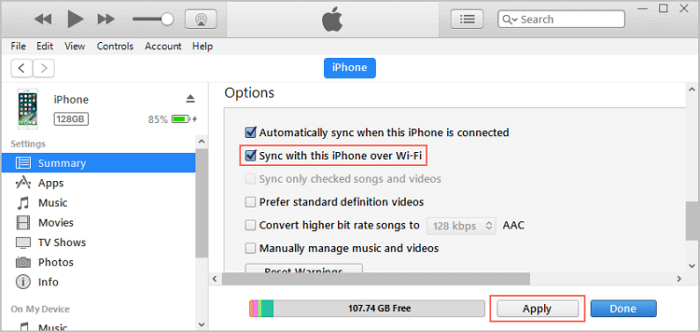
Step 1. Connect your iPad to your laptop or desktop.
Step 2. To access the "Summary" tab in iTunes, click on the device icon located in the top left corner of the iTunes window, which represents your iPhone, iPad, or iPod Touch. This will bring up a menu, and from there, click on "Summary".
Step 3. To sync this iPad over Wi-Fi, enable the option "Sync with this iPad over Wi-Fi" and click "Apply" followed by "Done".
Step 4. When your computer and iPad are connected to the same Wi-Fi network, data syncing will start automatically and wirelessly.
Option 2. Connect iPad to Mac Using Bluetooth
By connecting your iPad to your Mac via Bluetooth, you can view your Mac's Public folder on your iPad, retrieve files from your iPad, and send files to your Mac. To do this, you simply need to pair your devices and access the Public folder on your iPad, and then you can view, transfer, and share files between the two devices.
Step 1. To get your Mac's Bluetooth working, go to System Preferences, then Bluetooth, and turn it on. Also, make sure your Mac is set to be discoverable, so other devices can find it.
Step 2. To pair your iPad with your Mac, go to Settings on your iPad, then tap Bluetooth, and finally select your Mac from the list of available devices.
Step 3. To pair your Mac with your iPad, select the iPad from the list of available devices on your Mac, then click on "Yes" on your Mac and tap "Pair" on your iPad to finish the pairing process.
Option 3. Connect iPad to Mac via AirDrop
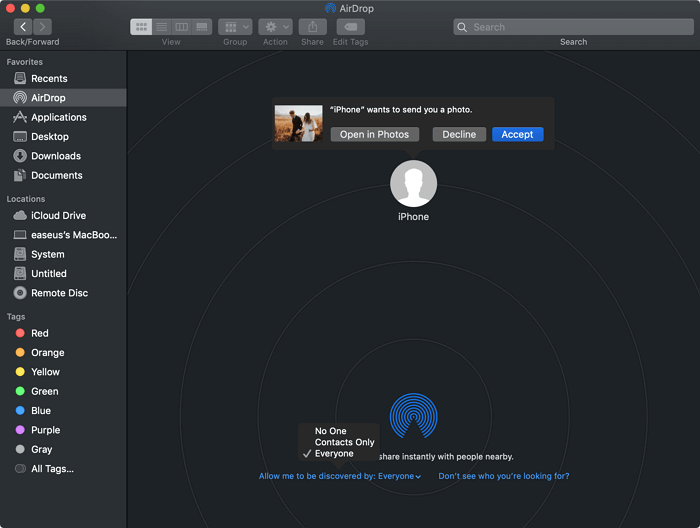
For Mac users, AirDrop allows sharing of photos, videos, contacts, websites, and more between the iPad and the Mac.
To connect iPad to Mac via AirDrop:
Step 1. Go to "Settings" > "General" on your iPad.
Step 2. Choose "AirDrop" and click "Contacts Only" or "Everyone."
Step 3. To turn on AirDrop on your Mac, go to Finder, click on Go, select AirDrop, and ensure Bluetooth and Wi-Fi are turned on. You can then set the option to allow your Mac to be discovered by either everyone or just your contacts.
Step 4. You can now easily transfer files between your iPad and Mac using the Files app, making it convenient to share and access files across devices.
Option 4. Connect iPad to Mac Using Handoff
Handoff, a feature of Continuity, enables data transfer between devices. It is available on iPads running iOS 8 and later, and Macs running 10.10 Yosemite and later. To use Handoff, users must enable Bluetooth and sign into the same iCloud account on both devices.
Step 1. To enable Handoff on your iPad, go to Settings, then General, and finally Handoff. Move the slider next to Handoff to the right, making it green, to turn it on.
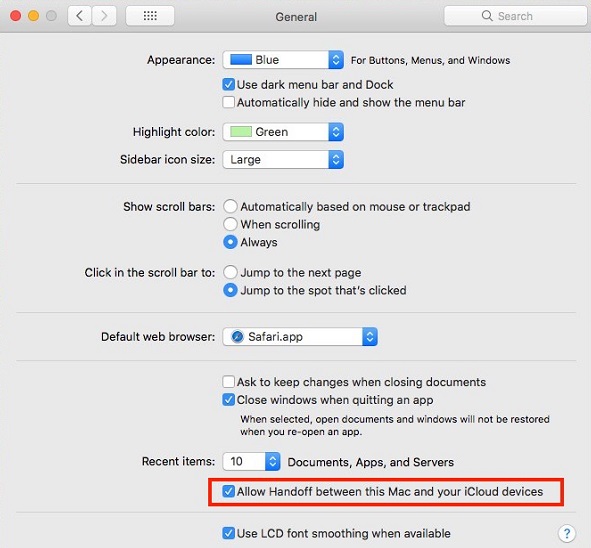
Step 2. To enable Handoff on your Mac, go to the Apple menu, select System Preferences, then General, and check the box next to Allow Handoff between this Mac and your iCloud devices.
The Bottom Line
Now that you know multiple ways to connect your iPad to a Windows PC, laptop, or Mac, you can choose the best method for your specific needs, depending on the type of content you want to share between your devices. This ensures a seamless and convenient experience.
Related Articles
- How to Transfer Messages from iPhone to iPhone
- Photos Didn't Transfer to New iPhone and How to Fix
- How to Back Up iPhone Without Wi-Fi
- Fixed: Transcend SSD Scope Not Working for System Clone
What if Transcend SSD Scope is not working for system clone in Windows 11, 10, 8, 7? here is the solution and better Transcend SSD clone tool.