How to Transfer Photos from iPhone to PC in Windows 7
Quick Navigation:
- How to Transfer Photos from iPhone to PC in Windows 7 with iPhone Transfer Software
- How to Import Photos from iPhone to Windows 7 via AutoPlay
- How to Transfer Photos from iPhone to Windows 7 via Windows Explorer
- How to Copy Photos from iPhone to PC in Windows 7 with iCloud
- How to Send Photos from iPhone to PC in Windows 7 via Email
- The Bottom Line
If you're still using Windows 7, don't worry - transferring photos from your iPhone to your PC is still possible. Whether you're running Windows 7 or the latest Windows 11, the process remains the same. To help you make a backup of your precious iPhone photos to your PC, we've got a collection of proven methods that'll get the job done smoothly.
How to Transfer Photos from iPhone to PC in Windows 7 with iPhone Transfer Software
Also supports videos, music, ringtones, contacts, messages, books, etc.
You can easily transfer your iPhone photos to a PC, regardless of whether you're using Windows 7 or the latest Windows 11, by using the iPhone transfer software Qiling MobiMover. This software allows you to transfer not only photos, but also videos, music, ringtones, books, contacts, and other file types between an iPhone/iPad/iPod and a computer, or between two iDevices.
This tool is an iPhone backup and WhatsApp manager that allows you to manage your iPhone backups and WhatsApp data, enabling you to easily access and manage your iPhone and WhatsApp content.
- Back up and restore an iPhone/iPad/iPod touch without iTunes
- Transfer WhatsApp messages from one iPhone to another
- Back up and restore WhatsApp chats
While various built-in utilities on Windows allow you to transfer photos from an iPhone to a Windows 7 PC, they often fail to import photos from a PC to an iPhone, and are limited to transferring only photos, making Qiling MobiMover a recommended alternative for transferring photos from an iPhone to a Windows 7 PC.
To transfer photos from an iPhone to Windows 7:
Step 1. Connect your iPhone to a PC running Windows 7 or later, then run Qiling MobiMover and choose the "Phone to PC" option, clicking "Next" to transfer data from iPhone to PC in one click.
Step 2. MobiMover allows you to transfer various file types, including audio, videos, pictures, books, contacts, and messages, from your iPhone to your PC. To transfer just pictures, select that option and MobiMover will save them to your desktop by default, although you can customize the save location as needed.
Step 3. Click the "Transfer" button after connecting your device. The transfer time will depend on the size of the files, so be patient and wait for the process to complete.
How to Import Photos from iPhone to Windows 7 via AutoPlay
On Windows 8 and later, the Photos app is pre-installed on PC for managing photos and importing them from external devices, including iPhones. On Windows 7, AutoPlay can be used to copy photos from an iPhone, making the process equally effective. To begin, ensure you have the necessary preparations in place.
- Download and install iTunes on your computer so that AutoPlay can read your iPhone data.
- Prepare a USB cable.
- Unlock your iPhone using your password.
To import iPhone photos to Windows 7 PC or laptop:
Step 1. Plug your iPhone into your PC using a USB cable.
Step 2.When a prompt appears on your iPhone asking you to "Trust This Computer," tap "Trust."
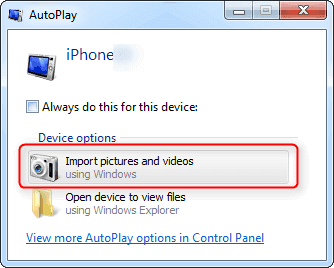
Step 3. When your iPhone is detected by this PC, the AutoPlay window will appear, prompting you to click "Import pictures and videos" to begin the import process.
Step 4. All your pictures will be imported to your computer and stored in a folder called "My Pictures". If you want to change the default location, you can click "Import Setting" and follow the on-screen instructions.
Note:AutoPlay doesn't allow exporting certain pictures. If you want to export specific photos, try another method instead.
How to Transfer Photos from iPhone to Windows 7 via Windows Explorer
To download pictures from your iPhone to your PC, you can use Windows Explorer, a free option that requires iTunes to be installed on your Windows 7 computer. Simply download and install the latest version of iTunes, which allows your computer to read your iPhone's content, and then follow the steps to transfer your photos.
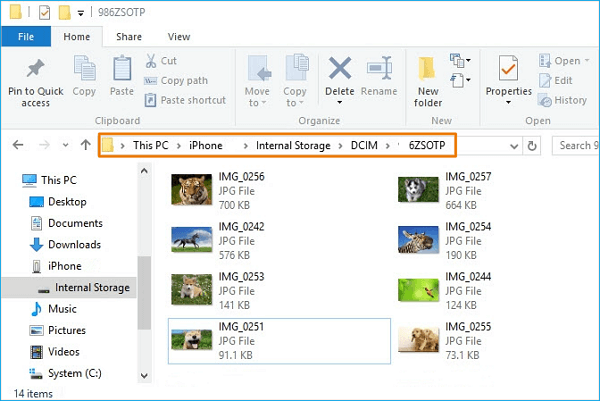
Step 1. To open Files Explorer, navigate to "This PC" and then select "Apple iPhone". From there, choose "Internal Storage" and finally select "DICM".
Step 2. Open the "DICM" folder, where all your pictures and videos are stored.
Step 3. Choose the pictures you want and copy them to another folder on your computer.
How to Copy Photos from iPhone to PC in Windows 7 with iCloud
To export iPhone photos to a Windows 7 PC using iCloud, you can simply go to iCloud.com on your PC's web browser, sign in with your Apple ID, and select the photos you want to download. The photos will be synced to the PC via the internet, allowing you to easily access and view them on your computer.
- To enable iCloud Photos on your iPhone, go to Settings, then tap on your name, followed by iCloud, then Photos, and finally toggle the switch next to iCloud Photos to the "on" position. This will allow your iPhone to store all your photos in iCloud.
- Once you've enabled iCloud Photos on your iPhone, every new picture you take will be automatically synced to your iCloud photos when your iPhone connects to a WiFi network.
- Every iCloud account comes with 5GB of storage, which can quickly be exceeded if you transfer large photos and videos. If you have many photos to transfer, consider upgrading your iCloud storage plan, which starts at $0.99 a month for 50GB.
Here are the steps to access your iPhone photos on other devices using iCloud:
Step 1. Download and install iCloud for Windows on your computer.
Step 2. Sign in to your iCloud account.
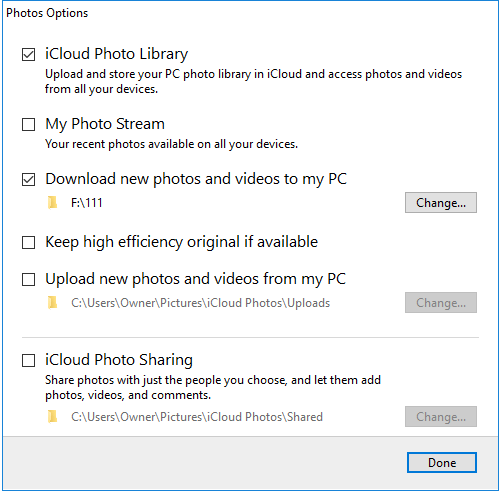
Step 3. Make sure the "Photos" option is enabled, then click "Option."
Step 4. To enable iCloud Photo Library on your PC, check the box next to "iCloud Photo Library" and "Download new photos and videos from my PC".
Step 5. Click "Done."
iCloud is not the only cloud-based service you can use. You can transfer photos from your iPhone to a Windows 7 PC or laptop using a cloud-based service like Dropbox, OneDrive, or Google Photos. These services are applicable and similar to the original method mentioned, allowing you to easily move your photos to your desired device.
How to Send Photos from iPhone to PC in Windows 7 via Email
Apart from the methods listed above, you can also transfer photos from an iPhone to a computer by using email, but this method is only practical for transferring multiple photos as your email has a size limit for attachments.
Step 1. Open the Photos app on your iPhone.
Step 2. Go to your Camera Roll.
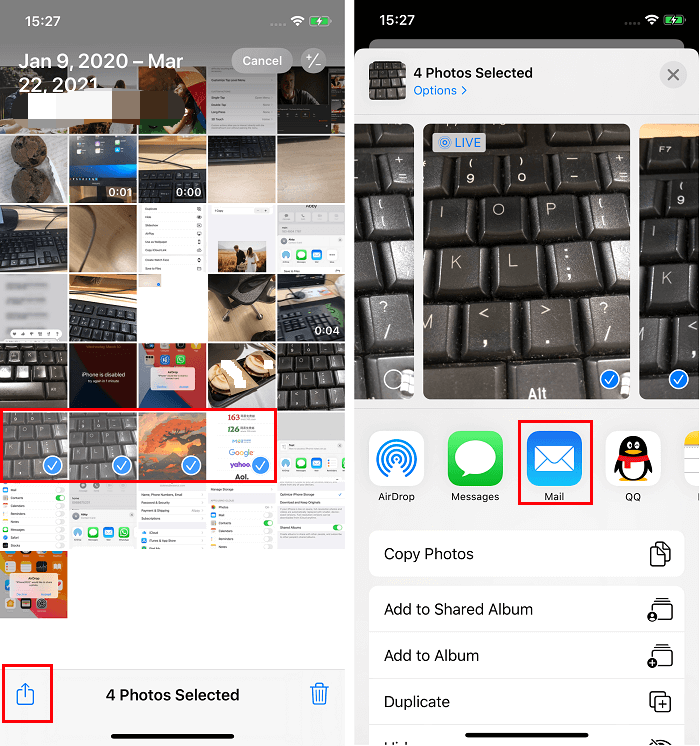
Step 3. Select the photos (not more than five) you wish you transfer.
Step 4. Click the export icon in the bottom left corner.
Step 5. From the suggested options, choose "Mail."
Step 6. Enter the detailed information by following its on-screen instructions.
Step 7. To download pictures from your email account to your computer, sign in to your email account on the computer, navigate to the photos you want to download, and click on the "download" or "save" button to save them to your PC.
The Bottom Line
All the methods mentioned above, except for AutoPlay, can also be used to transfer photos from an iPhone, iPad, or iPod touch to a PC in Windows versions 8, 10, and 11. However, if you need to transfer photos from Windows to an iPhone, AutoPlay and Windows Explorer are not suitable solutions, and you should use a tool like Qiling MobiMover or iCloud instead.
Related Articles
- How to Download Facebook Videos in Every Possible Way
- [7 Options] How to Download Pictures from iPhone to Mac
- Fixed: SFC Windows Resource Protection Could Not Perform
This page shows how to fix 'Windows Resource Protection could not perform the requested operation' easily and suggests backing up Windows in case of sfc /scannow not working. - How to Perform Windows Scheduled Disk Defragmentation?
How to enable Windows scheduled disk defragmentation to defrag hard drives on regular basis? Here, detailed steps will be given to help deal with it correctly.