How to Move Music from iPhone to iTunes
"You can try syncing your iPhone music library to your new laptop using iTunes, or use a third-party music syncing app like AnyTrans or PhoneCopy to transfer your music files directly."
Songs stored locally on an iPhone, iPad, or iPod touch can quickly consume storage space, with approximately 1GB of space used per 100 songs. To free up memory, backing up these songs to a computer or transferring them to iTunes is recommended. While backing up to a computer is a convenient option, it may not be the most reliable solution due to the risk of computer crashes or breakdowns. Transferring music to iTunes is a more reliable alternative, and this post will guide you through the process of transferring music from an iPhone to iTunes, or vice versa.
| Workable Solutions | Step-by-step Troubleshooting |
|---|---|
| Copy iPhone Music to iTunes | Create a new playlist on iPhone > Connect the iPhone to the computer...Full steps |
| Copy iPhone Music to PC | Get the iOS data transfer tool > Connect the iPhone to the computer...Full steps |
| Transfer Music to iPhone Without iTunes | Connect the iPhone to your PC and launch...Full steps |
| Transfer Music from iPhone to iPhone with iTunes | Launch the latest version of iTunes on your computer > Click on the device icon...Full steps |
Part 1. How to Transfer Music from iPhone to iTunes
Transferring songs from an iPhone to iTunes is a straightforward process, but it's limited to purchased music only. If the songs you want to transfer aren't purchased, this method won't work. However, there's still a way to transfer them.
If you're having trouble syncing your iPhone music to iTunes, try updating to the latest version of iTunes, as this may resolve the issue.
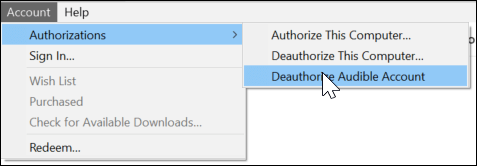
Step 1. To access your iTunes content, download and install the latest version of iTunes on your computer, then navigate to the iTunes screen and select the "Account" option, followed by "Authorizations" and finally "Authorize This Computer."
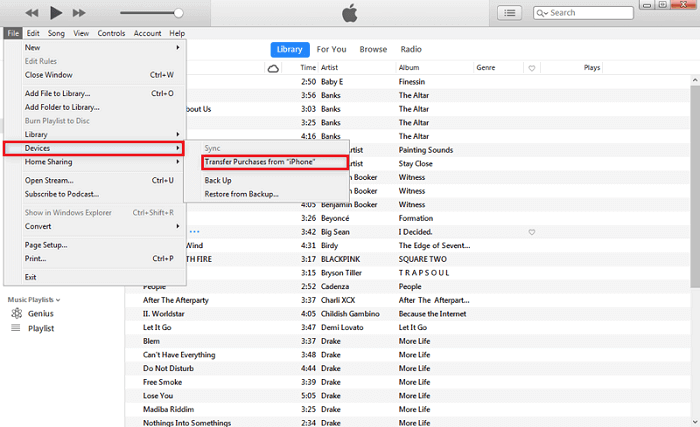
Step 2. Connect your iPhone to your computer with a USB cable, then go to "File" > "Devices" > "Transfer Purchases from [your iPhone name]" to transfer purchases from your iPhone to your computer.
Step 3. To see the newly added songs, click on "Recently Added" in the left panel of iTunes.
Step 4. To download the songs to your computer, select the music you want and click on the "Download" option.
What's the other way to keep a copy of iTunes music
Transferring non-purchased items to iTunes can be tricky, but you can make a copy of your songs using third-party software like Qiling MobiMover. This allows you to keep an exact copy or sync your iPhone music on your computer, making it easy to import songs from your computer to iTunes without needing to connect your iPhone. This is a convenient solution for playing iPhone music in iTunes.
To import iPhone music to PC using Qiling MobiMover, first, download and install the software on your computer. Next, connect your iPhone to the PC using a USB cable.
To put music to iPhone without iTunes, download and install Qiling MobiMover on your PC by clicking the download button below. If you need further assistance, you can link to another page for detailed guides.
Step 1. Connect your iPhone to your PC and run Qiling MobiMover. In the Content Management section, click "Audio" and select "Music" to proceed.
Step 2. Now you can access all music files on your iPhone. Select the items you want to transfer, and if needed, click "Settings" to change the storage path.
Step 3. To begin transferring music from your iPhone to your computer, click the "Transfer to PC" option. This will initiate the process of moving your music files from your iPhone to your computer.
Part 2. How to Transfer Music from iTunes to iPhone
If you've transferred music from your iPhone to iTunes, you may need to move those items back to your iPhone. To transfer music from the iTunes library to your iPhone, iPad, or iPod touch, simply connect your device to your computer, open iTunes, select your device, and click "Music" to sync your music library. This will transfer the music from your iTunes library back to your iPhone.
Step 1. Launch the latest version of iTunes on your computer. Open it.
Step 2. To connect your iPhone to a computer, start by plugging a USB cable into both the iPhone and the computer. On your iPhone, tap "Trust" if prompted to establish the connection.
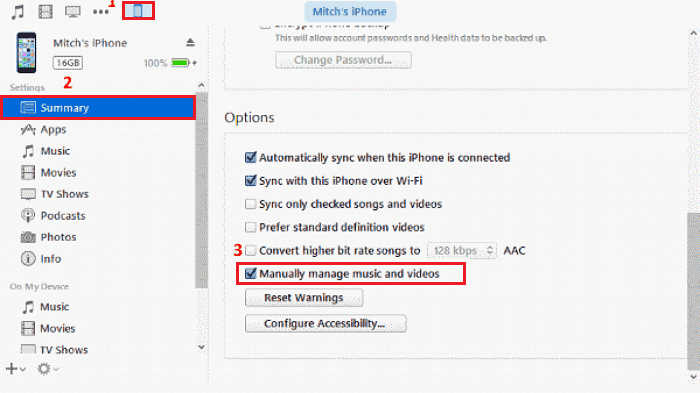
Step 3. To manually manage music and videos on iTunes, click on "Options" under the "Summary" section, then check the box next to "Manually manage music and videos" and click "Apply" to save the changes.
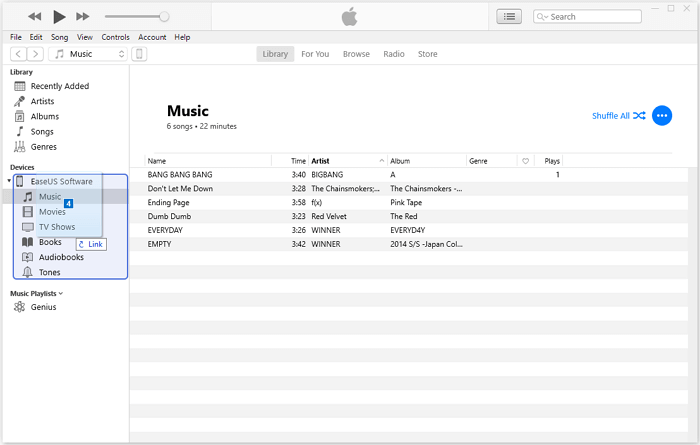
Step 4. Go to the "Devices" section, select "Music", choose the items you want to sync, and then drag and drop them to your device.
Part 3. How to Transfer Music from Computer to iPhone Without iTunes
If you want to transfer music from your computer to your iPhone without using iTunes, you can use a free alternative called Qiling MobiMover. This program works with all iPhone models and allows you to transfer a wide range of iOS data, including music, messages, contacts, videos, and more. Simply download it on your computer and you can start transferring your music.
Step 1. Connect your iPhone to your computer, run Qiling MobiMover, and go to "PC to Phone" > "Select Files".
Step 2. To transfer music files to your iPhone, select the desired files, and then click "Open" to proceed with the transfer process. This will allow you to transfer the chosen music files to your iPhone.
Step 3. Select the music files you want to transfer, check the box, and click "Transfer" to start moving them from your PC to your iPhone. Once done, open the Music app on your iPhone to access the transferred songs.
Part 4. How to Transfer Music from iPhone to iPhone with iTunes
To move music between iPhones using iTunes, follow these simple steps. First, connect both iPhones to your computer and open iTunes.
Step 1. To enable manual management of music and videos on your iTunes, launch the latest version of iTunes on your computer, click on the device icon, go to the "Options" under the "Summary" section, and check the box that says "Manually manage music and videos."
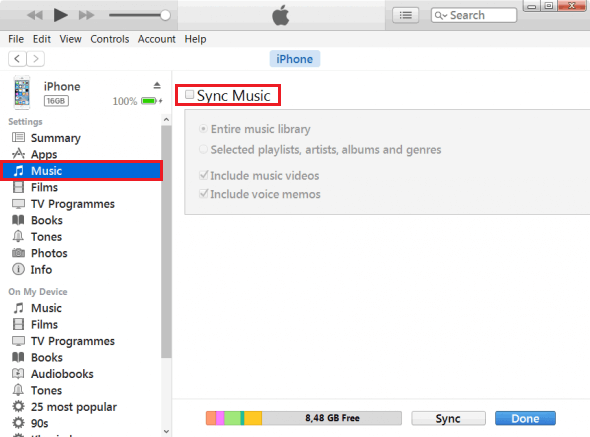
Step 2. To sync music on your Windows 10 device, go to the Settings app, select Music on the left pane, tick the "Sync music" box, select the items you want to sync, and then hit the "Sync" button at the bottom of the window to start the sync.
The Bottom Line
We hope this tutorial has been helpful in transferring music from your iPhone to your iTunes library on your computer. If you found this post useful, feel free to share it with others who might need it. If you have any questions or need further assistance, don't hesitate to reach out to us.
Related Articles
- 3 Simple Ways to Open HEIC File on Mac
- 2022 | How to Set a Song as a Ringtone on iPhone 11 and Later
- How to Transfer Photos from iPhone to PC in Windows 7
- HEIC Files Converters to Convert HEIC Pictures to JPG/PNG