4 Quick Fixes to Screenshot on Mac Not Working
Quick Navigation:
- 4 effective tips to fix screenshot not working on Mac
- 1. Restart your Mac
- 2. Check the screenshot shortcuts
- 3. Use Grab to take a screenshot on Mac
- 4. Take a screenshot using Preview
- How to transfer the screenshot from Mac to iPhone
The user is experiencing an issue where the screenshot shortcuts on their MacBook Pro are not working, despite hearing the camera shutter sound. The issue is that the screenshots are not appearing on the desktop and are also not showing up in search results for images created today on the Mac. The user is seeking a solution to this problem.
Many Mac users have encountered the frustrating issue of Mac screenshots not working, with no apparent reason. Theoretically, taking a screenshot on Mac should be a straightforward process, but in reality, this problem can occur unexpectedly. To resolve this issue and continue taking screenshots on Mac, users can refer to the effective tips provided to fix the problem timely.
4 effective tips to fix screenshot not working on Mac
If the command Shift 4 is not working on your Mac, causing the camera shutter to not appear or the screenshot of a selected area to not save, don't worry. You can fix it by trying the following methods.
1. Restart your Mac
Restarting your Mac can sometimes resolve issues with certain applications. If you need to restart your Mac, there are three ways to do so:
- Press the Power button (or press "Control + Eject") and, when a dialog box appears, click the Restart button.
- Choose the "Apple key" and then click "Restart".
- The command to shut down your Mac is "Control + Command + Eject" (or "Control + Command + Power" button).
2. Check the screenshot shortcuts
You can use the shortcuts Command + Shift + 3 to capture a full-screen screenshot and Command + Shift + 4 to take a selected region, but these shortcuts are overridden when you've activated them.
To resolve the issue with keyboard shortcuts not working, go to System Preferences > Keyboard & Mouse > Keyboard Shortcuts and verify that the shortcuts are enabled and not conflicting with other assigned shortcuts.
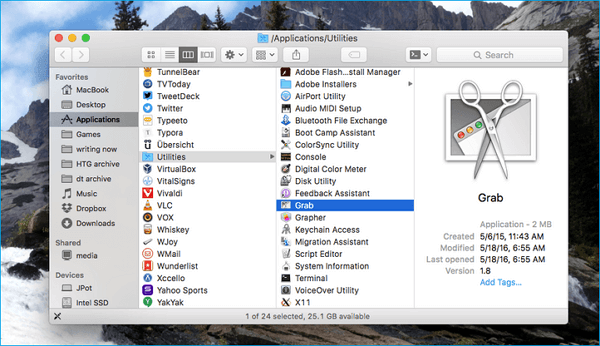
3. Use Grab to take a screenshot on Mac
If the two solutions above can't fix Mac screenshot not working, and you need to do it in a hurry, you can use the pre-installed Grab on Mac to take a screenshot of a particular section of the screen, an individual window, or the entire screen.
To take a screenshot using Grab, go to Applications, then Utilities, find and open Grab, and select Capture. From there, you can choose the type of screenshot you want to take based on your specific needs.
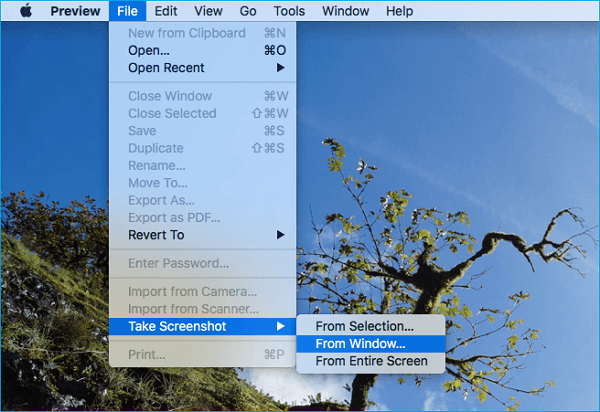
4. Take a screenshot using Preview
Preview is the default tool on Macs that lets you view and edit images. It also allows you to capture screenshots by clicking the toolbox icon.
To take a screenshot, go to the "Preview" tab and click on "File", then select "Take Screenshot" from the drop-down menu.
How to transfer the screenshot from Mac to iPhone
To sync a screenshot from Mac to iPhone, you can use AirDrop to easily transfer the image. Simply turn on AirDrop, Bluetooth, and Wi-Fi on both devices, then go to the Photos application on your Mac and select the screenshot you want to share. From there, choose to share it with your iPhone via AirDrop, making it a seamless process to get your screenshot from your Mac to your iPhone.
How to transfer the screenshot from Mac to iPhone
To transfer a screenshot from your Mac to your iPhone without incurring any costs, you can use Qiling MobiMover Free to sync photos between the two devices efficiently. This tool can also be used to download TV shows or movies, and add ringtones from your Mac to your iPhone with ease.
Step 1. Launch Qiling MobiMover on your computer, then connect your iPhone to your Mac. On the main interface, select the "Mac to Phone" option and click "Select Files" to continue.
Step 2. With MobiMover, you can transfer photos and other popular files from your Mac to your iPhone and iPad by selecting them and clicking "Open".
Step 3. MobiMover will show the files you've selected on the screen. If you've missed an item, you can click "Add Contents" to import more files. Next, click the "Transfer" button to start the transfer process.
Related Articles
- [Quick Fix]iPhone X/iPhone 8 Not Vibrateing? Useful Fixes Here!
- Practical Fixes | iPhone Videos Won't Play on Windows 10 PC
- iPhone 8/8 Plus/X Live Wallpaper Not Working in iOS 11? Fixed Here!
- iTunes backup location on Windows 7/8/10 and Mac