How to Send Live Photos as GIFs on iPhone/iPad in iOS 11/13 without Any Efforts and Cost
Want to share live photos as GIFs from your iPhone or iPad? You can do this for free by using certain solutions to send them to social platforms like Facebook, Twitter, Instagram, and more, or share them with friends across different mobile platforms. iOS 10/11/13 users can follow these guides to achieve this, and if you're interested in learning more about live photos, we've also got some practical tips in Part 3 to help you explore.
- Part 1. How to Send Live Photos as GIF
- Part 2. How to Send Live Photos on WhatsApp/Messenger
- Part 3. Everything You Need to Know about Live Photos
- What is Live Photo
- Who Can Use Live Photo
- How to Take a Live Photo with Your iPhone and iPad
- How to View Live Photos
- How to Enable/Disable Live Photos on iPhone in iOS 11/13
- How to Convert Live Photos to Still
Part 1. How to Send Live Photos as GIF
You can send live photos as GIFs using the iPhone Photos app or a free iOS data transfer tool, such as Qiling MobiMover, which preserves the live photo's original format, allowing the receiver to view it as a real GIF. However, sending live photos through the iPhone Photos app will convert them to JPEGs, displaying them as a still image only.
Option 1. Using iPhone Photos APP
To share live photos as GIFs, you can first turn them into GIFs, and then share them one by one with your friends.
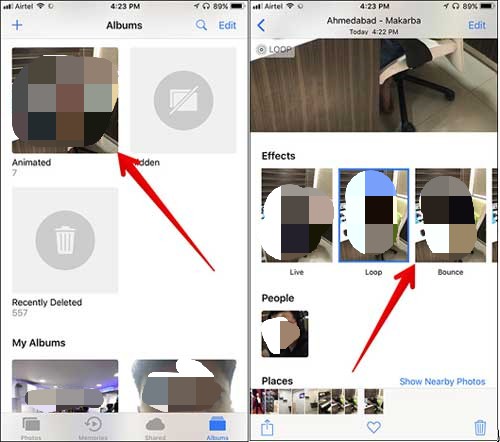
Step1. Open the Photos app on your device > Tap on the live photo you desire to turn into a GIF.
Step 2. To apply a live photo effect, swipe up on the photos you've chosen and you'll see four options: Live, Loop, Bounce, and Long Exposure.
Step 3. To turn a photo into a GIF, create an animated album, select the photo, and then choose an effect from the options provided. This will transform the photo into a GIF that can be saved and shared.
Step 4. To share live photos as GIFs, tap on the photos from the Animated Album and click the "Share" button at the bottom left corner, which will allow you to send them to apps like AirDrop, Mail, iMessage, Facebook, Twitter, and Instagram.
Option 2. Using Qiling MobiMover
To turn a Live Photo into a GIF, you can use the native iPhone Photos app, but the resulting file won't be a true GIF, it will just appear as another Live Photo. If you want to share a real GIF, you'll need to use a third-party tool like MobiMover.
To share a live photo as a GIF, first convert it to a real GIF using a free GIF maker like the GIF maker, GIPHY, or other apps, and then use Qiling MobiMover to share the GIF with someone else's iOS device.
Why we choose Qiling MobiMover?
Qiling MobiMover is a reliable iPhone data transfer tool. This app is designed to help you transfer various types of files, including pictures and GIFs, between iOS devices or between an iOS device and a computer. It offers several benefits, including the following advantages.
- It is free of charge, easy to use.
- It has the ability to copy images to the computer from the iPhone .
- The software supports a wide range of picture formats, including jpg, bmp, jpeg, tiff, tif, png, gif, and heic.
- It has a high transfer speed.
- This tool serves as both a backup and a video downloader, providing a convenient way to save and manage videos from various sources.
You can download Qiling MobiMover to send Live Pictures with just a few clicks.
Step 1. Connect your iPhone to your PC or Mac, run Qiling MobiMover, choose "Phone to PC", and click "Next" to transfer all your iPhone photos to the computer in one click.
Step 2. Select "Pictures" from the supported data types. MobiMover will save the exported files on your desktop by default, but you can customize the storage path by clicking "Custom Path".
Step 3. To start backing up your iPhone photos to a computer, click the "Transfer" button. The process may take seconds or a while to complete, depending on the size of the files. Once it's finished, check the destination to confirm that the photos have been transferred successfully.
Part 2. How to Send Live Photos in WhatsApp
To send live photos on WhatsApp or other messengers, ensure the recipient's device supports GIFs.
Step 1. Open WhatsApp on your iOS device.
Step 2. To share a live picture, tap on the "Contacts" tab and select the person you want to share it with from your contact list.
Step 3. Tap "+" at the bottom left corner of your screen.
Step 4. Choose Photo & Video Library option.
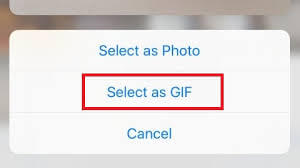
Step 5. To share a live photo, tap the live picture you want to share, then swipe up and choose the "Select as GIF" option to share it with someone you like.
Part 3. Everything You Need to Know about Live Photos
1. What is Live Photo
Live Photo is a feature on iPhone and iPad that captures three seconds of video along with a still photo, allowing users to relive moments with movement and sound. Introduced in 2016 with the iPhone 6s series, Live Photos records what happens 1.5 seconds before and after the photo is taken, resulting in a more dynamic image. These photos take up more space on devices, being double the size of normal JPEG files, but can be edited, shared, or have a fun effect added.
2. Who Can Use Live Photo
The Live Photos feature is only available for devices that meet certain conditions.
- The iPhone 6s or newer or iPhone SE is required. This includes the iPhone 11, XR, and X.
- 3D Touch Screen is a feature available on certain iPhone models that allows users to interact with their device in different ways by applying varying levels of pressure to the screen. This feature is not available on iPhone SE and iPhone XR, but they do have the Live Photos feature, which allows users to capture and view short videos instead of still photos.
- iOS devices that are running iOS 9 or later.
3. How to Take a Live Photo with Your iPhone and iPad
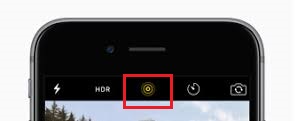
To take a Live Picture, enable the Live Photo icon on your iPhone's camera app, which appears as a yellow LIVE label. This allows you to capture a 3-second video before and after each photo, creating a dynamic image.
Step 1. Launch the Camera app on your device.
Step 2. To turn on the Live Picture feature, tap the Live Picture button, which is represented by an icon of three concentric circles, and ensure it is turned on, indicated by a yellow color.
Step 3. To take a photo, simply tap the Shutter button, which is located on the camera. This will capture the image you see on the screen, just like you would with a traditional camera.
4. How to View Live Photos
To view a Live Photo, go to the Photos app, find the photo you want to watch, and press firmly on it until it comes to life. If you're not sure where your Live Photos are stored, you can find them in the Photos app by tapping Albums, then scrolling to the Media Types section and tapping Live Photos.
5. How to Enable/Disable Live Photos on iPhone in iOS 11/13
The new iOS device has a feature called Live Photos, but some users don't like it. It also takes up more storage space than regular photos. So, you might want to turn it off. There are two options, to turn it on or off.
Option 1. Disable Live Photos Directly via Camera App
Step 1. Open your Camera app.
Step 2. To activate or deactivate Live Photos, navigate to the Photo screen and select the concentric circle icon located near the top of the screen. Then, toggle the switch to the desired setting, with yellow indicating that Live Photos are enabled and white indicating that they are disabled.
Option 2. Disable Live Photos via Settings
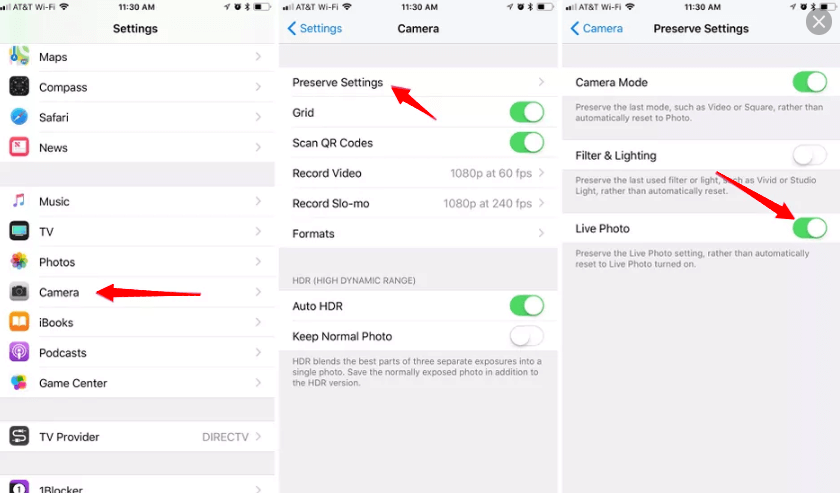
Step 1. Go to your Settings > Scroll down to find Camera and tap it.
Step 2. To disable Live Photos, go to Settings > Camera > Preserve Settings and toggle the Live Photo slider to off (white).
6. How to Convert Live Photos to Still
Converting live photos to stills is helpful for sharing pictures without the live photo version, allowing sharing across different platforms or copying to a computer, and can also be used to convert still photos back into live pictures.
Step 1. To convert a Live Photo to a regular photo, open your Photos application, locate the Live Photo you want to convert, and tap on it to open it in the Photos app. Then, tap the "Edit" button in the top-right corner of the screen.
Step 2. Tap the "Edit" button in the top right corner of your picture.
Step 3. To set a key photo, tap the Live Photo button at the bottom of your screen and select the key photo you want to use.
Step 4. Choose "Done" to complete the process.

The Bottom Line
With the methods outlined in this guide, you can easily share live photos as GIFs with your friends. If you're unfamiliar with live photos or have other questions, Part 3 of this guide provides more information. This guide aims to be helpful, and any additional questions can be left in the comments section.
Related Articles
- How to Transer Contacts from iPhone to iPhone Without iCloud
- How to Transfer Photos from iPhone to Laptop in 5 Proven Ways
- How to Back Up Line Chats on Android and iPhone
- How to Transfer Music from iPad to iPad in Proven Ways