How to Transfer Videos from iPhone to PC in Windows 10/11
Quick Navigation:
- How to Transfer Videos from iPhone to PC in Windows 10/11 Quickly
- How to Import Videos from iPhone to PC in Windows 10/11 via File Explorer
- How to Transfer Videos from iPhone to Windows 10 Using Photos
- How to Download Videos from iPhone to Windows 10 via iCloud
- The Bottom Line
Videos on your iPhone not only consume storage space but also slow down your device. However, the real importance of videos lies in their ability to preserve memories and valuable information. To make a backup of these precious files, it's essential to transfer videos from your iPhone to a PC running Windows 10 or Windows 11, making a safe and reliable copy of your valuable content.
To transfer videos from an iPhone to a PC in Windows 10 or Windows 11, you can use the built-in Windows feature, 'Quick Actions', which allows you to share files between devices, or use third-party software like iTunes, iMazing, or AnyTrans, which offer more advanced features and compatibility with various file types. Additionally, you can also use cloud services like Google Drive, Dropbox, or OneDrive to upload your videos and then access them on your PC.
How to Transfer Videos from iPhone to PC in Windows 10/11 Quickly
Also supports photos, music, ringtones, contacts, books, and more.
To take more control over your iPhone data, it's advisable to use an iPhone transfer software tool like Qiling MobiMover, which offers advanced data management features such as transferring files, backing up data, and managing iPhone space.
- Transfer files between an iPhone/iPad/iPod touch and a computer
- Transfer data from one iPhone to another
- Transfer, back up and restore WhatsApp messages
- Back up and restore iPhone data
Transferring videos from an iPhone to a PC can be done easily with or without Qiling MobiMover, but transferring files from a Windows PC to an iDevice or other types of content on an iPhone requires the use of such a tool.
To transfer videos from an iPhone to a PC in Windows 10/11, you can use the built-in Windows Photos app. First, connect your iPhone to your PC using a USB cable.
Step 1. Connect your iPhone to your computer, tap "Trust" on your iPhone screen, and run Qiling MobiMover. Choose "Phone to PC" and select "Next" to proceed.
Step 2. To transfer videos, select the "Videos" option and click the default path to set a custom storage path if needed. Then, click "Transfer".
Step 3. Once the transfer process is complete, you can view the videos on your computer.
How to Import Videos from iPhone to PC in Windows 10/11 via File Explorer
File Explorer is the simplest way to copy videos from an iPhone to Windows 10 or Windows 11, allowing you to access your iPhone photos and videos and copy them to your PC as needed. However, when transferring videos selectively, it can be time-consuming, requiring you to select each item individually.
To copy videos from an iPhone to Windows 10 or Windows 11, you can use the built-in Windows feature called "Quick Actions" or third-party software like iTunes, iMazing, or Qiling Disk Master. If you have an iPhone, you can also use the Photos app on your iPhone to transfer videos to your Windows computer.
Step 1. Connect your iPhone to your Windows computer using a USB cable. Wait for the iPhone to be recognized by the computer.
Step 2. To access your iPhone's camera roll, go to File Explorer, then select "This PC" from the left-hand menu, followed by "Apple iPhone" and then "Internal Storage." Finally, click on the "DCIM" folder, which stands for "Digital Camera Images."
Step 3. Now you can view all your iPhone folders that contain your photos and videos.
Step 4. To transfer videos from your phone to your PC, select the desired videos and copy them, then paste them into a folder on your computer.

How to Transfer Videos from iPhone to Windows 10 Using Photos
The Photos app on Windows 8 and later allows easy transfer of iPhone videos to a PC by importing photos and videos from an external device, including iPhones, and also manages photos and videos on the computer.
To import videos from your iPhone to Windows 10/11:
Step 1. To connect your iPhone to a Windows computer, start by plugging your iPhone into your computer using a USB cable. Ensure that your iPhone is unlocked and that you're signed in to your iCloud account.
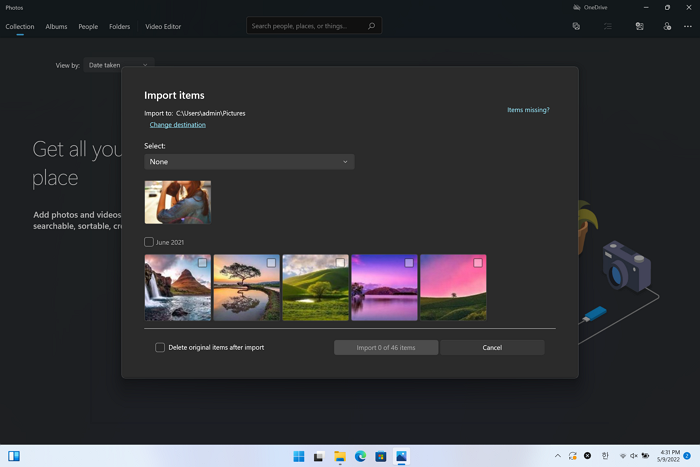
Step 2. To import photos from a USB device or a connected device in Photos, click the "Import" button located in the top right corner of the Photos window, and then select the option "From a USB device" or "From a connected device" from the dropdown menu.
Step 3. Wait for Photos to load the photos and videos from your iPhone.
Step 4. Select the desired videos and click "Import [number] items" to initiate the transfer process from your iPhone to Windows 10 or Windows 11.
Some users have encountered the issue "Photos not working on Windows 10." If you come across the same problem, refer to the troubleshooting guide to solve it.
How to Download Videos from iPhone to Windows 10 via iCloud
Cloud-based services have gained popularity, and they also help solve data transfer issues by syncing. By enabling iCloud Photos, you can automatically download videos from your iPhone to a Windows 10 PC over Wi-Fi, eliminating the need for a USB cable. This allows for wireless video transfer from an iPhone to any Windows version PC using iCloud.
The preparations you need to make include:
- To use iCloud on your PC, ensure that you are using the same Apple ID on your iOS device and the PC. This will allow you to access and sync your iCloud data across both devices.
- To ensure there is enough iCloud storage to save your iPhone photos, go to Settings > [Your Name] > iCloud > Photos. Check how much storage you have available.
- To ensure a stable and fast network connection on both devices, start by checking the internet connection on each device separately. Ensure that the Wi-Fi or Ethernet connection is stable and strong on both devices.
To download videos from your iPhone to Windows 10 or Windows 11 wirelessly, you can use the Shareit app on your iPhone and the Shareit app on your Windows computer. First, download and install the Shareit app on your Windows computer.
Step 1. Download and install iCloud for Windows on your PC.
Step 2. Turn on iCloud Photos on your iPhone in Settings.
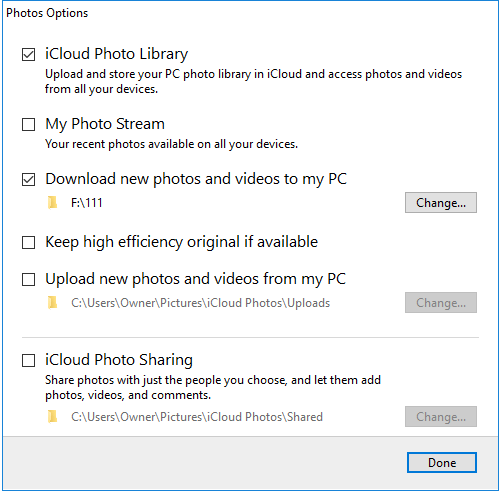
Step 3. On your PC, sign in to iCloud with the Apple ID used on your iPhone, then turn on "iCloud Photo Library" and "Download new photos and videos to my PC."
Step 4. When the syncing process is complete, you can find your iPhone videos in the folder shown under "Download new photos and videos to my PC".
The Bottom Line
While File Explorer or Photos can be used to transfer photos and videos from an iPhone to a PC, they are not a one-stop solution for transferring files between devices. A third-party data transfer tool can be more convenient for transferring videos from a PC to an iPhone or sharing other types of files between devices.
If you only need to copy iPhone videos to Windows 10, either of the methods mentioned can be used. However, if you want to perform more complex tasks, using a tool like Qiling MobiMover would be a better option. Ultimately, the choice between using a method or the tool depends on your specific needs, and you can choose the one that suits your situation best.
Related Articles
- How to Transfer Photos from iPhone to Mac in All Possible Ways
- How to Transfer Files from Mac to iPhone with/Without iTunes
- How to Print Contacts from iPhone with/Without iCloud
- Free iPhone Video Transfer: Transfer Videos from PC to iPhone Free