What Is an HEIC File and How to Convert HEIC to JPG
What is a HEIC file on my iPhone?
Why does the iPhone shoot pictures in HEIC format?
How to convert HEIC to JPG?
This guide covers everything you need to know about HEIC files, from what they are to how to convert them to JPG format and how to turn off HEIC on your iPhone. We'll explain it all in detail, so you can have a clear understanding of HEIC files and how to work with them. Let's get started.
What Is a HEIC File?
HEIC (short for High Efficiency Image Container) is a new photo format that allows users to save high-quality pictures in a smaller size, making it ideal for saving storage space. This format is available on iPhone devices running iOS 11 or later and macOS versions higher than High Sierra.
In 2018, Google and Microsoft added HEIF support to Android and Windows, respectively. However, to open HEIC files on Windows, users need to install the Microsoft HEIF Image Extensions from the Microsoft Store or convert them to a standard format like JPG.
How to Convert HEIC to JPG on iPhone
If you need to open HEIC on many different platforms, it's best to convert it to a more common image format like JPG, allowing you to open and edit it at will. To do this, you can use various methods to convert HEIC to JPG, giving you the freedom to convert any HEIC pictures to JPG.
Method 1. How to Convert HEIC to JPG in Batches with Qiling MobiMover (PC & Mac)
If you need to convert many HEIC photos quickly, a fast converter is essential. One of the best options is Qiling MobiMover, an iPhone data transfer tool that can help you achieve this.
Qiling MobiMover is a powerful iPhone data manager that allows you to convert HEIC photos to JPG, download videos from popular sites, manage WhatsApp messages, and perform many other tasks. Its batch conversion feature is particularly useful for those who need to convert multiple HEIC photos at once.
This program ensures complete privacy and security, with pictures being deleted from its server immediately after conversion is complete, so users have no need to worry about their photos being leaked.
To convert HEIC to JPG in batches:
Step 1. Connect your iPhone to your computer via a USB cable and launch Qiling MobiMover. Choose the "HEIC to JPG" option from the left panel, and the iPhone will be automatically detected and converted to JPG format.
Step 2. You can add HEIC files from your computer to Qiling MobiMover by either dragging and dropping them into the software or by clicking the "Browse" button to locate and select the files.
Step 3. To convert HEIC photos to JPG, click "Convert" or "Start All" after selecting the photos. Once the conversion is complete, you can view the converted JPG photos on your computer or transfer them to your iPhone using the "PC to Phone" feature.
Method 2. How to Change HEIC to JPG with Online Image Converters (PC & Mac)
Online image converters are websites that offer conversion services, requiring no installation and accessible on various operating systems, including Windows, Mac, and Linux.
You can convert HEIC to JPG using various online image converters such as Zamar, FileZigZag, and others. The process is straightforward: upload your HEIC files, select the output format as JPG, and then download the converted images to your computer.
Note: Be cautious when uploading photos to public websites, as they may collect your data and sell them for profit, especially avoid sharing private photos.
Method 3. How to Convert HEIC to JPG with the File App (iPhone or iPad)
If you're using an iPhone or iPad and want to convert HEIC to JPG without any third-party apps, you can use the File app to do it. This method is relatively complex compared to the others, so you'll need more patience to navigate the process.
Here are the steps to convert photos to a different format on an iPhone:
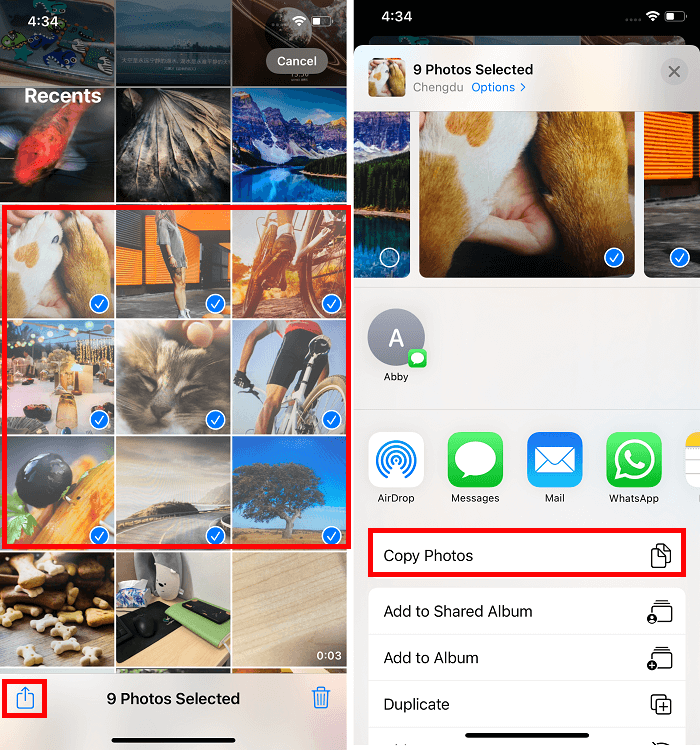
Step 1. To convert photos to JPEG, open the Photos app on your iPhone, tap "Select" in the top right corner, and then select the photos you wish to convert.
Step 2. To share a photo, select the photo you want to share, tap the "Share" icon, and choose "Copy Photo."
Step 3. To access the Photos app, open the File app and select either "iCloud Drive" or "On My iPhone." This will allow you to save your photos in the cloud, freeing up space on your iPhone.
Step 4. To create a new folder, simply tap any blank area on the screen and select the "Add New Folder" option. Then, give the new folder a name that suits your needs.
Step 5. To combine the images into one, open the created folder, long-press on the images, and tap "Paste" to paste them. The images will be automatically converted to JPEG format.
Step 6. After converting the image to JPG, you can open it in the File app, tap the "Share" icon to share it with others, or tap "Save Image" to save the JPG on your iPhone.
Tips: Besides the File app, there are many third-party converter apps available on the App Store that can easily convert HEIC to JPG.
How to Turn off HEIC on iPhone
To turn off HEIC on your iPhone and take pictures in JPG format, go to the Settings app, tap on "Camera", scroll down to the bottom, and tap on "Formats". Then, tap on "Most Compatible" under the "Formats" section and confirm with "OK". This will make it easier to share and transfer your photos to other devices, although it will reduce the quality of your photos slightly. Note that this change will only affect new photos taken after making the change, and existing HEIC photos will remain unchanged. If you want to convert your existing HEIC photos to JPG, you can use a third-party app or service.
Step 1. On your iPhone, go to the Settings.
Step 2. Scroll down to find "Camera."
Step 3. On the Camera settings page, tap "Formats."
Step 4. Tap "Most Compatible."
Wrap Up
Our guide explains what HEIC files are on iPhone and how to convert them to JPG. HEIC is a great photo format for iOS users, but its limited use on other platforms may require conversion to a more standard format. Fortunately, we've provided effective methods to quickly convert HEIC files on Windows, Mac, or iPhone, making it easy to share or edit them on different devices.
Related Articles
- How to AirDrop from Mac to iPhone in Details
- How to Sync Music from iTunes to iPhone
- How to Transfer Music from iPhone to Computer in 4 Ways
- How to Download Facebook Videos to iPhone with Ease