How to Boot Windows from SD Card [Full Guide]
Windows has been the dominant force in the computer operating system market, providing users with a versatile platform for their computing needs. Traditionally, Windows was installed on internal hard drives, but with the advancement of technology, alternative storage solutions such as external hard drives and solid-state drives (SSDs) have become popular options.
Booting Windows from an SD card offers increased flexibility, mobility, and the ability to carry your personalized Windows environment wherever you go, making it a compact and portable solution.
To boot Windows from an SD card with Qiling, you can follow these steps: First, download and install Qiling on your computer. Next, create a bootable SD card using Qiling's built-in tool.
| ⏱️Duration | 3-7 minutes |
| 🧑💻Supported OS | Windows 10/11/8/7 |
| 📖Preparation |
SD Card [8GB and NTFS format] |
| ⛏️Software | Windows Cloning Tool - Qiling Disk Master |
| 👣Steps |
Guide 1. Preparations to Boot from SD Card |
How to Boot Windows from SD Card
To boot Windows from an SD card, you'll need to prepare your system, create a bootable SD card, install Windows on the SD card, and finally, boot Windows from the SD card.
Guide 1. Preparations to Boot Windows from SD Card
To boot Windows from an SD card, you'll need a computer with a compatible BIOS or UEFI firmware that supports booting from an SD card. This may require entering the BIOS settings and enabling the SD card as a boot device. Additionally, you'll need a Windows installation media, such as a USB drive or CD/DVD, to install Windows on the SD card. It's also essential to have a compatible SD card with sufficient storage capacity to hold the Windows operating system.
1️⃣Prepare the SD Card and Format It
To start, you will need an SD card with sufficient storage capacity, which will serve as the primary storage device for your device.
- For optimal results, use an 8GB or larger SD card to hold the Windows installation files.
- To ensure seamless compatibility with the Windows operating system, it is crucial to format the SD card to the NTFS file system.
2️⃣Prepare Bootable SD Card
To boot a Windows computer from an SD card, you need to make the SD card bootable first, which can be done using tools like Rufus or the built-in Disk Management tool in Windows, or by using a third-party software like Qiling or WinToFlash. Once the SD card is bootable, you can then create a Windows installation media on it, which involves downloading the Windows ISO file, burning it onto the SD card, and configuring the boot settings to prioritize the SD card as the primary boot device. This process can take some time, depending on the size of the SD card and the complexity of the Windows installation.
- To install Windows, you need to download a Windows ISO file, which contains the installation files required for the operating system. You can obtain this file from the official Microsoft website or other trusted sources.
- You can also migrate your computer operating system and applications to the SD card by cloning them.
3️⃣Download the Windows Cloning Tool: Qiling Disk Master
To migrate the Windows OS to the SD card, you'll need a reliable cloning tool. Qiling Disk Master is a highly recommended option that can help you achieve this task.
Here are a few reasons why we suggest using Qiling Disk Master:
- It is Safe: Qiling Disk Master offers safe download links and minimizes advertising pitches, providing a more straightforward experience for users.
- Better Compatibility: This tool is known for its compatibility with various storage media, including SD cards, allowing for a smooth cloning process.
- Fewer Limitations: Qiling Disk Master offers more flexibility and control compared to other cloning tools, making it a more user-friendly option.
- Full Features: This software is a comprehensive tool for managing devices, offering a wide array of supplementary features and functionalities.
Guide 2. Create a Bootable SD Card
After completing the essential preparations, creating a bootable SD card is the next step. This involves installing the Windows system on the SD card and setting it up to boot from the card, allowing you to run Windows from the SD card.
The Clone OS feature in Qiling Disk Master enables you to clone your existing Windows system onto an SD card, duplicating all files, settings, and applications. This allows you to create a duplicate of your Windows system on the SD card.
This feature allows you to create a portable Windows environment on an SD card, which can be booted on any compatible device, providing a seamless and fully functional Windows experience.
To install Windows on an SD card, start by formatting the SD card to ensure it's empty and ready for the installation process. Next, download the Windows installation media from Microsoft's official website and create a bootable USB drive using the downloaded file.
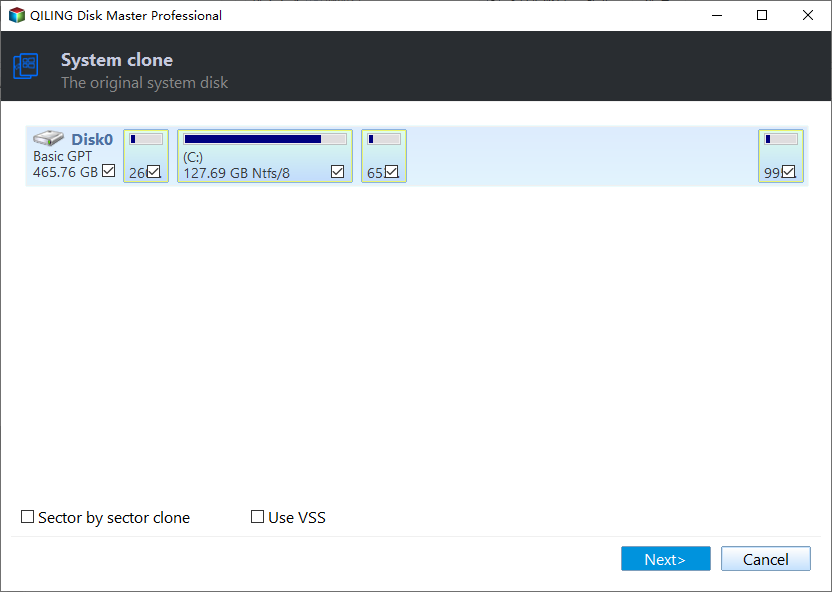
Step 1. Launch Qiling Disk Master, go to the Disk Clone tab, select Clone OS Disk and click Next.
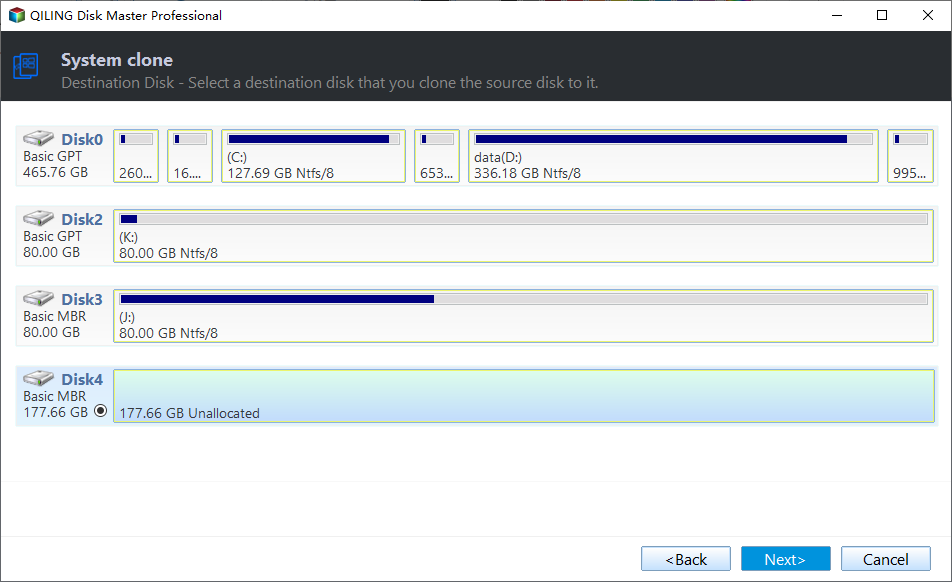
Step 2. Select the target new drive where you want to clone the OS to, and click "Next".
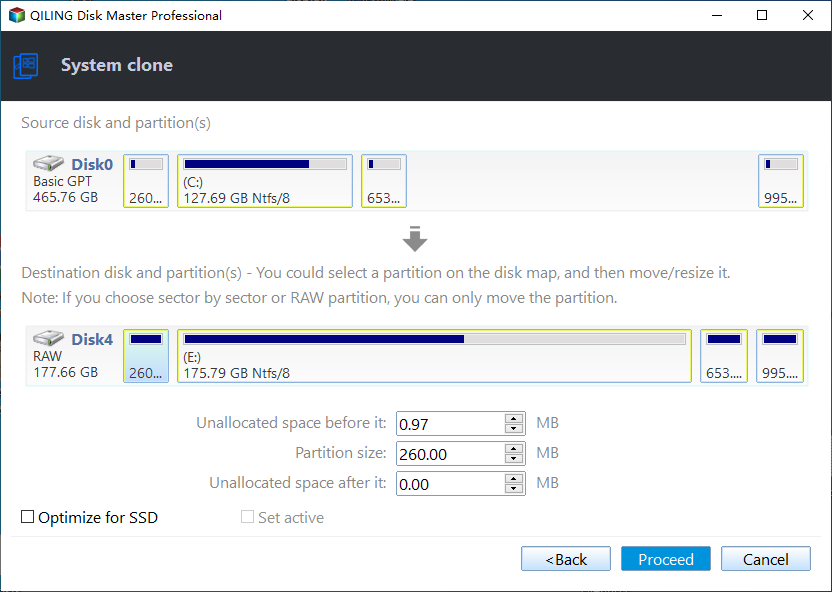
Step 3. The disk layout should be viewed, and then "Proceed" clicked to start the OS cloning process.
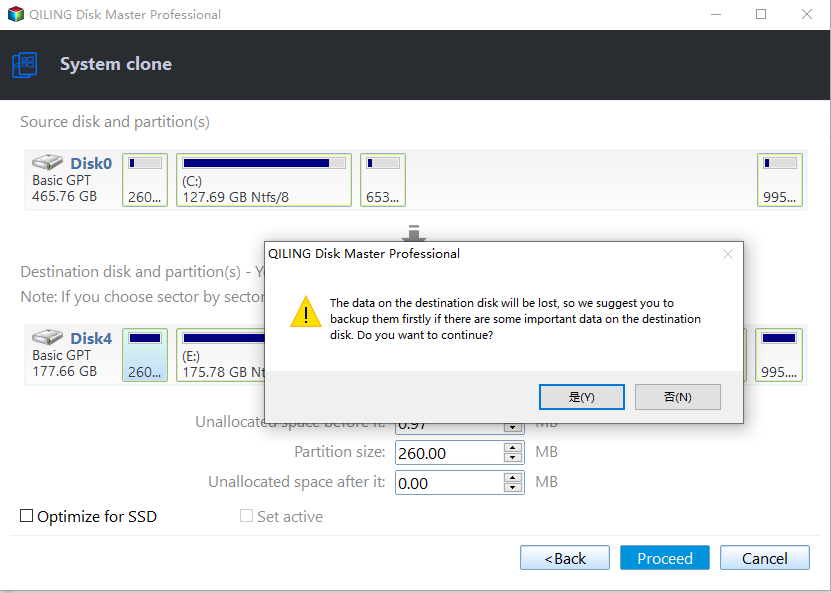
Confirm that you want to continue the OS disk cloning process.
Step 4. When the process completes, you'll see a confirming message asking if you want to start up your computer from the cloned target disk.
- Reboot Now To reboot your PC and configure the computer to boot OS from the new disk immediately, you would typically restart your computer, enter the BIOS settings, set the boot order to prioritize the new disk, save the changes, and exit the BIOS settings. This process allows the computer to boot from the new disk as soon as it restarts, effectively switching to the new operating system.
- Done means you want to make the changes later.
To install Windows 10 from a USB drive, you can create a bootable USB drive using the Media Creation Tool, which allows you to install Windows 10 from the USB drive. This method is an alternative to using a DVD or CD to install Windows 10.
Guide 3. Boot OS From SD Card
After creating a bootable SD card, the next step is to boot your operating system from the SD card. This allows you to start up and run your computer using the Windows installation on the SD card, creating a portable and independent Windows environment.
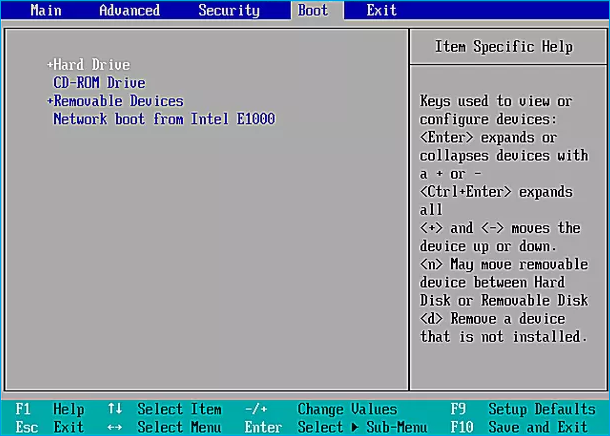
To boot Windows from an SD card, you need to modify your computer's BIOS settings to prioritize the SD card as the primary boot device, ensuring your system boots from the SD card instead of the internal hard drive.
Step 1: To set up your computer, insert a bootable SD card and reboot your computer. During the reboot, use the BIOS key (which varies by model and brand, e.g. F2, F8, Esc, F10) to access the BIOS settings.
Step 2: To access the BIOS menu, select "Enter Setup". From there, navigate to the "Change Boot Order" option. Use the arrow keys to prioritize the SD card as the highest boot priority. Then, save the BIOS settings and reboot to boot from the SD card.
Note: When trying to boot a USB drive on other laptops, such as Lenovo or ASUS, it's crucial to change the boot order. This process allows the laptop to prioritize the USB drive over its internal storage, enabling it to boot from the external device. By adjusting the boot settings, you can successfully boot your USB drive on these laptops.
Why Do We Boot Windows From SD Card
Booting from an SD card offers several advantages, making it a suitable option in various situations. For instance, it can be a convenient way to test operating systems or create a portable version of your OS, allowing you to boot from the SD card on any compatible device. Additionally, it can be a useful troubleshooting tool, enabling you to boot from a known-good environment and isolate issues with your main OS.
Portability and Mobility
Booting from an SD card offers the convenience of portability and mobility, allowing you to carry your operating system, personalized settings, and applications wherever you go. Simply insert the SD card into a compatible device, boot from it, and access your familiar Windows environment on the go.
Troubleshooting and Recovery
Having a bootable SD card is a valuable troubleshooting and recovery tool. If your primary operating system is experiencing issues or becomes inaccessible, a bootable SD card allows you to quickly boot into an alternative OS and perform diagnostics, repairs, or recover important files, making it easier to resolve problems and get back to work.
Compatibility with Multiple Devices
A bootable SD card allows you to boot a Windows system on various devices, including computers and laptops, increasing compatibility and flexibility, especially when working across different machines or temporary environments.
Test New Operating Systems
Testing new operating systems without interfering with your primary system can be done by booting from an SD card, allowing for easy experimentation and exploration of different software environments, such as various Windows versions or alternative operating systems like Linux distributions.
Conclusion
Booting Windows from an SD card offers numerous benefits, including portability, security, troubleshooting, and compatibility opportunities. By following the detailed process outlined in this guide, you can successfully clone the Windows OS onto an SD card and boot your operating system from it, unlocking a range of possibilities.
Qiling Disk Master is a reliable and feature-rich solution that stands out as a valuable aid in these endeavors. It offers additional functionalities, such as OS cloning, Surface Test, 4K alignment, MBR rebuild, etc.
FAQs About How to Boot Windows From SD Card
If you have questions about booting Windows from an SD card, we've can help with our list of frequently asked questions. We've compiled answers to common concerns, so keep reading to get a better understanding of this topic.
1. Can I install the OS on an SD card?
Installing an operating system on an SD card is feasible, requiring the creation of a bootable SD card and adjusting the computer's BIOS/UEFI settings to utilize the SD card as the primary medium for executing the operating system.
2. How can I use an SD card as RAM in Windows?
Use the following steps to use an SD card as RAM in a Windows computer:
Step 1: Insert your SD card into the SD card slot of your computer and format it using the FAT32 file system. Then, locate your SD card in Windows Explorer, right-click on it, and select "Properties."
Step 2: To dedicate your device to ReadyBoost, go to the ReadyBoost tab, select the option to dedicate the device, and then click Apply and OK to save the changes.
3. How do I create a bootable Windows SD card?
To create a bootable Windows SD card, you'll first need to format the SD card, then acquire the Windows ISO file. Next, use an ISO burner tool to transfer the ISO file onto the SD card. For a detailed, step-by-step guide on how to do this using Qiling Disk Master, refer to the tutorial.
Related Articles
- How to Increase C Drive in Windows Server
- Guide to Fix Microsoft Compatibility Telemetry High Disk Usage Windows 11/10
- How to Repair Corrupted SSD with SSD Repair Tool
- Unable to Extend C Drive? Fix It Now
- Troubleshooting: Why Can't I Format My USB Drive as FAT32 [2022 Guide]
Having trouble formatting your USB drive as FAT32? Don't worry, this page provides can help. We'll explore the possible reasons behind your formatting issues and provide a step-by-step guide to help you successfully format your USB drive as FAT32. - Can't Skip Disk Check on Startup Windows 11 | What Should I Do?
If you're experiencing issues with skipping disk check on startup in Windows 11, you can follow a guide to disable automatic disk checking. The guide provides a step-by-step solution to help you skip disk checking in Windows 11 and resolve any related problems.