Can Windows 11 Run MBR? Your Guide to Install Windows 11 on MBR in 2024
| Workable Solutions | Step-by-step Troubleshooting |
|---|---|
| 1. Check If Your PC Meets Windows 11 System Requirements | Before installing Windows 11, you need to ensure that your PC meets the minimum system requirements...Full steps |
| 2. Convert Disk from MBR to GPT for Windows 11 Installation | Step 1. Download and launch Qiling Disk Master on your Windows computer; Step 2. Right-click the MBR disk...Full steps |
| 3. Configure and Get PC Ready for Installing Windows 11 |
Steps to Enable Secure Boot Mode...Full steps Steps to Enable TPM 2.0...Full steps |
| 4. Download and Install Windows 11 with ISO File |
Step 1: Download Windows 11 ISO file; Step 2: Now select the 64-bit download of the ISO file and save it...Full steps |
Can Windows 11 run MBR, Yes or NO
The Master Boot Record (MBR) is a crucial component that holds information about your operating system, enabling your computer to boot or load the OS into the RAM for execution. In essence, the MBR is what drives your OS to run.
Windows 11 can run with an MBR (Master Boot Record) configuration, but only as a secondary disk. This means you can't have MBR as the primary disk for Windows 11. Instead, Microsoft has set up GPT (GUID Partition Table) as the preferred configuration for UEFI and secure boot-enabled systems, which is required for running and installing Windows 11.
To install Windows 11 on an MBR partition, you can still use it as a second drive with Windows 11, even if it's not the primary OS disk type. This means you can have Windows 11 installed on a GPT disk as your primary OS and use an MBR partition as a secondary drive. However, it's worth noting that you'll need to have Windows 11 installed on a GPT disk as your primary OS to take full advantage of the operating system's features. If you're looking to install Windows 11 on an MBR partition, you can still do so, but it will be used as a secondary drive.
How to Install Windows 11 on MBR Partition
If you have an MBR partition disk and want to run Windows 11, reading our article will be helpful. Be sure to read carefully and not miss any step in the process.
1. Check If Your PC Meets Windows 11 System Requirements
Before installing Windows 11, ensure your PC meets the minimum system requirements, which include specific hardware and system specifications, to run the operating system smoothly.
- 64 GB or more of free space is required on the C drive to install Windows 11.
- You need to ensure that TPM (Trusted Platform Module) is enabled for Windows 11 to run. If it's not enabled, don't worry, as you'll learn how to enable it in the next section.
- To meet the Windows 11 installation requirements, ensure your system supports UEFI and Secure Boot modes in the BIOS. This is a necessary condition set by Microsoft for a successful installation.
- If you're planning to install Windows 11 on an MBR partition, you don't need to worry about the disk type for your OS drive. The article is focused on installing Windows 11 on an MBR partition, so it's not a concern.
2. Convert Disk from MBR to GPT for Windows 11 Installation
Microsoft's limitation of MBR is something that can't be avoided while installing Windows 11, but you can convert your MBR disk to GPT using Qiling Disk Master, making the process relatively easy.
Qiling Disk Master gives a one-To convert your MBR disk partitions into GPT format, you can use a solution like Qiling Partition Master. This tool provides a comprehensive set of features to help you manage and create partitions, including converting MBR to GPT. With its user-friendly interface, you can easily resize, move, merge, split, and even clone partitions, making it a powerful and convenient solution for all your partition management needs.
To convert a disk from MBR to GPT, download Qiling Disk Master and follow these steps:
Step 1. Download and launch Qiling Disk Master on your computer.
Step 2. Go to Disk management tab page.
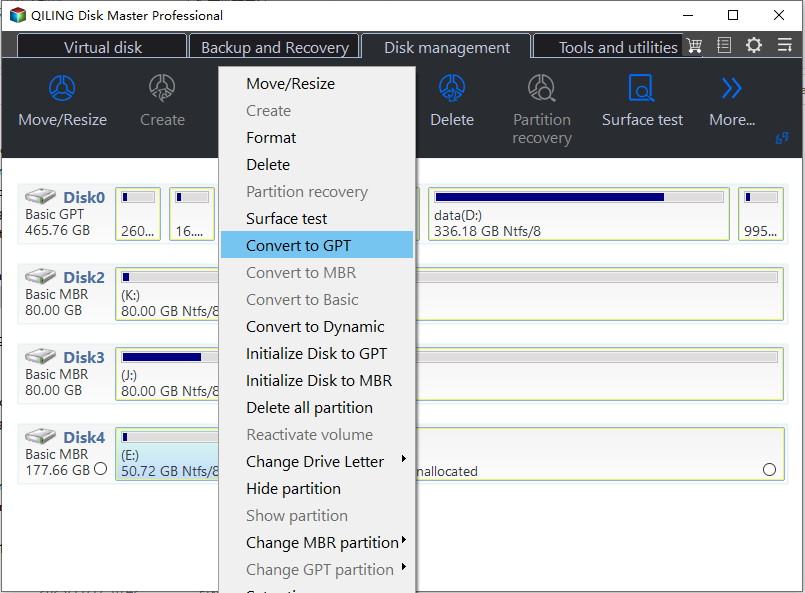
Step 3. To convert a target MBR disk to GPT, right-click the disk and select "Convert to GPT".
3. Configure and Get PC Ready for Installing Windows 11
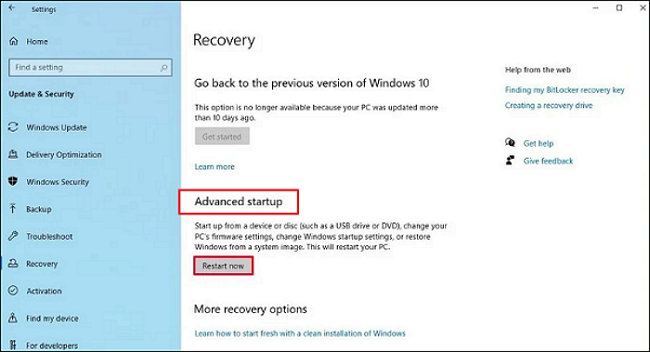
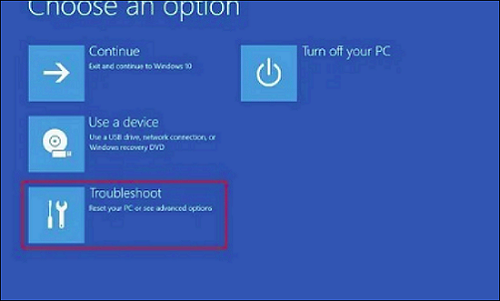
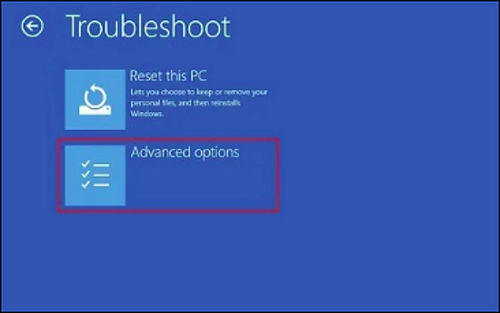
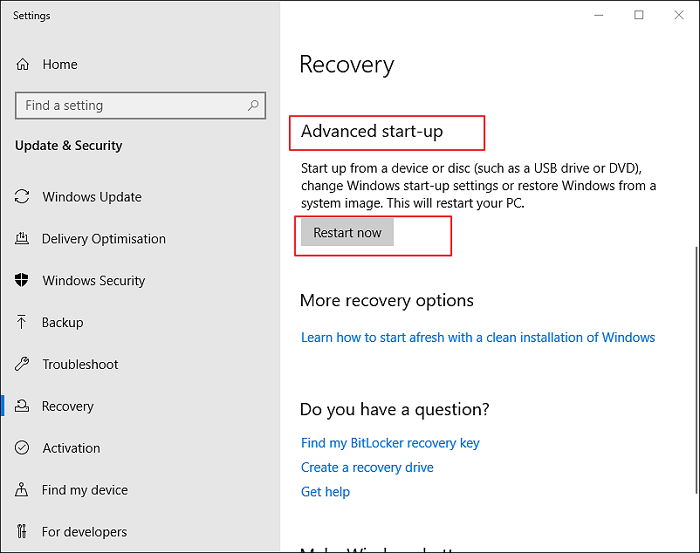
To configure Windows boot modes and enable the TPM 2.0, go to the Windows Settings, then click on "Update & Security," followed by "Recovery" and finally "Advanced startup." Select "Restart now" and press the "Enter" key. Once your system restarts, select "Troubleshoot," then "Advanced options," and finally "UEFI Firmware settings.
Steps to Enable Secure Boot Mode
Step 1: To update your Windows 10, go to Settings and select Update & Security, then select the Recovery option.
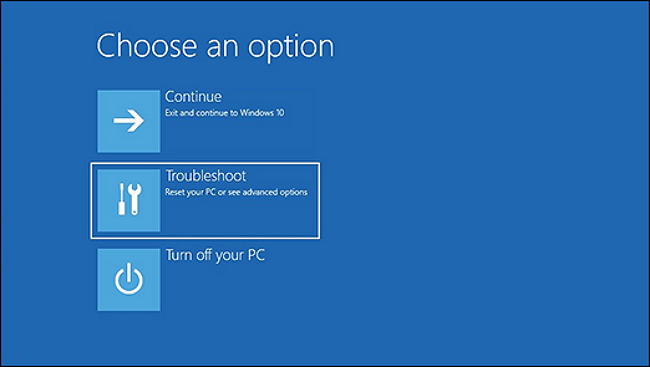
Step 2: In the "Advanced Startup," select the Restart now button.
Step 3: After Restart, select the Troubleshoot from the Advanced Startup menu.
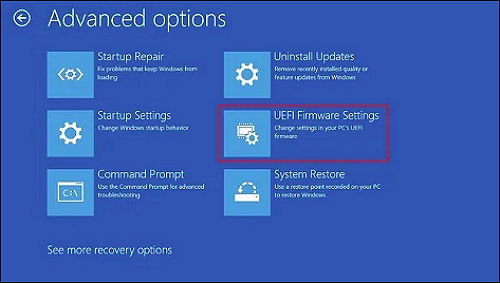
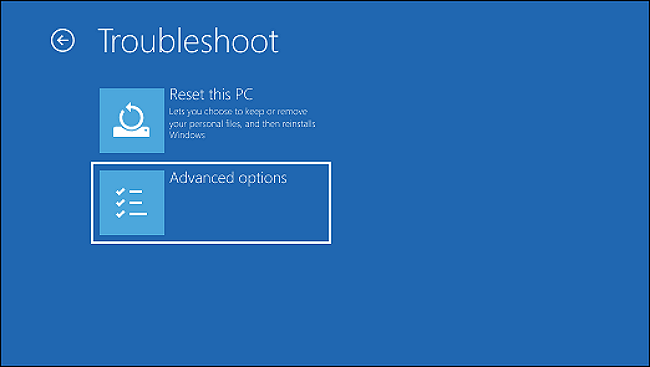
Step 4: Go to Advanced Options.
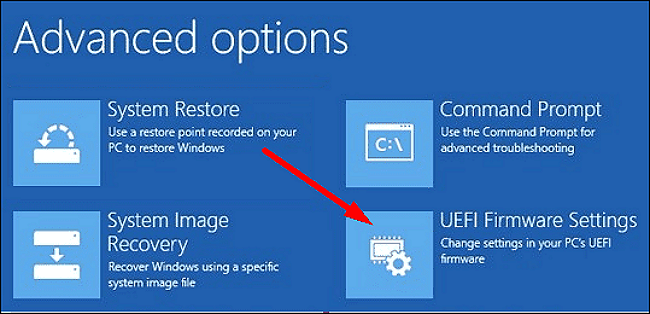
Step 5: You need to open the UEFI Firmware Settings option.
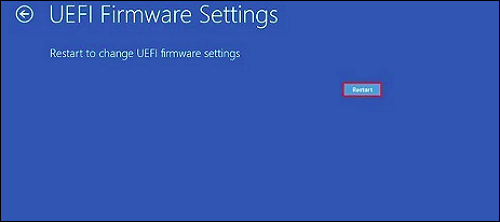
Step 6: Click on the Restart button.
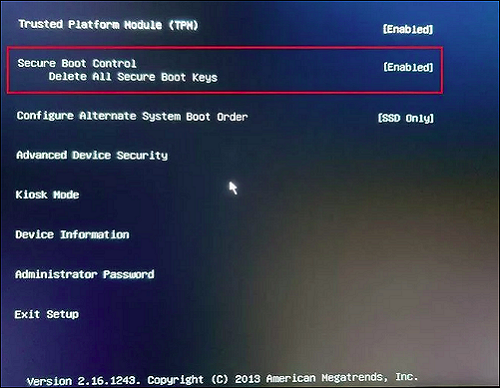
Step 7: To enable Secure Boot, open the boot or security settings page, navigate to the Secure Boot option, and press the Enter key.
Step 8: To enable the feature, select Enabled as an option and press the Enter key.
Step 9: Now exit the UEFT settings by confirming the new changes.
Your system will restart, enabling secure boot on your computer.
Step 1: To access the Recovery option in Settings, go to Settings, then choose Update & Security, and select the Recovery option.
Step 2: Restart from Advanced Start-up.
Step 3: Choose the Troubleshoot.
Step 4: Go to Advanced Options.
Step 5: Now, you have to open the UEFI Firmware Settings.
Step 6: Click on the Restart button.
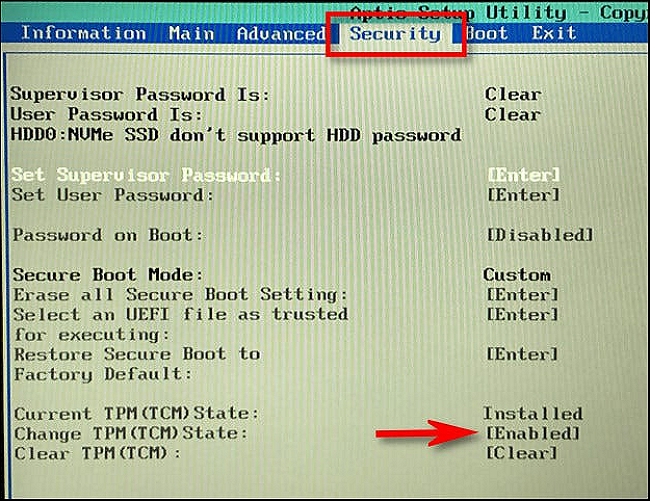
Step 7: Go to the boot or the security settings page.
Step 8: Go to the change TPM state, choose Enabled, and press enter.
Step 9: Exit UEFI settings and confirm your new changes.
Your system will restart now to enable the TPM for Windows 11 installation.
4. Download and Install Windows 11 with ISO File
To download and install Windows 11, follow these steps: click on the Microsoft Store icon, search for Windows 11, select the operating system from the search results, click the "Get" button to download and install Windows 11, and follow the on-screen instructions to complete the installation process.
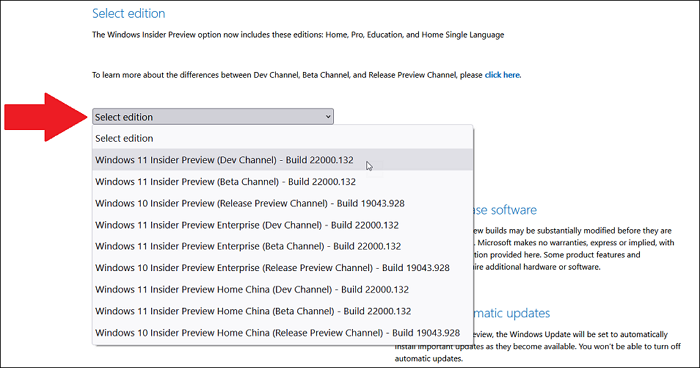
Step 1: Download Windows 11 ISO file by clicking here.
To sign in to your Microsoft account, select Windows 11 from the menu.
Step 2: To download the operating system, select the 64-bit download of the ISO file and save it on your disk.
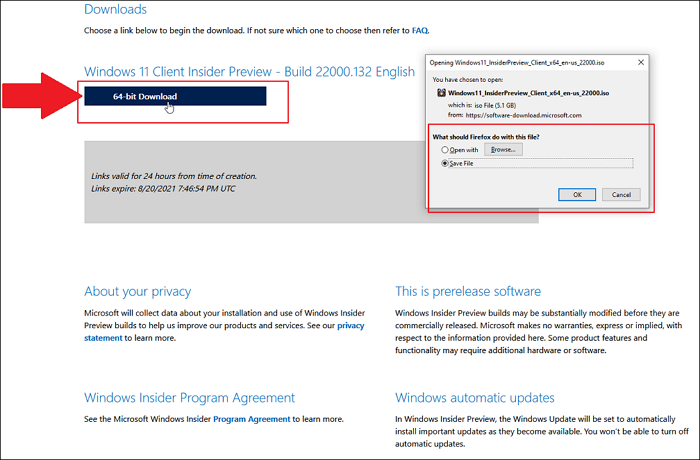
After that, it will ask you to select a product language. Choose that and click on confirm. It will take a while, and your Windows 11 ISO file will download on your computer.
Step 3: To prepare for installing Windows 11, burn your ISO file to a USB drive or a disc using a tool
Insert a USB drive or Disc into your computer, then select the Windows 11 ISO file, right-click on it and choose "Burn disc image". Select the USB or Disc location and click "Burn" to start the process.
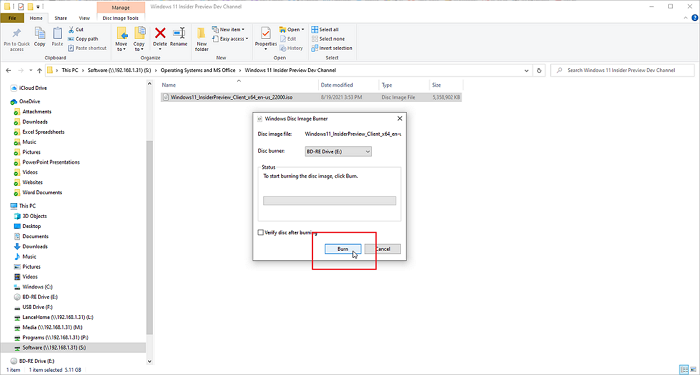
After waiting for a while, the Windows 11 file will be successfully burned on your USB drive or Disc.
Step 4: To install Windows 11 on your computer, restart your computer and boot it using a USB drive or CD/DVD that contains the Windows 11 installation files. This will allow you to start the installation process.
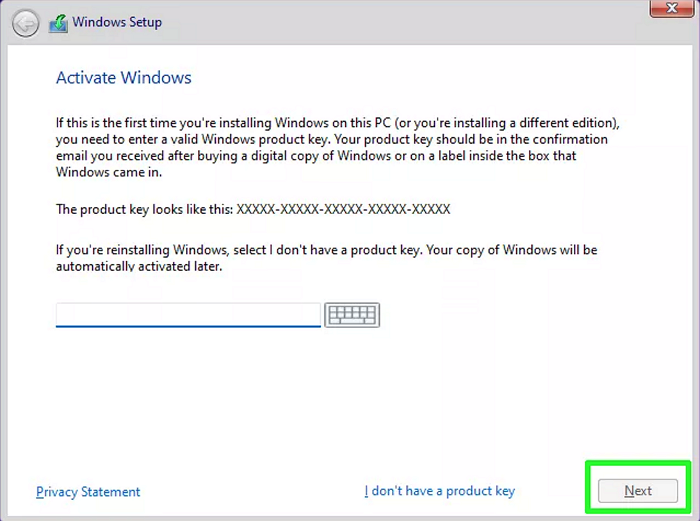
Step 5: Now, you will see Windows 11 setup in place. Select your language and click the Next button.

Step 6: Add the Windows 11 product key and hit Next.
Step 7: Proceed by accepting the license and agreement.
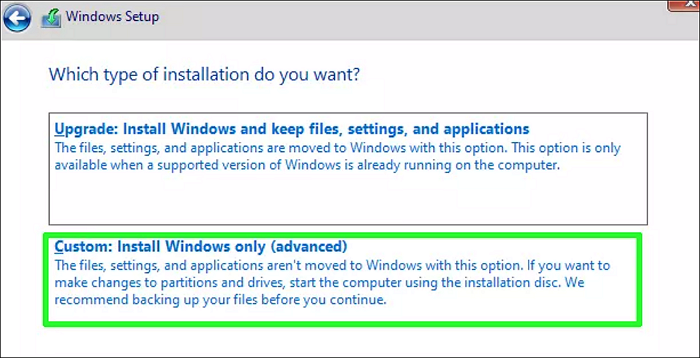
Step 8: Choose the Custom Install option.
Step 9: Choose your GPT converted MDR drive for installation and hit Next.
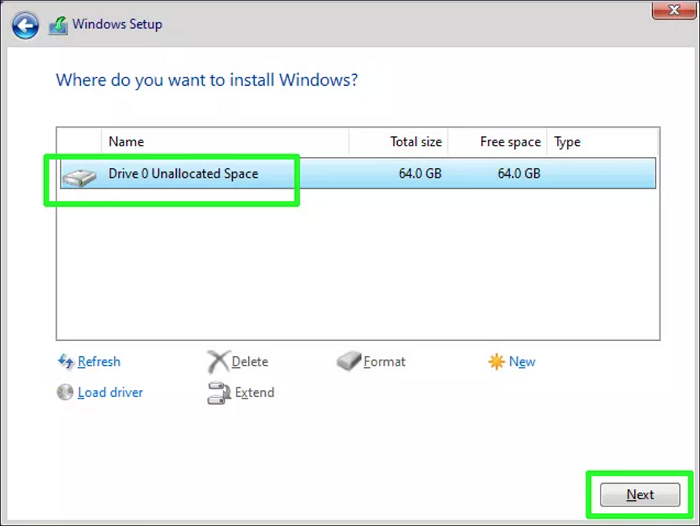
After completing the steps to convert your drive to GPT, you'll proceed with the basic installation steps to complete Windows 11 setup. Once done, Windows 11 will be installed on the drive that was previously MBR.
Request Online Assistance to Install Windows 11 on MBR Disk
You can customize an online remote assistance, and let Qiling experts guide you through the entire process and get Windows 11 successfully installed on the MBR disk.
Qiling experts offer one-on-one manual services 24/7 to fix Windows configuration issues, including Windows update errors, installation, and daily OS problems, with free evaluation and efficient resolution using their decades of experience.
- 1. To resolve Windows update errors, such as update failure or inability to upgrade Windows, try restarting your computer, checking for corrupted system files, and running the Windows Update Troubleshooter. You can also try resetting Windows Update components, disabling any conflicting third-party antivirus software, and checking for any pending updates in the Windows Update settings.
- 2. To download and install the latest Windows operating system on your PC successfully, follow these steps: Ensure your PC meets the system requirements, back up your files, and create a bootable USB drive or DVD with the Windows installation media. Restart your PC and enter the BIOS settings to ensure the USB drive or DVD is set as the first boot device.
- 3. To resolve daily Windows system errors, start by updating drivers for hardware devices, as outdated drivers can cause system crashes and other issues. Next, check and adjust permission settings for files and folders to ensure proper access and avoid errors. Additionally, review account settings, such as user accounts and group policies, to ensure they are configured correctly and not causing conflicts.
Tips to Optimize Windows 11 Disk Performance
Windows 11 has significantly improved in terms of UI and performance, making it a great platform to optimize disk performance. To get the most out of it, consider the following essential tips:
- Free-Ensure that your system's C drive has at least 120 GB of free space or more.
- Run the Windows disk cleaner utility to clean extra and useless files from your C drive regularly.
- To migrate large files, ensure that all large files are stored on a separate drive from the one where Windows 11 is installed. This helps prevent issues during the migration process.
- It's also a good idea to run a good antivirus software on your computer from time to time, as part of best practice to keep your system safe and secure.
Conclusion
Microsoft has set specific hardware and software requirements for Windows 11 to run, including having free storage space, a TPM (Trusted Platform Module) enabled, Secure Boot enabled, and a GPT (GUID Partition Table) disk drive.
To install Windows 11, you'll need to convert your MBR disk drive to GPT first. Fortunately, using Qiling Disk Master software simplifies this process, allowing you to make the conversion with just a few clicks. This makes it much easier to get started with the Windows 11 installation.
To install Windows 11, first, download the Windows 11 ISO file from the official Microsoft website. Then, follow the steps mentioned in the article to install Windows 11.
Related Articles
- MBR2GPT Disk Layout Validation Failed | 3 Proven Fixes
- Steam Deck Speed Test, Everything You Should Know
- How to Fix Virtual Disk Manager the System Cannot Find the File Specified in Windows 10/8/7
- [Fixed] Windows Resource Protection Found Corrupt Files but Was Unable to Fix Some of Them
- [100% Working] How to Increase C Drive in Windows 10/8/7 Without Formatting
This page provides a step-by-step guide on how to increase C drive space in Windows 10 without formatting or deleting other drives or partitions. By following this tutorial, you can easily learn how to increase C drive space in Windows 7 without formatting a partition, all with just a few simple steps. - Partition Manager Tutorials
You can find all you needed solutions to manage hard drive space in Windows. Qiling Partition Master is reliable partition manager that help you to resize and manage disk space.