Fix Steam Not Recognizing External Hard Drive Error
Steam users often face frustration when the platform fails to recognize their external hard drives, preventing game installations and access to existing game libraries. This issue has been a recurring problem in Steam forums, where users have reported that Steam does not detect their external hard drives. As a result, users are unable to install games or access their existing game libraries, making it difficult to manage their digital game collection.
The technical issue affects the seamless installation and management of games, disrupting the gaming experience. To resolve this error, a systematic approach is required, starting with investigating related factors.
This article guides users through the process of resolving issues with external hard drives on Steam, from simple reconnections to more complex tasks like partitioning or reformatting the drive for optimal performance and an uninterrupted gaming experience. By following these steps, users can regain control over their external hard drives and efficiently address the problem, providing a seamless experience on the Steam platform.
Fix 1: Reattach or Reconnect External Hard Drive
If your external hard drive is not recognized by Steam, try reattaching or reconnecting it to your computer. This simple step can often resolve the issue and allow Steam to recognize the drive.
Follow the below-mentioned steps to get started:
Step 1. Shut down both your computer and the external hard drive connected to it.
Step 2. Carefully disconnect the external hard drive from its USB port.
Step 3. Re-attach the external hard drive back into the same USB port.
Step 4. Power on the external hard drive and initiate the boot-up sequence for your computer.
Step 5. Launch the Steam application and verify if the external hard drive is successfully recognized within the system.
If Steam still refuses to recognize your external hard drive, don't worry, it's a basic step but often effective in resolving connectivity issues. Let's explore other potential fixes.
Fix 2: Partition or Reformat External Hard Drive
Ensure your external hard drive is correctly partitioned and formatted before attempting to partition and reformat it. If not, follow these steps: connect the external hard drive to your computer, open File Explorer, right-click on the drive, and select "Format." Then, choose a file system (such as NTFS or exFAT), and select the allocation unit size. Finally, confirm that you want to format the drive. This will erase all data on the drive, so be sure to back up any important files before proceeding.
To make your external hard drive compatible with Steam, ensure it uses the same language as Steam by adjusting its file system. Use Qiling Disk Master Professional, a user-friendly tool, to partition and format your external hard drive, making it perfectly aligned with Steam's requirements.
This tool simplifies technicalities, allowing you to focus on returning to uninterrupted gaming sessions. To ensure Steam recognizes your external hard drive, follow the detailed guide below.
#1. Partition External Hard Drive for Steam
To partition your external hard drive, you'll need to connect it to your computer and open the Disk Management tool. You can do this by searching for "Disk Management" in the Start menu, or by right-clicking on the Start button and selecting "Disk Management" from the context menu. Once the tool is open, you can create a new partition by right-clicking on the unallocated space on the external hard drive and selecting "New Simple Volume.
If the entire external disk is unallocated, the process is simplified, and you can proceed directly to step 3, where you would normally start the disk cloning process. This step is skipped as there's no need to allocate or format the disk before cloning.
Step 1. Launch Qiling Disk Master to check for free space at the Partition Manager section.
- If your hard drive has unallocated space, you can create a new partition using the built-in Disk Management tool in Windows. To do this, go to Start, type "Disk Management" in the search bar, and open the application.
- If the hard drive has no unallocated space, it means that the entire disk is being used by the operating system and other installed programs. In this case, you may need to delete some files or folders to free up space, or consider upgrading your hard drive to a larger capacity.
Step 2. Shrink a disk partition to create unallocated space.
Right-To free up space on your computer, click on the target drive partition with a lot of free space and select "Resize/Move".

To free up unallocated space, drag the partition to the right or left to shrink its size, making room for more space in the "Partition size" area. This visual representation shows the reduction in partition size.
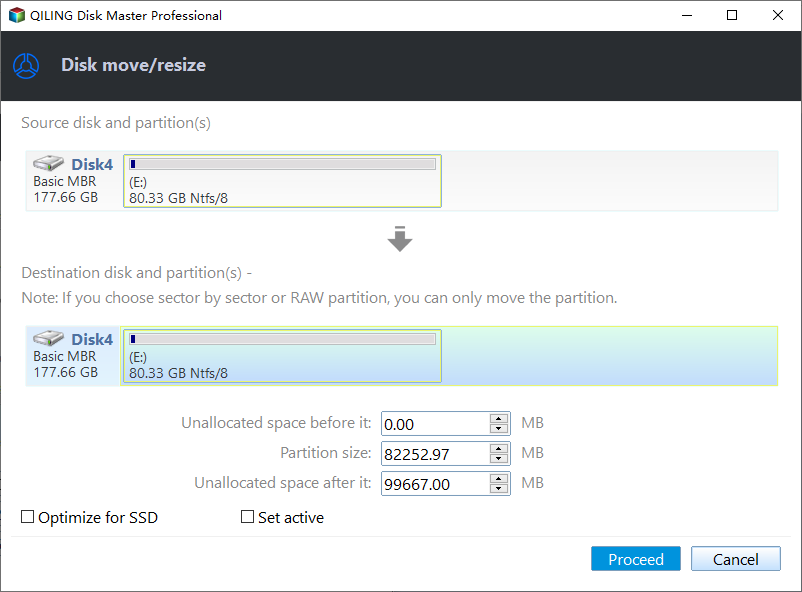
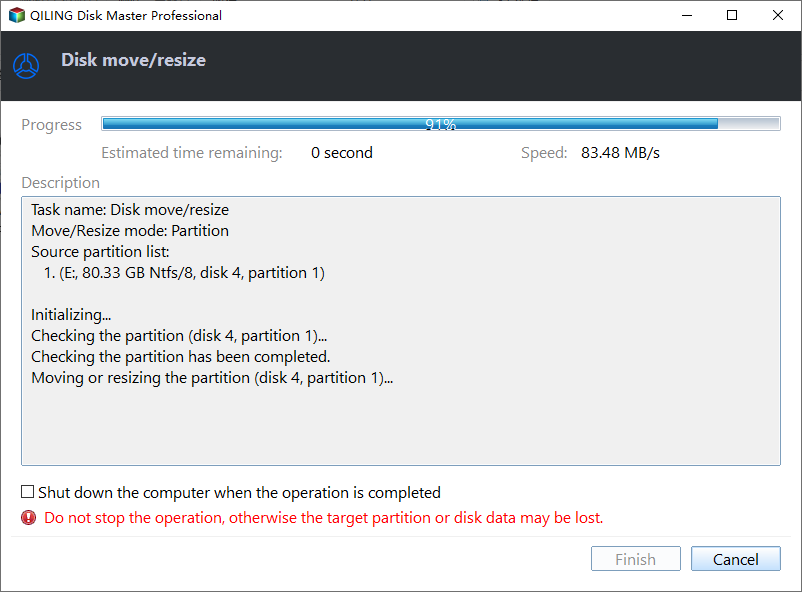
Click "Proceed" to save all the changes.
Go back to Partition Manager, there should be unallocated space appearing on the same disk and you can continue with the next step to create new partition on your hard drive.
Step 3. Create a new partition with unallocated space on the target hard drive.
Right-click on the unallocated space and choose "Create".

The software allows users to customize various settings for a partition, including its size, drive letter, label, and file system type, among other options, in the Advanced Settings section.
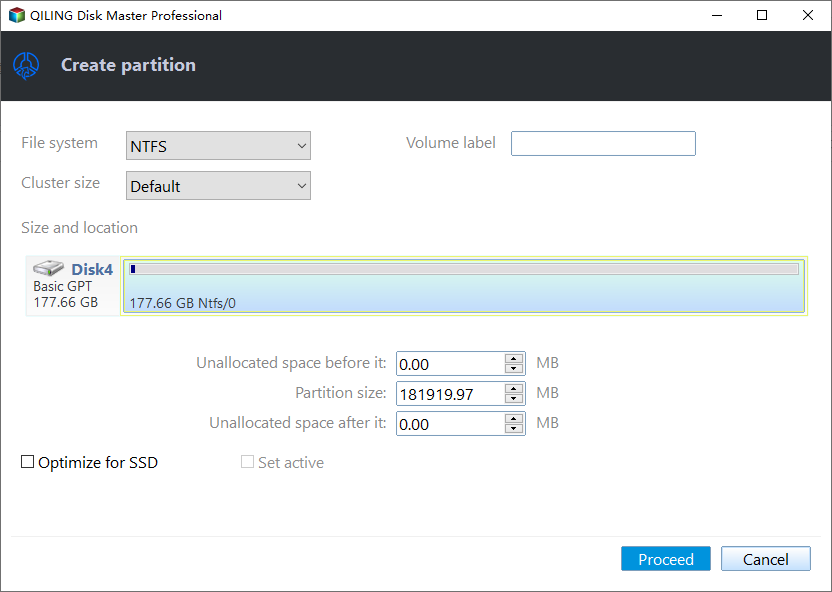
To create a new partition on your disk, go to Disk Management, select the unallocated space, right-click on it, and choose "New Simple Volume". Enter the size of the partition you want to create, assign a drive letter, and select the file system (e.g.
This tool can also resolve the Steam not launching issue:
#2. Reformat the External Hard Drive for Steam
To play Steam games on a computer, you'll need to set up an external disk with the NTFS file system. If your current disk isn't formatted to NTFS, you'll need to reformat it. To do this, follow these steps:
- Right-To format a USB drive or external hard drive, click on the drive you want to format and select the "Format" option. This will erase all data on the drive, so be sure to back up any important files before proceeding.
- Set the Partition label, File system (NTFS/FAT32/EXT2/EXT3/EXT4/exFAT), and Cluster size.
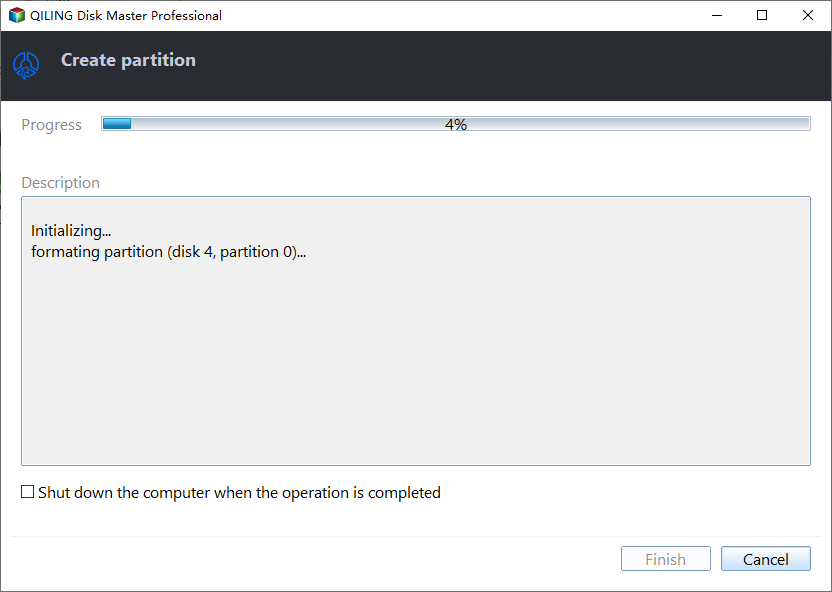
- Click "Yes" to continue.
- Click the "Proceed" button to format the hard drive partition.
If this method resolved your issue, making the external hard drive recognized by Steam on your PC, don't forget to share this guide online to help more Steam players. The method involved updating the Steam client to the latest version, then enabling the "Show hidden devices" option in the Device Manager, and finally, restarting the Steam client.
Fix 3. Re-add External Hard Drive with Steam Library Folder
To reconnect your external hard drive to your Steam Library, start by ensuring the drive is properly connected to your computer. Next, launch Steam and navigate to the Library tab.
Here's how to add your external hard disk as a second or third game drive in Steam:
Step 1. Launch Steam and select "Settings" from the upper menu.
Step 2. Select "Downloads" from the left-hand navigation under the Settings menu.
Step 3. Add a Steam Library Folder to the external hard drive:
- To move Steam library to an external hard drive, select the "Steam Library Folders" section, click on "Steam Library Folder", and navigate to the designated location on the external hard drive. Then, create a new folder on the external hard drive specifically for Steam games. This will allow you to free up space on your computer's hard drive and keep your games organized.
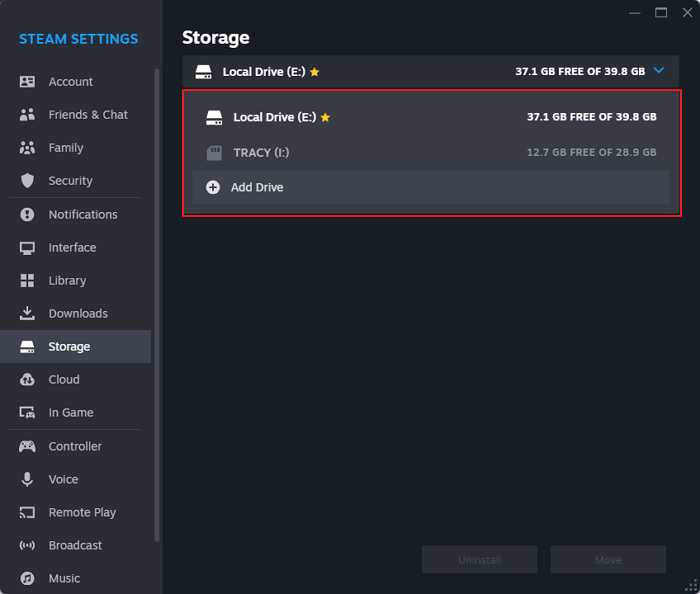
Go to the Storage section, click the storage drive with the Add button, and browse to select the external hard drive.
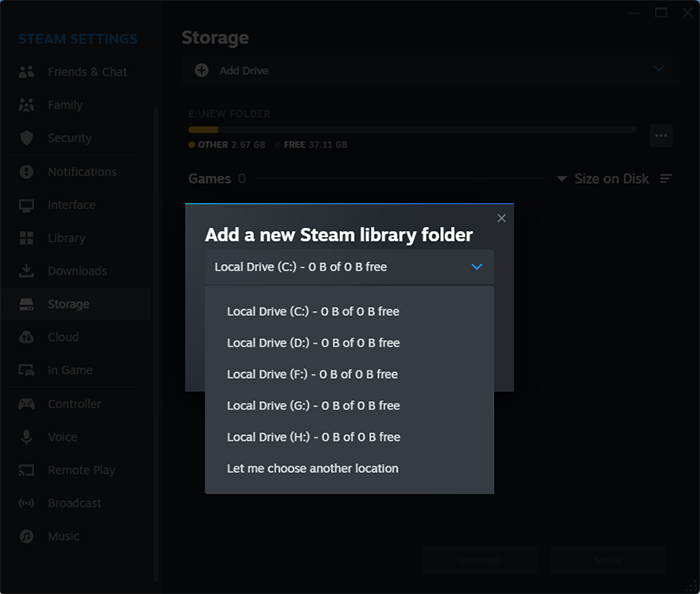
Confirm your selection, allowing Steam to recognize the new library folder on your external hard drive.
Before you start, remember to follow each step carefully to add a new Steam Library folder to your external hard drive, ensuring a seamless integration that lets your external hard drive host your favorite games effortlessly. Let's proceed with these steps and bring your Steam Library back to order!
Conclusion
Resolving Steam's failure to recognize an external hard drive requires a systematic approach to address potential causes. Frustrated users often report this issue, disrupting the seamless installation and management of games. To troubleshoot, start with the basic step of reattaching or reconnecting the external hard drive to the PC, and then proceed with more advanced steps if necessary.
To resolve persistent recognition issues, users should thoroughly check their external hard drive's specifications and ensure they meet Steam's requirements. Utilizing tools like Qiling Disk Master can simplify this process, providing a user-friendly interface to manage external hard drive configurations effectively. This involves partitioning and reformatting the drive, if necessary, to ensure compatibility.
To ensure optimal performance and an uninterrupted gaming experience on Steam, users can follow these comprehensive steps to navigate through technical intricacies. By following these steps, users can troubleshoot common issues, optimize their system, and resolve problems with ease. This guide is a valuable resource for Steam users, and sharing it with friends can help them too.
FAQs of Steam Not Recognizing External Hard Drive
Here are some hot questions that most Steam fans asked online and if you are interested, follow to find answers here:
How do I get my Steam to recognize a new SSD?
- Ensure proper connection using a compatible cable.
- Open Disk Management (Windows) or Disk Utility (Mac).
- Initialize and format the SSD, assigning a drive letter.
- Reboot to apply changes.
- In Steam Settings, go to "Downloads."
- Add a new library folder on the SSD.
- Right-click on a game in Steam Library.
- Choose "Move Install Folder" and select the SSD.
To get Steam to recognize and utilize your new SSD for enhanced gaming performance, follow these steps. First, ensure your SSD is properly installed and recognized by your computer.
Can I install Steam games to an external hard drive?
To install Steam games on an external hard drive, you can follow these steps.
- Access Steam "Settings" and choose "Downloads."
- Select "Steam Library Folders" and click "Add Library Folder."
- Choose the location on your external hard drive.
- Confirm your selection, and Steam will recognize the external hard drive as a game installation destination.
Which is better for Steam gaming, HDD or SSD?
The choice between HDD and SSD for Steam gaming comes down to prioritizing speed or affordability, with SSDs offering faster load times and smoother performance but at a higher cost, and HDDs providing ample storage at a lower cost but with slightly slower load times.
Related Articles
- Effective Fixes for Windows Was Unable to Complete the Format SD Card and USB Drive
- How to Fix Disk 1 Unknown, Not Initialized Western Digital in Windows 10/8/7
- What Is the Best MBR to GPT Convert Tool? Your Checklist Here
- Boot Device Not Found in Windows 11? Here Are The Fixes
- How to Transfer CS:GO to Another PC or Another Drive
Counter-Strike: Global Offensive transfer is not a problem anymore. Qiling Disk Master can help you transfer CS:GO or any other Steam game to another PC or drive easily. Stop making every effort to move CS:GO to another PC or drive, try Qiling game mover now. - How to Transfer Files from PC to PC Using OneDrive
This post covers the step-To transfer files from one PC to another using OneDrive, follow these steps: first, sign in to OneDrive on both PCs with the same Microsoft account; next, move the files you want to transfer to the OneDrive folder on the source PC; then, on the destination PC, open...