Guide to Check Disk Space Using PowerShell [2024 Tutorial]
Many Windows users want to check their disk space using PowerShell, but may find it confusing to perform operations. This tutorial aims to introduce multiple ways to check disk space with PowerShell and an alternative tool to show disk usage, making it easier for users to manage their disk space effectively.
| ⏱️Duration: | 5-10 minutes |
| 🎯Goal: | Check disk space with Powershell script on Windows computers |
| 🧰Tools: |
|
When to Check Disk Space with PowerShell
To check your computer's disk space using PowerShell, you can use the command `Get-PSDrive` to list all available drives, and then use the command `Get-ChildItem` to get the total size of each drive. For example, to check the disk space of the C: drive, you can use the command `Get-ChildItem -Path C:\ -Recurse -Force`.
- The disk gets full for no reason
- The computer system gets slow or repeatedly freezes up
- Unable to install new applications or updates
- Cannot save or open files
- Files or apps taking a long time to load
- Low disk space warnings
If you're running low on disk space, you can refer to the tutorial in the coming section to learn how to check disk space using PowerShell. This will help you identify which folders or files are taking up the most space, and free up some space by deleting unnecessary files.
How to Check Disk Space in PowerShell [With Pictures]
To check disk space in PowerShell, there are three commonly used methods. These methods are straightforward and functional for Windows users, offering a quick and easy way to assess your disk space.
Way 1. PowerShell Check Disk Space via the Get-Volume Command
Get-You can use the "Volume" command to quickly find disk storage information. This command displays essential details about all volumes, including health, system type, and free/used space in GB. Additionally, you can use the command to check the storage space information of a specific drive.
1) Show All Volumes and space allocation
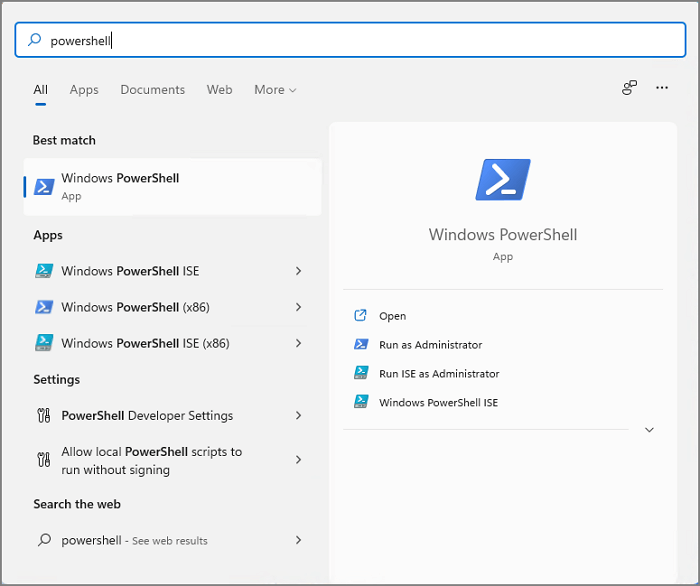
Step 1: Go to the Search bar and type PowerShell.
Step 2: Select the "Run as Administration" option.

Step 3: Type Get-Volume in PowerShell window and hit Enter.

You will find a list of partitions, each with its own unique information.
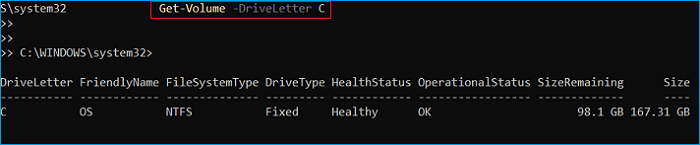
2) Show a Specific drive
To get the details of a specific drive, such as the C drive, insert the command `Get-Volume -DriveLetter C` and replace the drive letter if needed.
Way 2. PowerShell Check Disk Space via the Get-PSDrive Command
You can also check disk space using cmdlets, another effective yet simple way. Two different commands are available.
# 1. Check the Space of All Drives
Displays free disk space in GB for all drives.
Step 1: Open the PowerShell window.
Step 2: Type Get-PSDrive command, and hit Enter to run it.
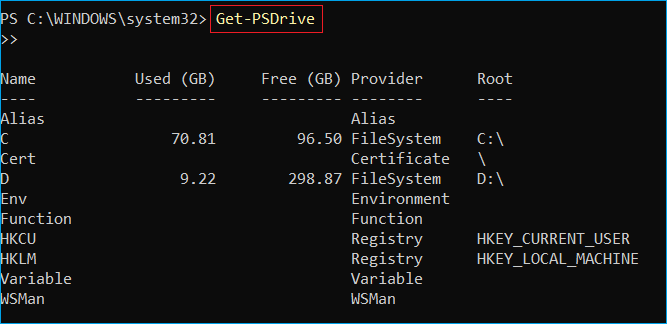
The script will display a detailed view of used and free disk space, provider, and root of all partitions in the local drive.
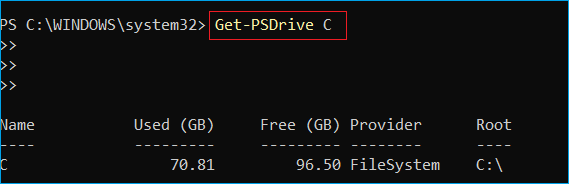
# 2. Check the Space of a Specific Drive
To check the used and free disk space for a specific drive, you can run the command `Get-PSDrive [drive letter]` in PowerShell, replacing `[drive letter]` with the actual letter of the target drive, such as `D`, `E`, or `C`. This will display the used and free disk space for the specified drive. For example, running `Get-PSDrive C` will show the used and free disk space for the drive lettered `C`.
Way 3. PowerShell Get Disk Space via the Get-WmiObject Command
This method is a more complex but practical alternative that provides detailed information about your drives. Two scripts of this method offer detailed information, including media type, total size in GB, and employed/free space, making it a useful tool for drive management.
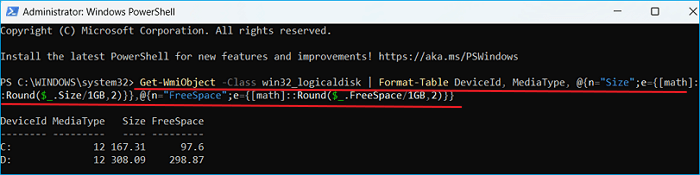
1) Check Total Allocated Space
Copy and paste the following command into PowerShell, then hit Enter: `Get-ChildItem -Path C:\Windows\Temp -Recurse -Force -Include *.log`
- Get-WmiObject -Class win32_logicaldisk | Format-Table DeviceId, MediaType, @{n="Size";e={[math]::Round($_. Size/1GB,2)}},@{n="FreeSpace";e={[math]::Round($_. FreeSpace/1GB,2)}}
The space allocation of all partitions of the local drive can be easily determined by using the command `df -h` in the terminal. This command displays a list of all mounted file systems, including their total and used space, as well as their percentage usage. The output shows the partition name, total space, used space, percentage used, and the mount point for each partition.
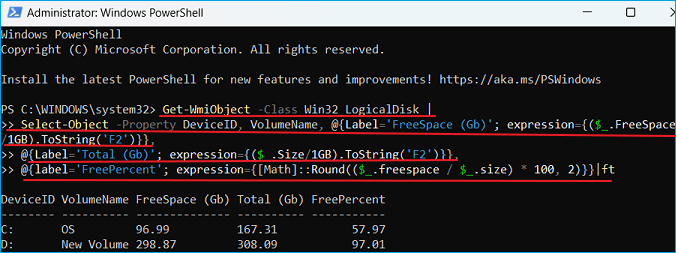
2) Check the Storage Capacity Assigned to Each Drive
You can check the detailed space portion of each drive specifically by running the command "df -h" in your terminal or command prompt. This command shows the free/total disk space and the free percentage of each drive in your computer.
To use the given command, simply drag and drop it into PowerShell. A screenshot can be referenced to see how this process works.
- Get-WmiObject -Class Win32_LogicalDisk |
- Select-Object -Property DeviceID, VolumeName, @{Label='FreeSpace (Gb)'; expression={($_. FreeSpace/1GB). ToString('F2')}},
- @{Label='Total (Gb)'; expression={($_. Size/1GB). ToString('F2')}},
- @{label='FreePercent'; expression={[Math]::Round(($_.freespace / $_.size) * 100, 2)}}|ft
- Personal Thoughts:
- PowerShell can be a useful tool for checking disk space, but its complexity and potential for data loss make it less suitable for beginners. Without prior experience, users may struggle to use PowerShell correctly, and a mistake can lead to unexpected consequences. As a result, those without prior knowledge may want to consider alternative solutions for managing disk space.
If you're a beginner without extensive computing experience or familiarity with PowerShell, we recommend using a reliable third-party tool like Qiling Disk Master, which you can learn more about in the next part.
Bonus Tip: Check Disk Space with PowerShell Alternative Software
Qiling Disk Master is a popular alternative software that offers a free disk space analyzer, known for its rich features and appealing interface. It allows users to check disk space and free it up easily, with options such as its Disk Space Analyzer feature, which provides information for individual drives without requiring a scan.
The tool can also be used to check the total disk space on a newer operating system like Windows 11, by displaying the total disk space available on the system, allowing for better management of storage space.

How to Check Total Disk Space in Windows 11
To check hard drive space, you can use a professional disk space analyzer, or utilize built-in tools such as Windows Settings, Disk Management, and the Command Prompt (CMD).

Qiling Disk Master VS PowerShell, What Makes This Software Stand Out In Checking Disk Space
Qiling Partition Master's Disk Space Analyzer feature outshines PowerShell in terms of functionality and user experience. While PowerShell provides some basic disk space analysis capabilities, Qiling Partition Master offers a more comprehensive and user-friendly solution.
| Qiling Disk Master | PowerShell |
|---|---|
|
|
Qiling Disk Master is not only a tool for checking disk space but also allows you to manage disk space. It provides a range of features, including, but not limited to, checking disk space, allowing you to manage disk space.
- Migrate OS and clean up data.
- Perform most management tasks automatically.
- Check and manage hard drives, including creating, formatting, and partitioning.
A Brief Review of PowerShell
PowerShell is a powerful command-line shell and scripting language tool designed to manage Windows administrator tasks with multiple commands, scripts, and modules. It enables users to perform various tasks, such as checking disk space and installing Windows Updates.
PowerShell is a versatile tool that works seamlessly on all Windows operating systems, offering an extensive array of cmdlets that provide users with multiple options to execute tasks. Users can choose from various commands to check disk space, and can further enhance the level of detailed results by adding different commands, making it a go-to tool for professionals.
If you're looking for ways to check disk space, consider using PowerShell or its alternative tool. You can share this information with others online to help them out, and it's a great way to spread the word and assist your friends in need.
Conclusion
This tutorial aims to help you manage your disk space, and you have the flexibility to choose any method to get the job done. However, only advanced Windows users are recommended to use the PowerShell utility, while beginners can opt for Qiling Disk Master, which is user-friendly and easy to operate with any level of expertise.
We recommend following the given tips to manage your disk space more efficiently, which will help you avoid running out of space.
- Separate and store document files from the system
- Extend and leave enough space in the C drive
- Regularly deleting unnecessary files and large files can help maintain a clutter-free digital environment, improve system performance, and save storage space. By doing so, you can free up space for more important files and applications, reduce the risk of data loss, and make it easier to find and access the files you need.
- Clear cache or temporary files if necessary
- Utilize OneDrive's cloud storage for rarely used files
- Regularly clean the recycle bin and temporary files
FAQs About Check Disk Space Using PowerShell
If you have more doubts about checking disk space using PowerShell, follow our FAQs section to find answers.
1. What PowerShell script can I use to get the disk space report?
To get a disk space report through PowerShell, run the "Get-PSDrive" script, which will display information such as used and available disk space, total capacity, and used space.
2. How do I check disk space in CMD?
You can CMD to check the disk space. Follow the steps:
Step 1: To open Command Prompt as an administrator, first open the Windows Search bar. Then, type "Command Prompt" and click on the result that says "Command Prompt" with the "Run as administrator" option.
Step 2: Type wmic diskdrive get size and press Enter.
It shows you the total size of your hard drive.
3. Can I run PowerShell to check disk space on Windows Servers?
To check the disk space on Windows Servers, run the command "Get-DiskSpaceReport" in PowerShell.
The script will collect Windows Server info and save it as a CSV file on the local disk in C:\Temp\DiskSpaceReport.
Related Articles
- What Is Ext2/Ext3/Ext4 File System Format? What's The Difference [Full Guide]
- How to Reset Windows XP Passwords [Full Guide]
- DiskPart Format: How to Format Hard Drive Using DiskPart [Free]
- 10 Best Free ISO Burner Software for Windows [New Checklist]
- How to Fix Windows 11 Won't Install from USB | 2024 Guide🔥
This article provides eight efficient ways to fix the 'Windows 11 won't install from USB error, along with possible reasons to avoid the error and successfully install Windows 11 from USB. - Windows Boot Manager Not Showing in BIOS | Fixed
Discover how to fix the issue of Windows Boot Manager not showing in BIOS. Our step-by-step guide will help you resolve this problem and get your computer back up and running smoothly.