How to Make MSI Boot From USB | Best Tutorial🔥
MSI (Micro-Star International) laptops can deliver an unrivaled gaming experience. If your MSI laptop is experiencing issues such as a black screen or not working as expected, you can try booting it from USB to prevent crashes and failure to boot.
Qiling Software will guide you on how to make your MSI boot from USB on Windows 11/10 through a tutorial, and also provide additional troubleshooting to help resolve issues with booting MSI from a bootable USB.
| ⏱️Duration | 3-6 minutes of reading |
| 💻Applies to | Get the MSI boot from USB on Windows 11/10/8/7 |
| ⛏️ Tools |
✔️USB ✔️Professional tool - Qiling Disk Master ✔️MSI laptop or desktop |
| 🖌️ Stages |
1️⃣Stage 1. Access the Boot Device Menu 2️⃣Stage 2. Select Boot from the USB 3️⃣Stage 3. Set Up MSI to Boot from USB |
Preparations for MSI Boot From USB
To boot your MSI laptop from USB and install Windows, prepare your computer by ensuring the USB drive is properly formatted and contains a valid Windows installation media. You may need to disable Secure Boot and enable Legacy Boot in your BIOS settings to allow the USB drive to boot.
Stage 1. Prepare the USB
Please prepare at least 16GB of free space on the USB and format USB to FAT32:
- Right-click on the Windows icon and find Disk Management.
- Locate the USB drive, right-click, select "Format," and set it to FAT32 format.
Stage 2. Make a Windows Bootable USB
There are two scenarios for making a Windows bootable USB:
- To create a bootable installation USB, download the Windows ISO file and burn it to a USB drive, allowing you to install Windows from USB and potentially resolve issues such as system crashes or boot errors.
- To run a boot computer on MSI without installing Windows, you can create a bootable USB drive by cloning your Windows system to USB, or use a Windows installation tool or third-party tool to create a bootable USB.
To create a bootable USB, follow these steps: First, download a tool like Rufus or Etcher, which will help you create a bootable USB drive. Next, insert the USB drive into your computer and run the tool, selecting the USB drive as the target.
Guide 1. Creating a Bootable Installation USB
We prefer to use Qiling Disk Master Professional to create bootable installation media and then reinstall Windows OS on MSI.
Download the Windows ISO file: https://www.microsoft.com/en-us/software-download/windows11
Download the ISO burning tool:
The tool provides easy-to-use methods, even if you are a novice, you can finish mastering the operation skills:
Steps to create a bootable installation USB:
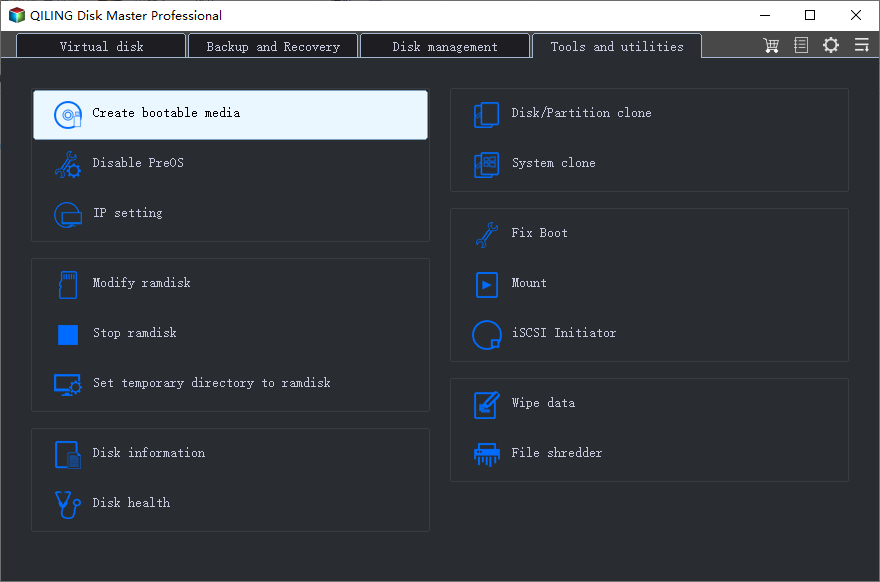
Step 1. Launch Qiling Disk Master and go to the Tools section, then click "Create Bootable Media" to start.
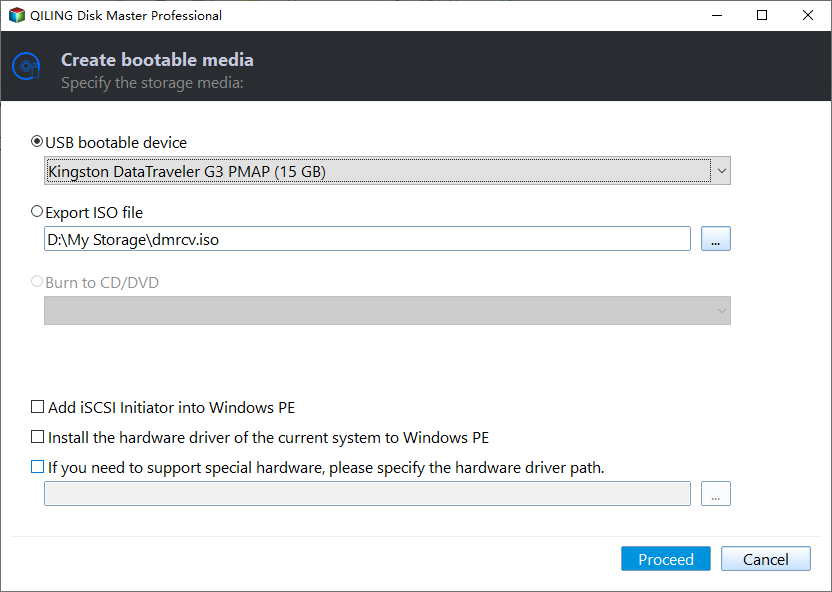
Step 2. Select the target USB as destination and click "Proceed" to execute the operation.
Guide 2. Creating a Bootable USB
To create a bootable drive, you can use Qiling Disk Master to migrate Windows OS to USB, making it possible to boot from the USB drive.
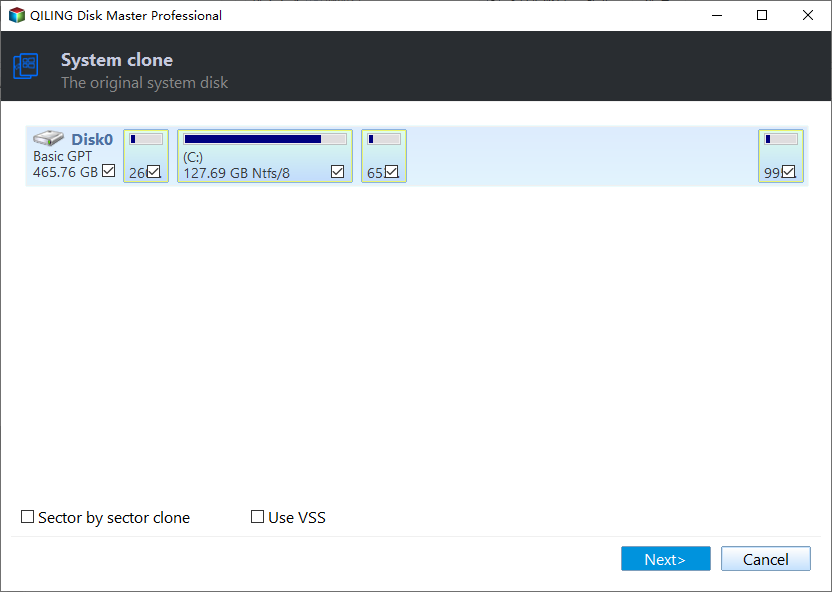
Step 1. To clone an OS disk, launch Qiling Disk Master, go to the Disk Clone tab, select "Clone OS Disk" and click "Next".
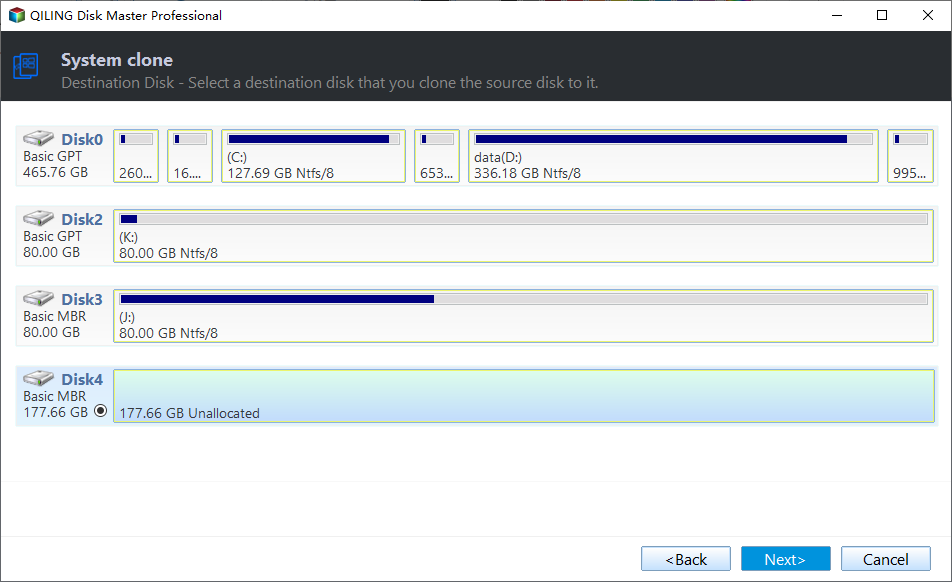
Step 2. Select the target new drive where you want to clone the OS to, and click "Next".
Step 3. To start the OS cloning process, view the disk layout and click the "Start" button.
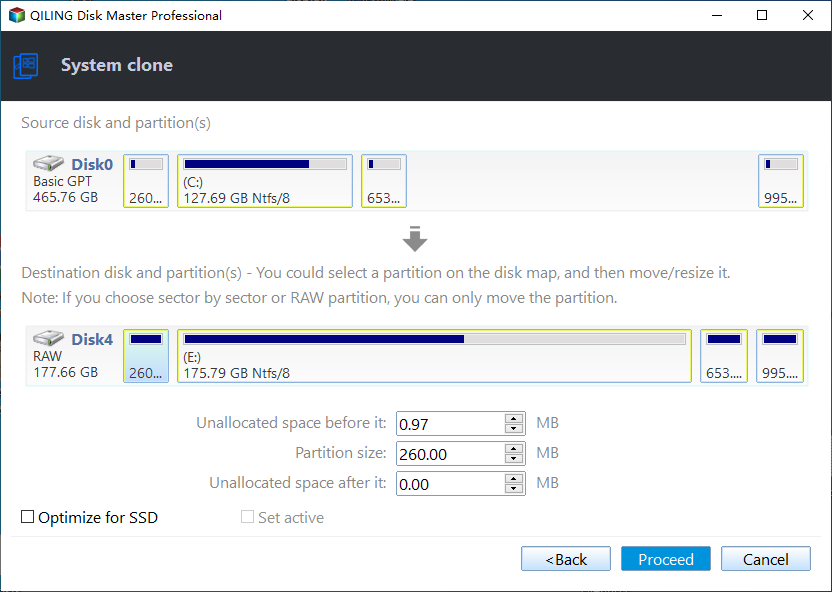
The user wants to confirm that they want to continue the OS disk cloning process.
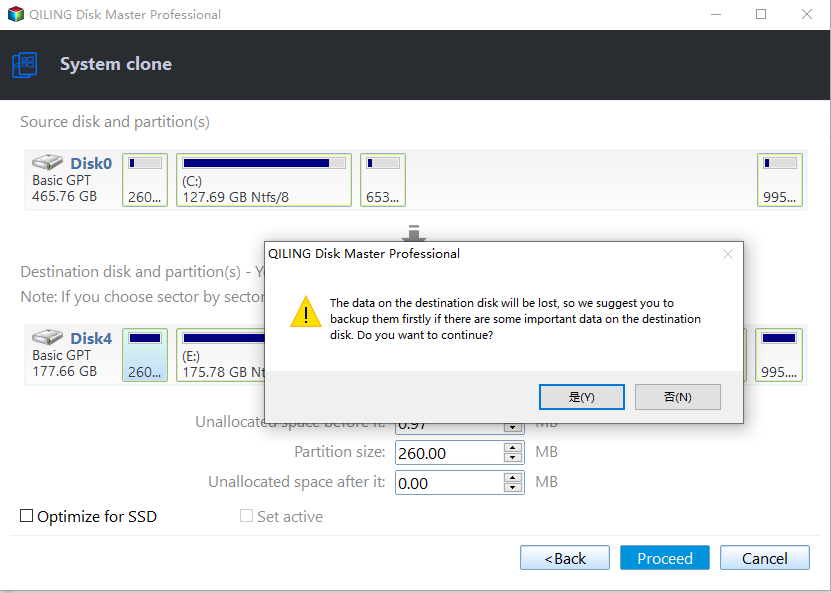
Step 4. When the process completes, you'll see a confirming message asking if you want to start up your computer from the clone target disk.
- Reboot Now To "reboot and reconfigure" means to restart your computer and set it to boot from a new storage device, such as a hard drive or solid-state drive, immediately after the reboot. This process allows you to switch the operating system to run from the new device, effectively replacing the old one.
- Done means you want to make the changes later.
You can also use Qiling Disk Master, a program specifically designed for Windows bootable purposes, in addition to the other methods mentioned earlier.
Read more: How to create a bootable USB
When you're ready, use the bootable USB to boot your MSI laptop. Once you're done with the steps above, read on to proceed. If you find this guide helpful, share it with others who need it.
How to Boot from USB on MSI Motherboard
To boot your MSI laptop from a USB drive, follow these 5 stages: Stage 1: Prepare a bootable USB drive with a compatible operating system, Stage 2: Enter the BIOS settings by pressing the designated key (usually F2, F12, or Del) immediately after powering on the laptop, Stage 3: Set the USB drive as the first boot device and save the changes, Stage 4: Save and exit the BIOS settings, and Stage 5: Your MSI laptop will now boot from the USB drive.
Stage 1. Access the Boot Device Menu
Open the laptop, and when the MSI logo appears, press F11 repeatedly.
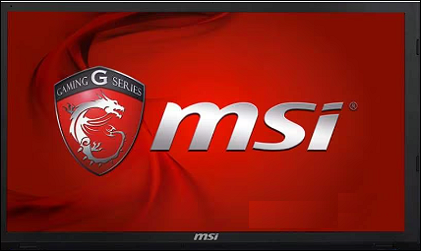
To access the boot menu, press the key that opens it, usually F2, F12, or Del, depending on the computer. Once in the boot menu, select the option to boot from the USB flash drive, which should be labeled as the installation media. This will allow the computer to boot from the USB drive and proceed with the installation process.
Stage 2. Select Boot from the USB
To boot from a USB drive, locate the bootable USB drive in your computer's boot menu, and select it as the device to boot from.
To make the MSI laptop boot from a USB, press Enter to start the process. This will initiate the boot sequence, allowing the laptop to recognize and load the USB drive as the primary boot device. Once initiated, the laptop will display a message indicating that it is booting from the USB drive.
Stage 3. Set Up MSI to Boot from USB
1️⃣. Reboot the MSI laptop.
After the MSI logo appears, press F11 repeatedly to open the Boot menu.
3️⃣. In the Boot menu, select the option to boot from a USB device. This will allow you to boot from the USB drive and access the operating system or other software stored on it.
4️⃣. To boot the MSI laptop from the USB drive, insert the USB drive into the laptop's USB port. Press the power button to turn on the laptop.
Stage 4. Enable MSI to Boot from USB
Once you have successfully set USB as a bootable drive, you can use it to boot your computer, following the on-screen instructions to complete the installation process.
1️⃣. Shut down the MSI computer.
Press and hold the Esc key and the Power button to boot the MSI.
3️⃣. Keep holding the Esc key until BIOS SETUP UTILITY appears.
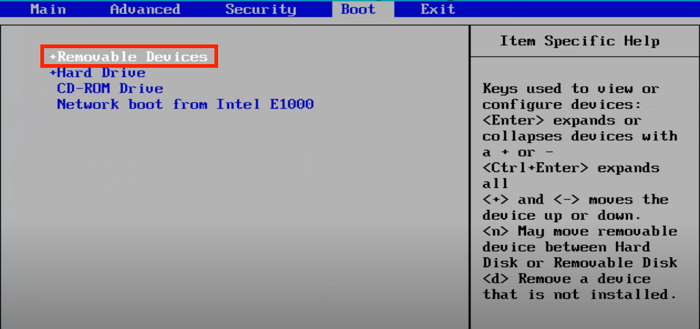
4️⃣. To boot the MSI system from a USB drive, select the "Under the Boot" option and choose the USB drive. Then, press and hold the Enter key to initiate the boot process.
Stage 5. Adjust Boot Priority in MSI BIOS
After booting your MSI laptop from the USB drive, adjust the boot priority by setting the USB drive as the highest priority in the BIOS settings. This will ensure that the system boots from the USB drive first, and if it's not present, it will boot from the next highest priority item, allowing you to build your system.
1️⃣. Turn on your MSI notebook and press Del/F2 repeatedly.
2️⃣. Go to the MSI BIOS setup menu.
3️⃣. Set the boot order of the USB:
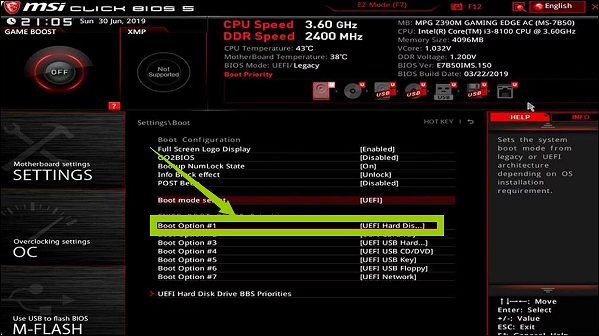
- The MSI BIOS defaults to EZ mode, and to use a USB drive, you need to drag and drop it to the first position in the "Boot Priority" section.
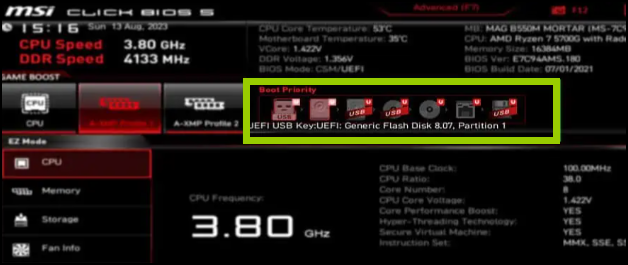
- To switch to the advanced mode interface, press F7. Then, navigate to Settings > Boot and set USB as the boot option 1.
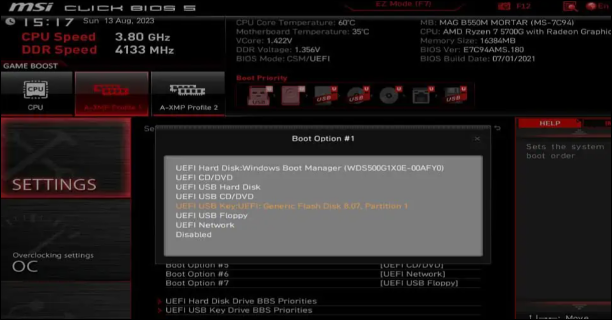
4️⃣. After setting the boot priority for your MSI laptop, press F10 to save the changes and exit the BIOS.
If you want to reinstall Windows via the created bootable USB, you can set the USB as a boot order by following the above steps, and then refer to the article on reinstalling Windows for further instructions.

How to Install Windows 10 from USB Drive
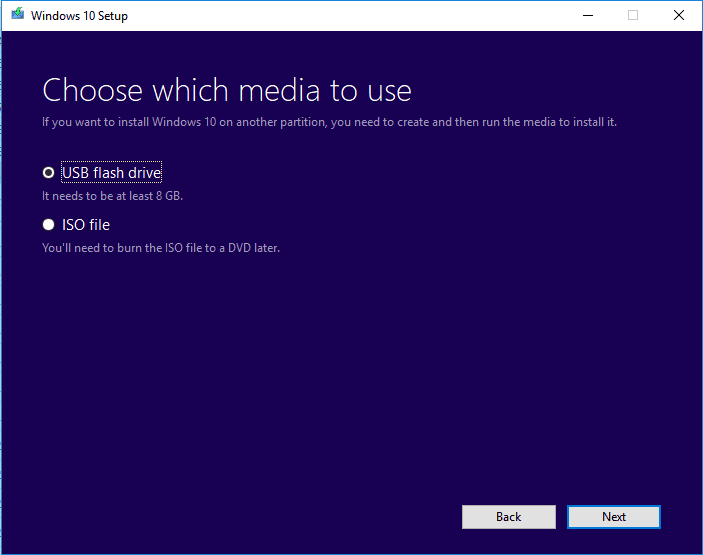
This tutorial focuses on installing Windows 10 from a USB drive, which is a convenient option when your computer doesn't have a CD drive. You can use either Qiling Disk Master or the Windows Media Creation Tool to create a bootable USB drive and install Windows 10.
Bonus Tip: Fix Unable to Boot MSI from Bootable USB
It is not difficult to burn Windows ISO to USB using Qiling Disk Master, then set the USB boot sequence on an MSI laptop so that it can boot from USB, but sometimes the BIOS fails to detect the bootable USB, which requires quick troubleshooting.
1. First, please check the cables and power supply board and solve any other hardware problems, such as USB port corruption or USB drive corruption.
2. Disable Fast Boot and Safe Boot to prevent USB detection and booting with unauthenticated devices.
3. The USB's target system (Legacy/CSM/UEFI) and partition style (MBR/GPT) must match your current system configuration, so if they don't, you'll need to convert the partition style from MBR to GPT or vice versa.
4. Updating the BIOS can resolve issues with an unbootable USB, as outdated BIOS versions may be the cause.
5. Resetting the CMOS battery can clear all non-default BIOS settings, potentially allowing the MSI to boot again.
6. When attempting to create a bootable USB, it's recommended to use a professional tool such as Rufus or Etcher instead of relying on built-in functionality. This ensures a more reliable and efficient process, reducing the likelihood of errors or failures.
I hope these tips help solve your problem! If you find them useful, feel free to share this tutorial with others.
Conclusion
If your MSI laptop system crashes and won't boot, try booting from a USB flash drive and reinstalling Windows OS. You can create a bootable installation media or USB using Qiling Disk Master, which offers two methods for doing so. If the bootable USB doesn't appear in the BIOS, you can try some quick fixes.
FAQs About MSI Boot from USB
To boot MSI from a USB drive, you'll need to create a bootable USB drive with the MSI installer using software like Rufus, which allows you to create bootable USB drives for various operating systems, including MSI. Once created, you can boot your computer from the USB drive and follow on-screen instructions to install MSI, noting that you may need to enable the USB boot option in your computer's BIOS settings beforehand. The process is generally straightforward and can be completed in a few steps.
1. How to boot into MSI BIOS?
You can enter the MSI motherboard BIOS by pressing the designated boot menu key, which varies depending on the specific MSI motherboard model. The boot menu key is usually indicated in the user manual or on the motherboard itself. Once you enter the BIOS, you can configure various settings, including the boot order, to ensure your system boots correctly.
To access the BIOS settings on your computer, you need to reboot it and press and hold the Delete key (or F2, depending on your computer model) as soon as it starts booting. This will take you to the BIOS settings menu, where you can make changes to the boot order, configure hardware settings, and more.
After changing the BIOS settings, press Esc to save the changes and exit.
2. How to boot Windows 10 from USB in MSI?
Before booting from USB, set the USB drive as the bootable media and connect it to your MSI computer.
Step 1. To enter the BIOS setup, you should reboot your computer and immediately start pressing the Delete key repeatedly. This will allow you to access the BIOS settings, where you can make changes to your computer's boot order, configure hardware settings, and more.
Step 2. To set the boot mode to UEFI, navigate to the Boot tab in the BIOS setup and select the UEFI option.
Step 3. After saving the settings, reboot and press "F11" repeatedly to enter the boot menu.
3. How to install Windows from USB in MSI?
To create a bootable installation media, use Qiling Disk Master to create a bootable installation CD. Once the CD is created, boot from the installation CD.
Step 1. To boot your computer from a USB drive, you need to reboot your computer and enter the boot menu when the MSI logo appears. Then, select the option to boot from the USB drive.
Step 2. Set the language, date, etc., and click Next.
Step 3. To install the software, select Install Now and follow the on-screen instructions to continue the installation.
Related Articles
- How to Check Samsung SSD Health on Windows [100% Working Solutions]
- SD Card Shows Read Only? See How to Fix It (4 Solutions)
- Extend System Partition into Non-Contiguous Space with Freeware
If you're unable to add unallocated space to your C drive in Windows, you can use free partition software to extend your partition into non-contiguous unallocated space. This allows you to utilize free space that's not adjacent to your C drive, effectively expanding your C drive's capacity. - Best Gptgen Alternative for Windows OS
Qiling Disk Master is a tool that can convert a disk from MBR to GPT or vice versa without losing any data, making it a good alternative to Gptgen in Windows. - How to Permanently Assign Drive Letter with Ease?
A permanent drive letter prevents us from being confused with multiple USB drives. Then, how to permanently assign drive letter with ease? This post offers three effective ways to make it. - Fix Guide of Recovery Blue Screen on Windows 10
Here's a fix guide of recovery blue screen on Windows 10 to provide suitable solutions for users to repair different blue screen errors.
Products
Articles & Tutorials
- Data Recovery
- Data Backup
- File Recovery
- File Backup
- System Backup and Restore
- Disk and Partition Clone
- Technical articles
- Mobile articles
- Disk Master Help
- Windows Data Recovery Tutorials
- Windows Secure Delete Tutorials
- Windows Partition Management Tutorials
- Windows File Backup and Restore Tutorials
- Windows System Backup and Restore Tutorials
- Windows Disk Backup and Restore Tutorials
- Windows Clone Tutorials