How to Partition A USB Drive Windows 10 [Step-by-Step Guide]
Hard drive partitioning involves dividing a single hard drive into multiple separate areas for efficient file management and use. This is similar to how a USB drive, a common storage device, is used for storing data and files.
Partitioning a USB drive is a process that allows users to divide the drive into multiple sections, each with its own file system, to better organize and manage their data. This can be useful for various reasons, such as having separate partitions for different types of files, like videos, documents, or photos, or for creating a portable operating system on a USB drive. To partition a USB drive in Windows 10, users can use the built-in Disk Management tool, which can be accessed by searching for "Disk Management" in the Start menu, and then selecting the USB drive from the list of available disks.
Why Do I Need to Partition A USB Drive Windows 10
Partitioning a USB drive is a way to manage it by shrinking, expanding, deleting, or creating partitions, but it's usually not necessary for a new one. However, there are reasons why you might want to partition a USB drive, such as to better organize your files and data.
- Create a bootable USB
- Make the most of the space on the USB
- Modify the file system format of the USB
- Organize the storage volumes of a USB drive
Partitioning a USB drive is not a difficult task. In the next section, I shows you how to partition a USB drive Windows 10.
How to Partition A USB Drive Windows 10 – Three Ways
There are three ways to partition a USB drive in Windows 10: using the built-in Disk Management tool, the built-in Diskpart command, or professional partitioning software such as Qiling Disk Master.
To partition a USB drive, users can use Qiling Disk Master, a user-friendly tool that makes the process easy for all users.
For experienced users, partitioning a USB drive can be done via the Disk Management utility. This method allows for more control over the partitioning process, including the ability to resize or delete existing partitions, and create new ones. To access Disk Management, press the Windows key + R to open the Run dialog, type `diskmgmt.
There are three ways to partition a USB drive. The easiest method is to use the built-in Disk Management tool in Windows, which allows users to create and manage partitions on their USB drive. The second method, using a third-party partition manager software, is also relatively easy and provides more advanced features.
If you're new to computer operations, I highly recommend Qiling Disk Master, a reliable and all-in-one disk management software that simplifies the process of partitioning a USB drive.
Let's take a look at how these three methods work.
Way 1. Partition A USB Drive via Qiling Disk Master
Qiling Disk Master is a professional disk partition tool that can improve USB performance by partitioning USB drives, and also remove limitations of Windows disk tools, such as creating FAT32 partitions larger than 32GB.
To partition a USB drive, first, ensure it is safely removed from your computer. Next, connect the USB drive to your computer and open the Disk Management tool.
Step 1. Launch Qiling Disk Master and navigate to the Partition Manager section to check for free space.
- If your hard drive has unallocated space, you can skip to Step 3 to create a partition, as this space is not being used by the operating system.
- If the hard drive has no unallocated space, the next step would be to delete or resize existing partitions to free up space for the new installation. This might involve deleting unnecessary partitions, resizing existing ones to make room, or even merging partitions to create a single, contiguous block of unallocated space.
Step 2. Shrink a disk partition to create unallocated space.
Right-Click on the target drive partition with a lot of free space and select "Resize/Move".
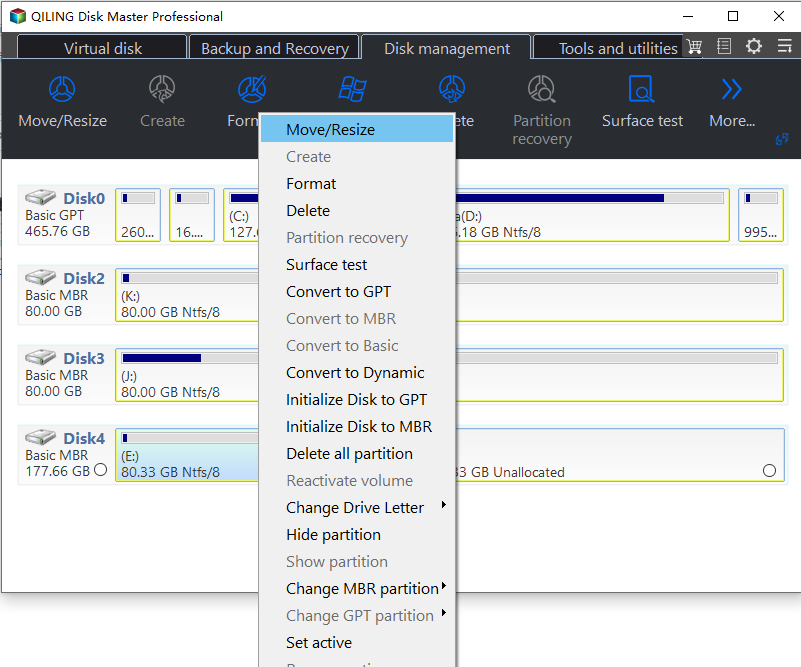
To free up enough unallocated space, drag either end of the partition in the desired direction, either rightwards or leftwards. This action will decrease the partition size, and you can monitor the progress in the "Partition size" area, which will display the amount of space that has been reduced.
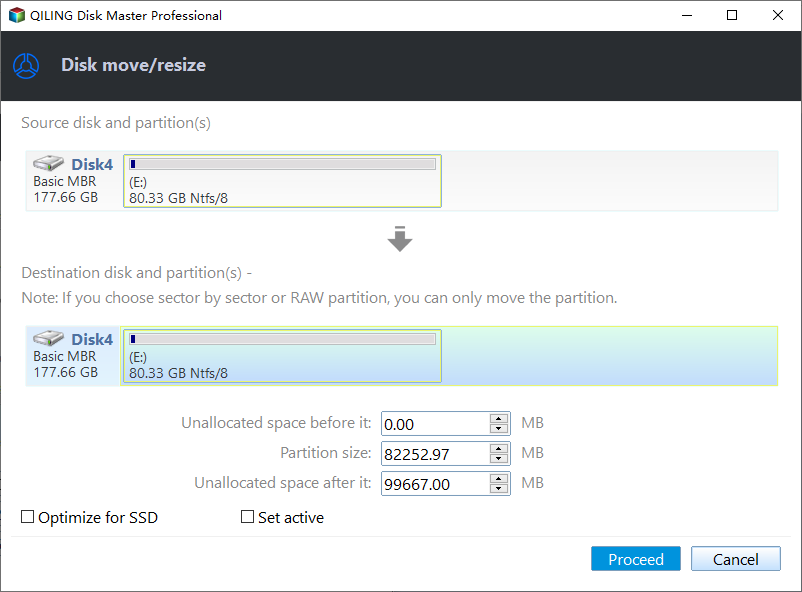
Click "Proceed" to save all the changes.
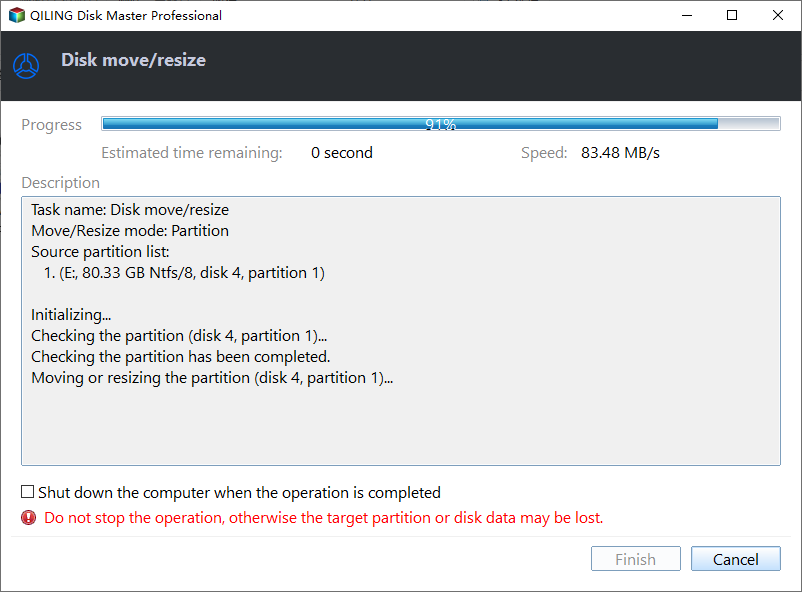
To proceed, go back to Partition Manager, where you should see unallocated space appearing on the same disk. From there, you can create a new partition on your hard drive.
Step 3. Create a new partition with unallocated space on the target hard drive.
Right-click on the unallocated space and choose "Create".
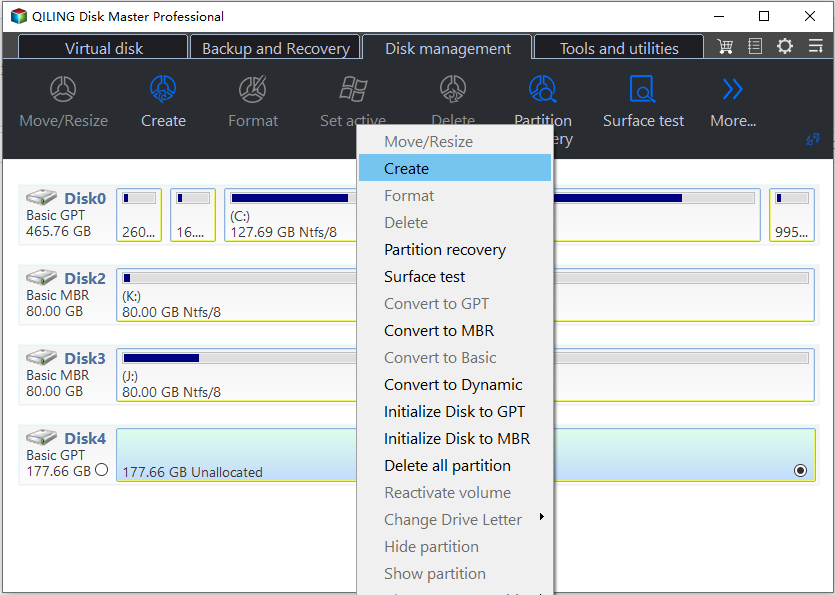
In the Advanced Settings, you can customize various partition settings such as partition size, drive letter, partition label, file system type (NTFS, FAT32, EXT2/3/4, exFAT), and other options.
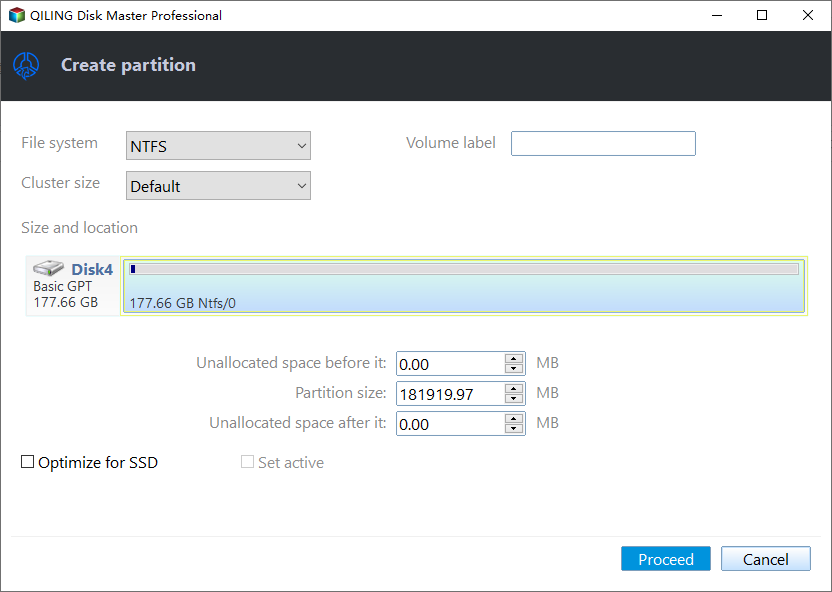
To create multiple partitions on a hard drive, first, open the Disk Management tool. Select the hard drive you want to partition and right-click on it. Choose "New Simple Volume" and follow the prompts to assign a drive letter and file system.
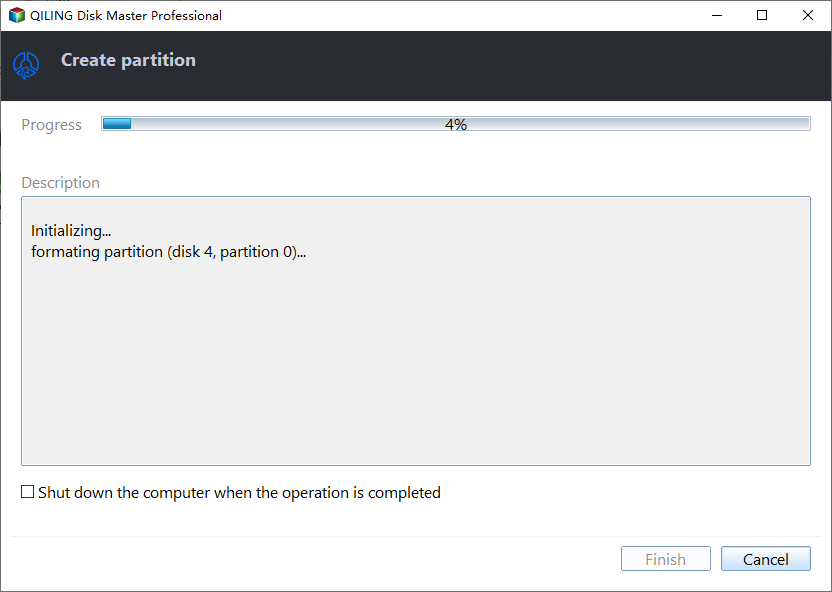
Qiling Disk Master is a powerful tool that allows users to manage disks and partitions, and also has the capability to repair corrupted USB drives, providing a solution to any problems that may arise.
Way 2. Partition A USB Drive via Disk Management
Disk Management is a Windows 10 tool that enables users to manage and partition their USB drives, allowing them to shrink, expand, or create new partitions.
Step 1. Connect the USB drive you want to partition to your Windows computer.
Step 2. Right-click on the Windows icon and select "Disk Management."
Step 3. To partition a USB drive, locate the drive, right-click on its unallocated space, and select "New Simple Volume."
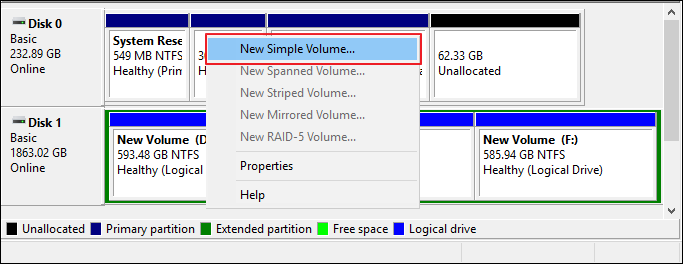
- Tip
- If your USB drive is larger than 2TB and the "New Simple Volume" option is greyed out, it may be due to the disk format being MBR, which cannot support volumes larger than 2TB. To resolve this, you can use Qiling Disk Master to convert the MBR disk to GPT, allowing you to create a new simple volume on the larger USB drive.
Step 4. Set the volume size to be created and select "Next."
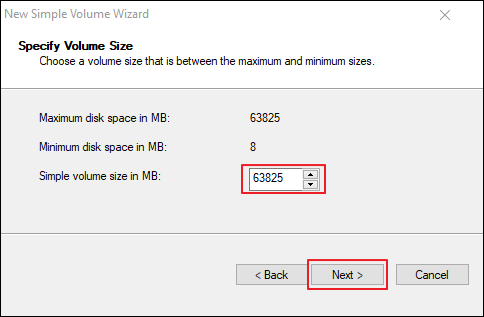
Step 5. Set the drive letter for the USB drive and select "Next."
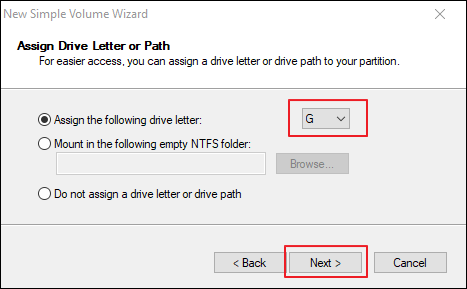
Step 6. Set the file format of the USB drive and click Next.
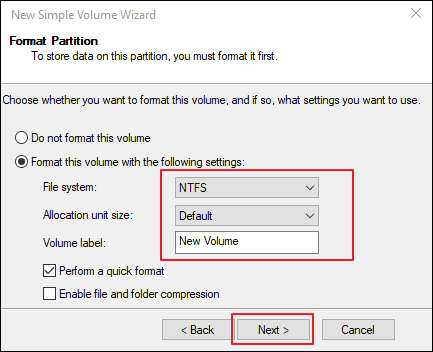
Step 7. Click "Finish" to finish partitioning the USB drive on Windows.
Way 3. Partition A USB Drive via Diskpart
Diskpart command is a tool provided by Windows for advanced users, allowing them to perform complex operations on USB partitions using the command line interface. However, the command itself is intricate and must be entered with care to avoid errors.
Step 1. Right-click the Windows icon and open the "Run" window.
Step 2. Type "diskpart" and press Enter.
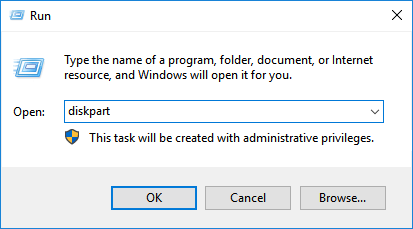
Step 3. Type the following commands in turn and press "Enter" after each command.
list disk (view all disks)
select disk 1 (select USB drive)
create partition primary size=20480 (set the size of the USB partition)
assign letter=H (assign a disk letter to the USB partition)
format fs=ntfs (set the file format of the USB partition)
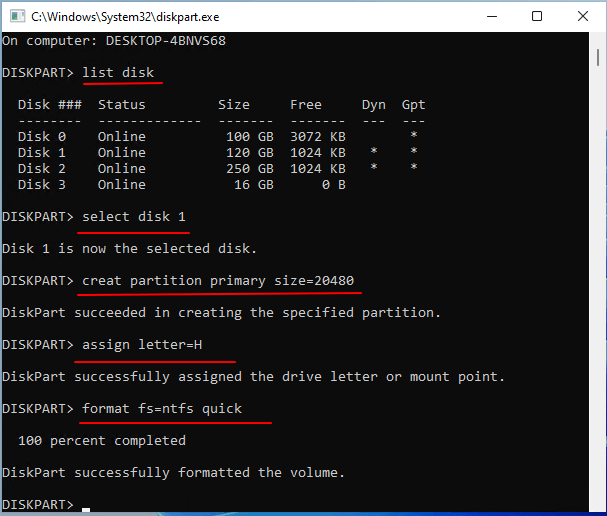
Step 4. To end the partitioning of the USB, type "exit" and press Enter.
Conclusion
Partitioning a USB drive is a necessary step in utilizing its full potential, and Qiling Disk Master offers a reliable solution for various partitioning needs. With its user-friendly interface, it makes the process easy and efficient.
Diskpart and Disk Management can meet basic partitioning needs, but for more complex USB partitioning, continue reading the next section for further guidance.
FAQs About How to Partition A USB Drive Windows 10
This section addresses three common questions about USB drives, providing helpful information for users.
1. Can a USB flash drive be partitioned?
USB flash drives can be partitioned, allowing for the creation of new partition spaces on a new USB or shrinking the existing partition to free up space for further partitioning.
2. How do I create a one USB drive partition?
To partition a USB drive, you can use one of three methods. The simplest approach is to utilize Qiling Disk Master, which can easily partition the USB. Alternatively, you can employ Disk Management to create partitions on the USB drive.
Step 1. Connect the USB drive to the PC.
Step 2. To create a new simple volume on the unallocated space of a USB drive, select the unallocated space and choose the option "New Simple Volume."
Step 3. To finish partitioning the USB drive, follow the wizard to set the size and drive letter.
3. How do I make my USB a FAT32 partition?
If your USB drive isn't partitioned in FAT32 format, you can use Qiling Disk Master to convert NTFS to FAT32 without losing data, or use Disk Management's "Format" function.
Related Articles
- How to Create EXT2/EXT3 Based Linux Partition from Windows
- Boot Device Not Found? Follow to Fix 'No Bootable Devices Found' Error
- Your Best Guide for SSD Speed Test on Windows 10 | Step-by-Step Guide 2024
- How to Transfer OEM Windows 10 to A New PC [Easy & Quick]
- 6 Solutions to External Hard Drive Not Initialized in Windows 10, 8, 7
Sometimes, you may find your external hard drive is not initialized and cannot be opened. Refer to this post, it will demonstrate 6 solutions to "external hard disk not initialized" in Windows 11, 10, 8, 7. - How to Open Disk Management in Windows 11, 10, 8, 7, XP or Vista [4 Ways]?
Here list four ways to open Disk Management in Windows 10, 8, 7, XP, and Vista.
Products
Articles & Tutorials
- Data Recovery
- Data Backup
- File Recovery
- File Backup
- System Backup and Restore
- Disk and Partition Clone
- Technical articles
- Mobile articles
- Disk Master Help
- Windows Data Recovery Tutorials
- Windows Secure Delete Tutorials
- Windows Partition Management Tutorials
- Windows File Backup and Restore Tutorials
- Windows System Backup and Restore Tutorials
- Windows Disk Backup and Restore Tutorials
- Windows Clone Tutorials