How to Fix Seagate External Hard Drive Write Protected
"I took a Seagate external hard drive from a friend to transfer some games. I cannot move, copy, or remove any files from the drive after connecting it to my laptop, causing problems. I'm looking for help to address this rambling issue. - from Microsoft"
If your Seagate external hard drive has write-protected attributes, you won't be able to transfer or change the data. To gain complete control, you'll need to make the drive writeable. Fortunately, Qiling Software offers five efficient solutions to fix the Seagate external hard drive write-protected issue in Windows.
| ⏱️Duration | 5 - 10 minutes of reading |
| 🎈Goal | Remove write protection from Seagate external hard drive |
| ✂️Required Tools | Windows PC, Seagate external hard drive |
| 🧑💻Solutions |
Follow the detailed guide to retrieve your drive's access.
How to Fix Seagate External Hard Drive Write Protected
If your Seagate external hard drive is write-protected, there are several solutions to fix the issue. You can try any of the five most efficient methods to remove the write protection manually, but we recommend using a handy tool for beginner Windows users.
Method 1. Take Full Control of Seagate Disk via Property Security Tool
To resolve the write-protected error on your Seagate External drive, you can use the built-in Properties security tool in Windows. Here's how: right-click on the drive, select "Properties", then click on the "Security" tab. Look for the "Deny" column and check if any permissions are set to "Deny" for the "Everyone" group. If so, click on the "Edit" button next to "Everyone" and change the permissions to "Allow" for the "Everyone" group.
Step 1: Connect your computer to the hard drive.
Step 2: Open File Explorer, and select the Seagate drive from the "Devices and Drives" section.
Step 3: To view the properties of a drive, right-click the drive and select "Properties" from the context menu. Alternatively, you can use the keyboard shortcut "Alt + Enter" to expand the drive's properties.
Step 4: The top menu should have a "Security" tab selected.
Step 5: To add a user to a group, click on the "Edit" button under the "Group or User Names" section.
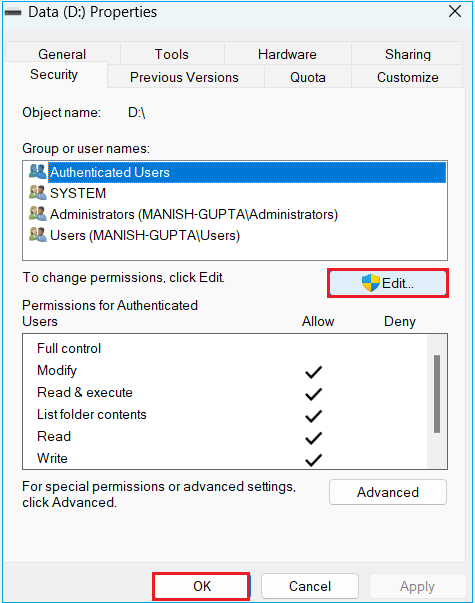
Step 6: Select the permission as "Everyone."
In addition, click your username to see the permissions.
Step 7: If you can't find your username on the list, click the "Add" button and enter your name.
Step 8: Tick the "Full Control" checkbox and click "OK."
Step 9: Select "Apply" and wait till it changes the permissions.
Step 10: Click "OK" and close the window.
If you're experiencing issues with editing data, first check if it's editable. If the problem persists, consider using a specialized tool like a database editor or a data manipulation software to assist with the editing process. These tools can provide a more detailed and controlled environment for making changes to the data, which may help resolve the issue.
Method 2. Remove Write Protection from Seagate
Fixing the write protection issue of an external or internal drive is easily done with a user-friendly tool designed to handle hard drive problems. This tool is suitable for Windows users of all skill levels and can be used without prior experience. For those who don't want to go through complex procedures, Qiling Disk Master is a convenient option.
The tool provides an easy-to-use interface and various features that make it simple to manage disks. Its "Remove write protection" feature is particularly helpful for Windows users, allowing them to regain full access to their hard drives with just a few clicks. This feature is especially useful for beginners, as it can quickly restore access to any drive, and it supports all Windows versions and storage formats.
To fix the Seagate external hard drive write-protected problem, download Qiling Disk Master and follow its steps to automatically resolve the issue.
Download and install Qiling Disk Master, then navigate to the "Disk management" section and click on "Advanced" followed by "Remove disk readonly".
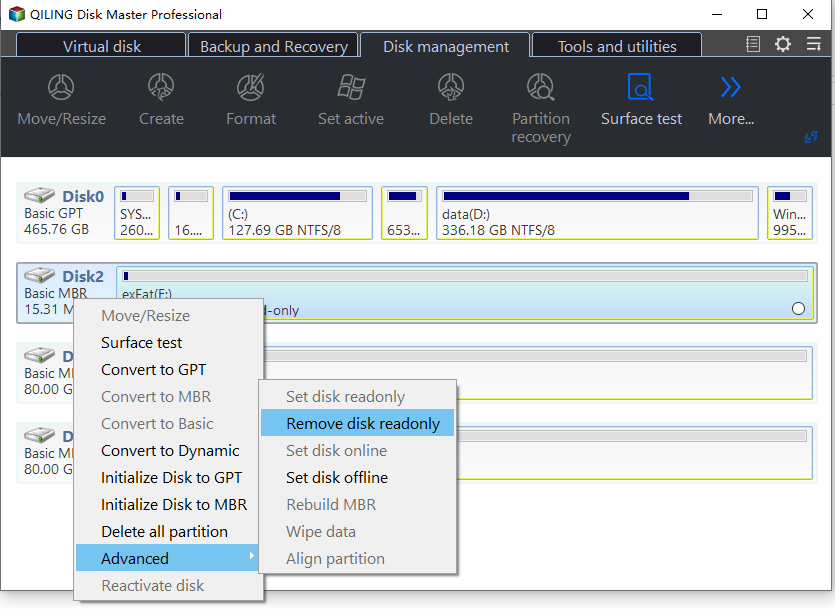
In addition to the previous scenario, there are other situations where Qiling Disk Master can be used to remove write protection. These include situations where write protection is applied to a disk or partition for security or data integrity reasons, and the user needs to modify or delete files on the protected disk or partition.
Method 3. Clear Read-Only State via CMD
To remove the read-only state of an external drive, simply use basic CMD commands. If you're familiar with them, go through the following steps:
Step 1: Using the Windows key, enter "Command Prompt."
Step 2: Simply click it and choose "Run as administrator."
Step 3: Type the following commands after each order and press "Enter."
- diskpart
- list disk
A list of connected disks will be shown on the screen.
Step 4: 1
Select disk 2
Step 5: Type the given command and hit "Enter."
attributes disk clear read-only
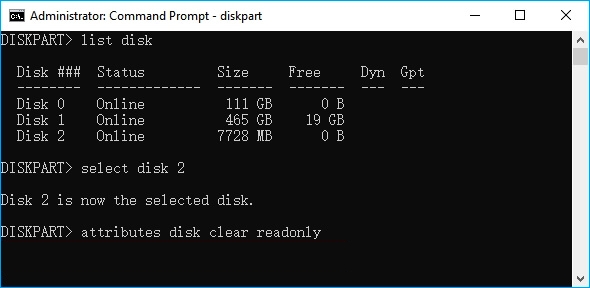
The command will remove the read-only attributes from your external disk, allowing you to write data on it.
Method 4. Use Windows Registry to Remove Write Protection
The Windows Registry is a utility that can fix disk-related errors, but it's a complex process that's not recommended for those without basic computer knowledge, as one wrong step can cause significant issues, including data loss. To remove write protection from an external drive using the Registry, you'll need to follow a series of steps, which are best avoided unless you're confident in your ability to navigate the process safely.
Note* Please follow each step carefully.
Step 1: Press the "Win + R" keys to open the run dialog box. In the Run dialog box, type "cmd" and press Enter to open the Command Prompt.
Step 2: Click the run search box, type "regedit," and press "Enter."

Step 3: Select "HKEY_LOCAL_MACHINE" and click "System."
Step 4: Click "CurrentControlSet" and then select "Control."
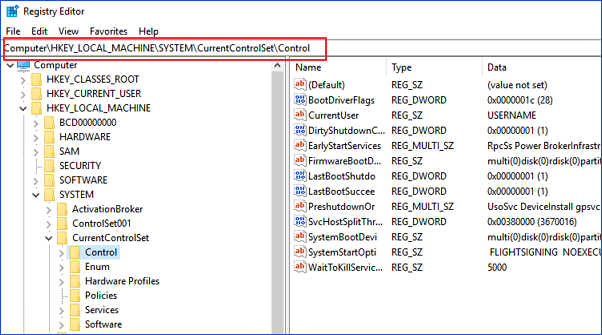
Step 5: Click "StorageDevicePolicies" and modify the DWORD value as 0.
Step 6: Select "OK" to save changes and close the Registry menu.
Step 7: Restart your computer and check if the write-protected state is removed.
Wait for the computer to restart. Then, check if your device is accessible.
Method 5. Turn Off BitLocker to Remove Write Protection
BitLocker encryption may cause the write-protected issue of the Seagate external hard drive due to its data encryption feature, which stops users from writing data on the drive. To resolve this, follow these steps to remove BitLocker's write protection.
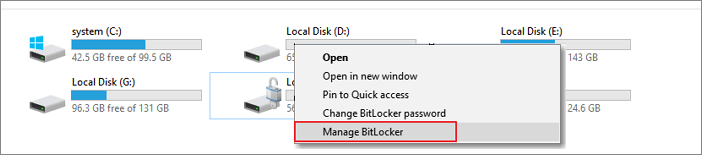
Step 1: To access the Seagate External drive, press the Windows key + E on your keyboard to open File Explorer, then select the Seagate External drive from the list of available drives.
Step 2: Right-click the drive and select "Manage BitLocker."
Step 3: Choose the locked drive and click "Turn off BitLocker."
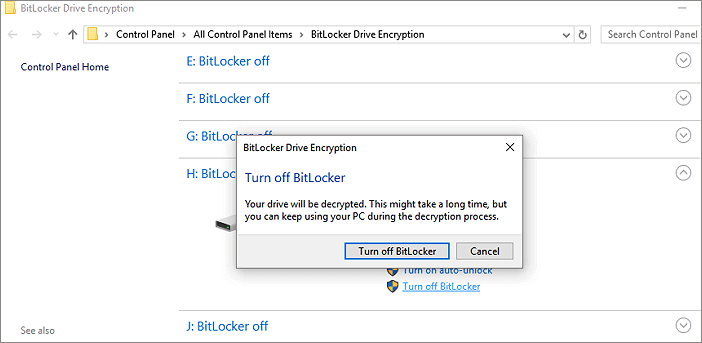
The decryption process may take some time, so wait until it's over.
When BitLocker protection is disabled, the Seagate hard drive is no longer write-protected, allowing for seamless data management. This means you can access and modify your files without any restrictions. If you found this guide helpful, consider sharing it with your friends by clicking the buttons.
Why Seagate External Hard Drive Write Protected?
The primary cause of a write-A protected drive is a drive that has been encrypted or has had its attributes modified to be read-only, preventing unauthorized access. This means only authorized users can add or modify data on the drive. Additionally, if a drive is not write-protected, it may develop corrupted or damaged sectors over time.
- Seagate external drives may become read-only due to various reasons, including corrupted firmware, incorrect drive configuration, or a faulty drive. In some cases, the drive may be set to read-only mode by the operating system or a third-party application.
- Lack of authority to access the drive's data
- Seagate external drive is write-protected
- Hard drive corruption or has bad sectors
- Write-protect error caused by virus
- Third-party encryption software or malware causing write-protection errors
Further Reading: SD Card Write Protected But Not Locked
Conclusion
If your Seagate external hard drive is write-protected, we have solutions to help you. We've identified the possible causes of this issue and provided effective fixes, including using Qiling Disk Master for a less complicated solution. This tool can assist non-experienced Windows users in resolving the problem.
FAQs About Seagate External Hard Drive Write Protected
If you have questions about Seagate External Hard Drive write protection, explore the FAQs below for detailed answers.
1. How to fix Seagate's external hard drive read-only on Windows?
If your hard drive is read-only, there are several ways to fix it. You can quickly check for hardware write-protection switches, or use a tool like Qiling Disk Master to remove the protection. Alternatively, you can use a Diskpart command to resolve the issue.
attributes disk clear read-only
2. How do I change permissions on the Seagate external hard drive on Mac?
Here are the steps to change permissions on a hard drive on a Mac in one paragraph:
Step 1. Right-click a Seagate external hard drive and select "Get Info."
Step 2. To change the sharing and permissions settings, go to the "Sharing & Permissions" section, where you can adjust the access levels to meet your requirements.
3. Why is my external drive suddenly write-protected?
Your external drive may become unexpectedly write-protected due to a corrupt file system, a broken drive, or accidentally changed write-protection permissions. To fix the issue, right-click the drive and expand properties to check the access permissions.
Related Articles
- USB Flash Benchmark Download with Complete Review in 2024
- How Do I Clone Windows to SSD for Free? Your Reliable Guide
- How to Format My 1TB Hard Drive to FAT32? 2024 Guide for Beginners
- A Powerful PC Junk Cleaner for Windows 10 And 11
How to make the computer run faster? An excellent PC junk cleaner for Windows 10 can help you, which can remove all kinds of junk files to free up more space and improve computer performance. - Partition Manager Tutorials
You can find all you needed solutions to manage hard drive space in Windows. Qiling Partition Master is reliable partition manager that help you to resize and manage disk space. - Data Backup and Drive Clone Tutorials
Windows File Recovery Tutorials