How Do I Clone Disk in Windows Server? 2022 Full Guide
- Applies to:Upgrading and cloning a Windows Server disk to a larger, newer, and faster HDD/SSD without data loss involves a straightforward process. First, back up all essential data and applications to an external drive or cloud storage.
- Duration: 30 minutes - 1 hour.
- Support: Windows Server 2022, 2019, 2016, 2012/2012 r2, 2008/2008 r2, etc.
You can clone a Server hard drive to a larger or bigger new hard drive or SSD without data loss or Server OS reinstallation, following a complete guide specifically designed for Windows Server computers. This guide provides a step-by-step process to clone the disk, ensuring a seamless transfer of data and minimizing downtime.
If you have the same requests, follow the tips below and start your disk upgrade process now.
Before You Start: Get a New Hard Drive or SSD Ready
When experiencing issues with the Windows Server disk, it's time to clone and upgrade to a new server disk to resolve the problems and ensure a smooth operation.
- Data or system disk becomes full.
- A Windows Server computer can slow down as its disk space becomes full, leading to decreased performance and potentially causing system crashes. This is because the operating system has to work harder to manage the limited disk space, resulting in increased CPU usage and slower response times.
- The C drive in Windows Server is running out of space and there is no free space to extend it. This is a critical issue that requires immediate attention to prevent data loss and system crashes.
To clone a disk in Windows Server and upgrade to a larger or faster new HDD or SSD, first, prepare the new disk by formatting it with the same partition style as the old disk. Then, use a cloning software like Qiling to create an exact copy of the old disk on the new one, ensuring all data is transferred successfully. Once the cloning process is complete, you can remove the old disk and use the new one as a replacement, taking advantage of the increased capacity or performance of the new HDD or SSD.
To get your new disk ready, follow these quick guides: format the disk, install the operating system, install drivers and software, and configure the disk to work with your computer. This will ensure that your new disk is properly set up and ready for use.
- 1. Research and purchase a new mechanical hard drive or hybrid HDD-SSD with a larger storage capacity (e.g.
- If your goal is to move the Windows Server OS disk to a faster and larger SSD, you can consider the following approach. First, ensure the SSD is recognized by the system.
- Install and initialize the new disk in Windows Server when you get the new disk back.
To initialize a new disk in Windows Server, you can simply install the new disk and open Disk Management, where you can initialize the new drive.
1. Prepare the necessary materials, including a screwdriver, a hammer, and a drill.
Full Guide: Initialize SSD/HDD for Free
If you add a new disk to your PC and it doesn't show up in File Explorer, you may need to add a drive letter or initialize it before using it. In Windows and Windows Server, there are three ways to initialize an SSD or HDD: to add a drive letter, to initialize it, or to do both.
How Do I Clone a Windows Server Disk? 2 Reliable Methods Available Here
Here are two reliable methods to upgrade a disk in a Windows Server:
- To clone a disk in Windows Server using third-party disk cloning software, you would first need to download and install the software, such as Qiling Partition Master. Then, launch the software and select the source disk and the destination disk or storage device. The software will then create a sector-by-sector copy of the source disk to the destination disk, preserving the original disk's structure, files, and operating system.
- #2. Back-To restore a system from a backup using Windows Server Backup, follow these steps:
Which disk clone tool to choose? Here is Qiling Editors' pick:
- For a simpler approach, using a third-party disk cloning software like Qiling Partition Master Enterprise is more suitable for Windows Server administrators of different levels, offering an easier way out.
- Windows Server Backup is a built-in tool in Windows Server that allows you to create backups of your server's data and system, and then restore them to another drive or location. It's a 100% free way to migrate Windows Server disk data to another drive, making it a great option for those who want to avoid paying for third-party backup software.
- If you're trying to clone the entire Server OS disk to a new drive, the first solution can help you achieve this task and ensure that Windows programs and installed software are bootable after cloning.
Let's get started to clone your disk in Windows Server now.
#1. Clone Windows Server Disk with Qiling Disk Cloning Software
- Tool: Qiling Partition Master Enterprise is a 3rd party disk cloning software that offers a feature called Disk Copy, which allows for the cloning of entire disks.
- Supported: Windows Server 2022/2019/2016/2012/2008, etc.
To efficiently upgrade and clone a disk in Windows Server computers, utilizing reliable Windows Server disk clone software is recommended. Qiling Partition Master Enterprise, which features a Disk Copy function, allows for seamless cloning and upgrading of disks to a new one, making it an ideal solution for Windows Server users.
Qiling Partition Master Enterprise
Your trustworthy Windows Server disk manager.
- Extend System drive, combine/split partitions.
- Clone disk, migrate OS to HDD/SSD.
- Convert MBR to GPT, GPT to MBR, no data loss.
- 1-click adjust disk layout, create volumes at one time.
To clone a Windows Server disk to a new and larger disk, you'll need to use a cloning software such as Qiling Partition Master. First, prepare the new disk by formatting it and creating a new partition.
Step 1. Select the source disk.
Right-To clone a disk, click on the disk you want to copy or duplicate, then select the "Clone" option.
Step 2. Select the target disk.
Select the desired storage device, such as a hard disk drive (HDD) or solid-state drive (SSD), as the target location, and proceed by clicking "Next".
Step 3. View the disk layout and edit the target disk partition size.
To reinstall Windows, first insert the Windows installation media into the computer and restart it. Then, in the BIOS settings, set the computer to boot from the installation media. Save the changes and exit the BIOS settings. The computer will then boot from the installation media.
Users can choose from three options to customize their disk layout: Autofit the disk, Clone as the source, or Edit disk layout. The latter is recommended if they want to leave more space for the C drive.
Step 4. Click "Proceed" to start the disk cloning process.
1. Reboot the PC with the new disk installed. 2.
If you cloned a Windows Server OS disk to a new drive but the computer fails to boot, it could be due to two main issues: the cloned disk not being recognized as the boot device or the system not being able to locate the cloned disk as the boot device.
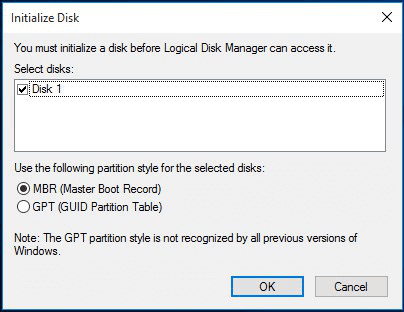
- 1. 1. Open the Disk Management tool. 2.
- 2. To configure the boot mode for the OS disk, you need to set it to MBR (Master Boot Record) for Legacy mode or GPT (GUID Partition Table) for UEFI mode. This is typically done by disabling or enabling UEFI mode on the system.
Aside from cloning a disk in Windows Server, Qiling Partition Master Enterprise also offers features to better manage disk partition space, including various tools to assist with disk partition management.
- Fix "Can't Extend Volume" error in Windows Server
- Extend C drive or Increase Partition Size
- To convert a GPT disk to MBR or vice versa without losing data, you can use the built-in disk management tool in Windows (for MBR to GPT conversion) or use a third-party tool like Qiling Partition Master. These tools allow you to convert the disk without affecting the existing data, ensuring a smooth transition.
- Wipe or erase hard drive partition in Windows Server
#2. Back Up Server Data and Restore to A New Disk with Windows Server Backup
- Tool: Microsoft Windows Server Backup.
- Supported: Windows Server 2022/2019/2016/2012/2008, etc.
Windows Server users can turn to Windows Server Backup for a free disk upgrade solution. Although it's primarily a disk partition data backup tool, it's a perfect alternative for Windows Server disk clone.
1. Connect the new hard drive to the computer and format it. 2.
First, Backup Windows Server Hard Drive
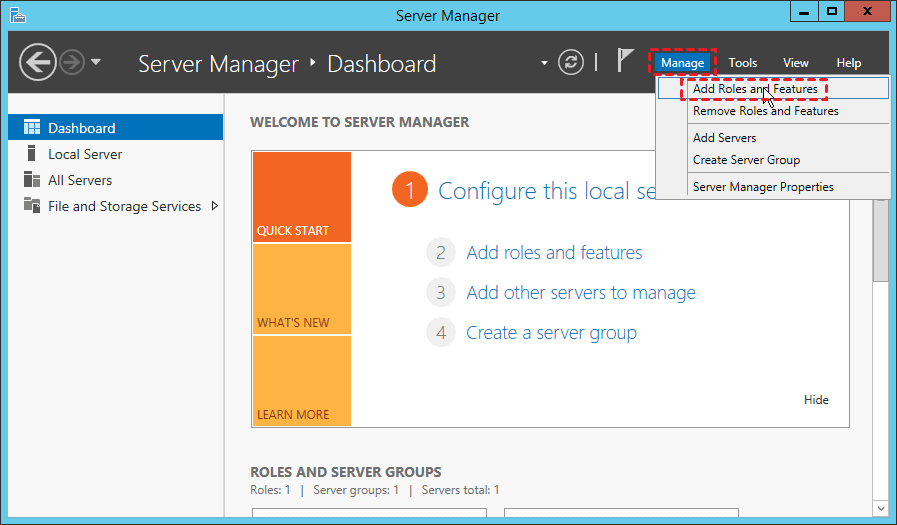
- To add roles and features to Windows Server, launch Windows Server Manager, navigate to Server Manager, click on "Manage", and select "Add Roles and Features".
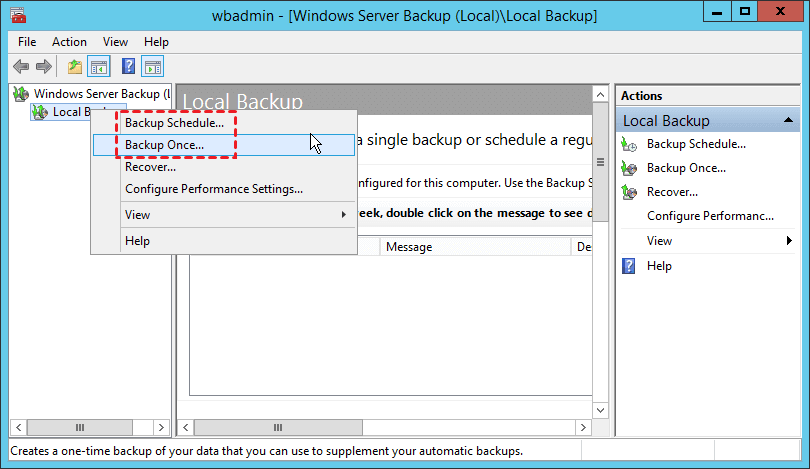
- To configure Windows Server Backup, click on "Tools" in Server Manager, select "Windows Server Backup", and then click on "Local Backup".
- To schedule a backup, select the option "Backup Schedule..." or "Backup Once...". This allows you to choose "Backup Once...".
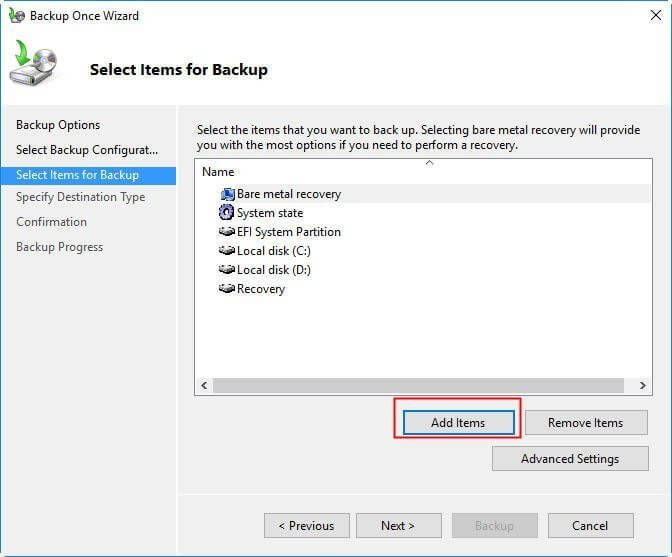
- To select the items for backup, click on the "Select Items for Backup" button on the left pane. The default option is "Bare metal recovery", which is usually the most suitable choice for most users, as it offers the most recovery options.
- To create a backup of your disk, go to the "Add Items" section and select "Backup".
Next. Restore Disk Content Backup to Another Drive
- Open Windows Server Backup, click "Local Backup" and select "Recover".
- On the Getting Started window, select "This Server" and click "Next" to initiate the disk backup recovery process.
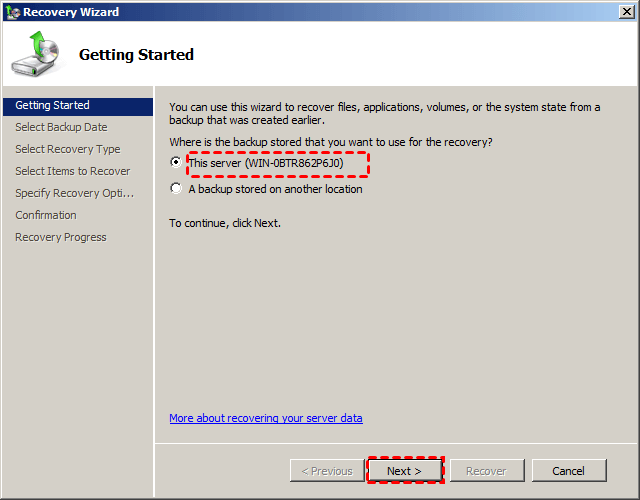
- Select the backup date, recovery time, items to restore, and navigate to restore the backup to a new disk that you added to the computer, then click "Recovery" to start.
After completing the process, you just need to wait for it to finish.
Bonus Tip: What to Do with the Old Drive after Disk Clone
To manage the old drive after cloning or moving all data to the new drive, you can simply erase or wipe the old drive to protect your data, or you can also repurpose the old drive for other uses, such as a secondary storage for less important files, a test drive for software testing, or even a donation to a local school or charity.
Qiling disk manager software - Partition Master Enterprise offers a comprehensive solution to clean up and re-partition an old drive with just a few clicks.
1. Clean Up Old Drive
We've set two options for you to wipe data. Choose the one you need.
Option 1. Wipe Partition
- Choose "Wipe Data" in tools page.
- To erase data from a partition, open the new window and click on the partition you want to erase data from. Set the time you want to wipe the partition, then click "Proceed" to confirm the action.
- For warning message, click "OK" to confirm.
Option 2. Wipe Disk
- Choose "Wipe Data" in tools page. Select the HDD/SSD.
- Set the number of times to wipe data. (You can set to 10 at most.) Then click "Proceed".
- Check the message. Then click "OK".
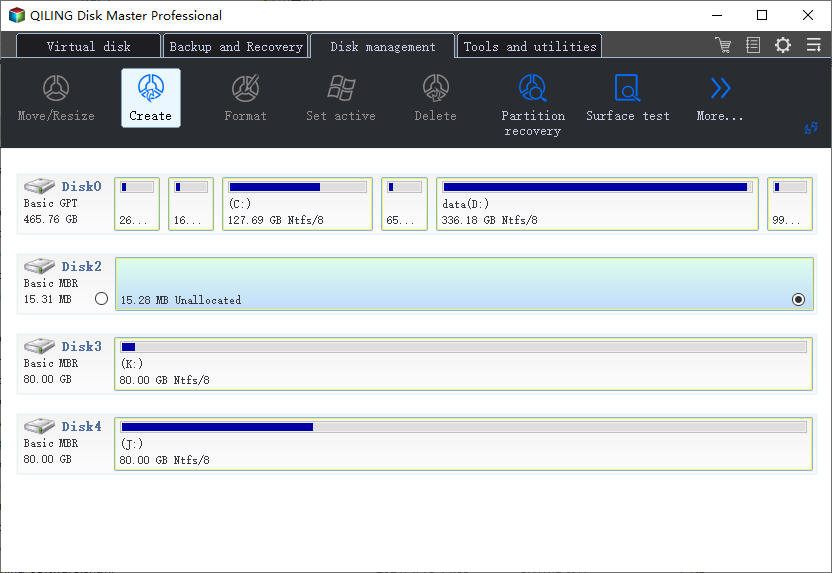
2. Partition Cleaned Drive
Step 1. Open Qiling Partition Master, which will detect the new disk, and select the "Create" button to start the process.
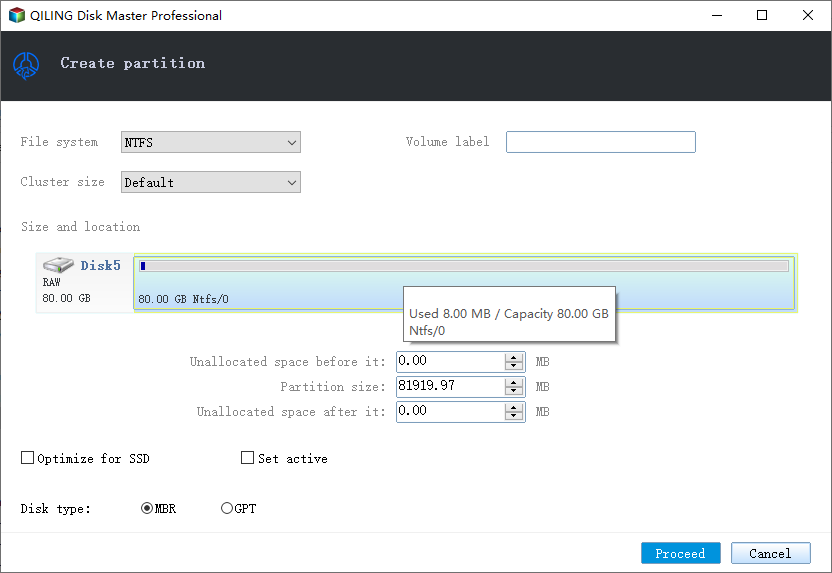
Step 2. You can continue to customize how many partitions you want to create, and set the partition style you want, MBR or GPT, in one paragraph shortly.
You can customize the partitioning settings or accept the default setting offered by Qiling Partition Master. Once the customization is done, click "Proceed" to finalize partitioning the new HDD/SSD or external disk.
Clone Disk in Windows Server Is Easy with Reliable Disk Cloning Software
This guide provides a step-by-step process for Windows Server users to clone and upgrade their Server computer disks to a larger and newer drive, making it easy to upgrade their system with minimal disruption.
To upgrade your disk, you can either follow the methods provided on this page, or simply prepare the new drive and proceed with the upgrade operation.
Related Articles
- Setup SSD/HDD and Change System/OS Disk for Windows 11/10
- How to Partition A Hard Drive in Windows 11/10 [2022 New]
- How Do I Clone SSD to External Hard Drive in Windows 11/10/8? 2 Ways Available
- How to Fix Windows 11 Slow Startup? Your Complete Guide
- How Do I Clone Disk in Windows Server? 2022 Full Guide
Upgrading and cloning disks in Windows Server computers is a straightforward process that can be completed in a few simple steps. - D Drive Not Showing Up in Windows 10/11 | 4 Methods to Fix
If your D drive is missing or disappeared in Windows 10/11, it's an easy fix! The reasons for this issue can vary, but common causes include disk errors, corrupted system files, or incorrect drive letter assignments.